FREE DINNER EBOOK! Get your copy!
  • Cookie Policy
  • GDPR Policy
  • Disclaimer
  • Terms Of Use
  • Visit my other site: Fun Cookie Recipes
mini chef kitchen
  • Home
  • Dinner
  • Desserts
  • Drinks
  • Appetizers
  • Contact
  • About
  • Privacy Policy
  • Home
  • Dinner
  • Desserts
  • Drinks
  • Appetizers
  • Contact
  • About
  • Privacy Policy
  • Cookie Policy
  • GDPR Policy
  • Disclaimer
  • Terms Of Use
Visit my other site: Fun Cookie Recipes

HOME / CATEGORIES /

Latest

To make this honey lime fruit salad, gather these key ingredients: - 2 cups strawberries, hulled and sliced in halves - 1 cup fresh blueberries - 1 ripe kiwi, peeled and finely diced - 1 cup juicy pineapple chunks - 1 medium banana, sliced into rounds - 2 tablespoons smooth honey - 2 tablespoons freshly squeezed lime juice - 1 tablespoon fresh mint leaves, finely chopped - Zest of 1 lime You can add other fruits or toppings to make it your own. Consider these options: - 1 cup diced mango for a tropical twist - 1 cup diced watermelon for extra juiciness - A sprinkle of chia seeds for added crunch - A handful of granola for a fun texture This fruit salad is not just tasty; it's also good for you. Here are some benefits: - Strawberries are rich in vitamin C and antioxidants, which help your immune system. - Blueberries are known for their brain benefits and can improve memory. - Kiwi is high in vitamin E, which promotes healthy skin. - Pineapple contains bromelain, which can help with digestion. - Bananas provide potassium, which is great for heart health. - Honey adds natural sweetness and has antibacterial properties. - Lime juice gives a boost of vitamin C and adds freshness. - Mint leaves can aid digestion and add a refreshing flavor. With these ingredients, you create a bright and healthy dish. For the full recipe, check out the instructions later in this article! Start by washing all the fruits well. For strawberries, remove the green tops and slice them in halves. Use two cups of strawberries for a sweet base. Next, rinse one cup of fresh blueberries and add them to your bowl. Peel and dice one ripe kiwi, then toss it in as well. Cut one medium banana into rounds and add it last. Finally, chop up one cup of juicy pineapple into bite-sized chunks. Gently mix the fruits together in a large bowl. Be careful not to squash them. You want to keep their shape and color. In a small bowl, combine two tablespoons of smooth honey with two tablespoons of freshly squeezed lime juice. Whisk them together until the mixture is smooth. You want a nice balance of sweet and tangy. Next, add the zest of one lime into the dressing. This adds a burst of fresh flavor. Mix it all well so that all the ingredients blend together. This honey lime dressing will bring the salad to life. Now, pour the honey-lime dressing over your colorful fruit mix. Make sure to cover all the pieces with the dressing. With a gentle hand, toss the fruits together. You want everything to be well coated. Avoid being too rough to keep the fruit intact. After that, sprinkle one tablespoon of finely chopped fresh mint leaves on top. Toss everything just once more to spread the mint evenly. Cover the bowl with plastic wrap and chill it in the refrigerator for about 30 minutes. This wait allows the flavors to mix. When you’re ready to serve, enjoy the fresh and flavorful delight of your Honey Lime Fruit Salad. For the complete recipe, check out the Full Recipe section. When picking fruits, freshness is key. Look for bright colors and firm textures. Strawberries should be red with no white spots. Blueberries should be plump and round. Choose pineapples that smell sweet and feel heavy for their size. For kiwis, pick ones that yield slightly when pressed. Bananas should be yellow with minimal brown spots. Remember, ripe fruits taste better! Mix honey and lime juice for the best flavor. Use fresh lime juice for a zesty kick. Adjust the honey to your taste. If you want it sweeter, add more honey. For extra zing, you can add lime zest. Whisk until smooth to ensure even flavor. A well-mixed dressing makes all the difference! Serve your salad in a clear bowl. This showcases the colorful fruits nicely. Garnish with mint leaves for a fresh look. Add lime wedges on the side for a fun touch. You can also use individual cups for a personal feel. A beautiful presentation makes every bite more enjoyable. Enjoy your Honey Lime Fruit Salad Delight! {{image_4}} To add a tropical twist, swap in fruits like mango and papaya. These fruits add a sweet and juicy flavor. You can also try adding coconut flakes for extra texture. Mixing in some diced star fruit gives a lovely look too. This variation brightens your salad and gives it a vacation vibe! If you love berries, this version is for you. Use all kinds of berries, like raspberries, blackberries, and strawberries. You can create a bold and colorful mix. The sweet and tart flavors pair well with the honey-lime dressing. Each bite bursts with freshness and joy. Want to make your salad more filling? You can add protein like Greek yogurt or cottage cheese. They mix well with the fruits and dressing. You can also add nuts like almonds or walnuts for a crunchy texture. This will turn your salad into a complete meal, perfect for lunch or a snack! For the complete recipe, check out the Full Recipe. To keep your honey lime fruit salad fresh, store it in an airtight container. This helps prevent air from making the fruits soggy. Place a piece of paper towel in the container. It absorbs extra moisture and keeps the salad crisp. Always refrigerate the salad right after serving. This keeps the flavors vibrant and prevents spoilage. When stored properly, your honey lime fruit salad lasts about 2 to 3 days in the fridge. After that, the fruits may start to lose their texture. Check for any signs of browning or mushiness before eating. If you see these signs, it's best to toss it out for safety. I don't recommend freezing honey lime fruit salad. Freezing changes the texture of most fruits. They may become mushy when thawed. If you want to freeze some fruits, try freezing just the individual fruits first. You can then mix them into a fresh salad later. Yes, you can use other sweeteners like maple syrup or agave nectar. These options add a different flavor but still keep the salad sweet. Just use the same amount as honey. This way, you maintain the balance in the dish while enjoying a new taste. To make this salad vegan, simply swap honey for maple syrup or agave nectar. Both are plant-based and work well in the honey-lime dressing. This keeps the recipe vegan and delicious. You won’t lose any flavor, and it stays fresh and vibrant. Many fruits pair nicely with honey and lime. Consider using mango, papaya, or peaches for a tropical twist. Citrus fruits like oranges or grapefruits also work well. The bright flavors of these fruits enhance the salad's overall taste and add variety. Feel free to mix and match based on what you love! This blog post covered how to make a tasty fruit salad with simple steps. You learned about key ingredients and their health perks. I shared tips for choosing fruits and perfecting the dressing. We explored fun variations and how to store leftovers. Fruit salad is easy to make and good for you. Enjoy it anytime to boost your health!

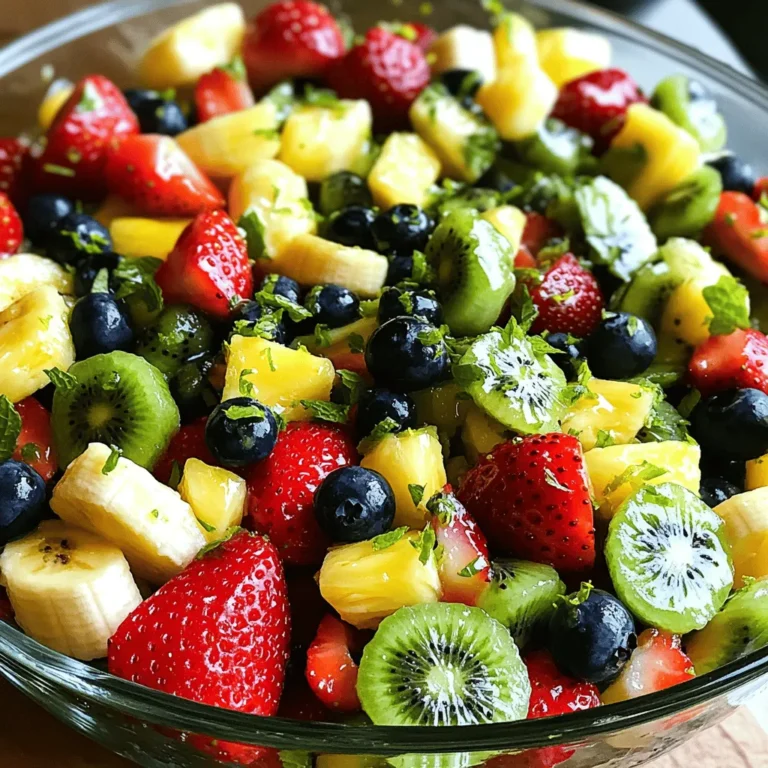
Honey Lime Fruit Salad Fresh and Flavorful Delight

To make this dish, you need the following main ingredients: - 1 pound Brussels sprouts, trimmed and halved (about 450g) - 2 tablespoons extra-virgin olive oil - 1/4 cup balsamic vinegar (60ml) - 2 tablespoons pure maple syrup - 1 teaspoon Dijon mustard - 1/2 teaspoon garlic powder - 1/2 teaspoon salt (adjust to taste) - 1/4 teaspoon freshly ground black pepper These ingredients create a perfect balance of sweet and tangy flavors. The Brussels sprouts get tender while the outside crisps up nicely in the oven. You can enhance your dish with these optional ingredients: - 1/4 cup pecans, finely chopped (for added texture) - Fresh thyme sprigs (for visual appeal) Adding pecans gives a delightful crunch. Fresh thyme not only looks great but also adds a lovely aroma. If you need to make swaps for dietary needs, here are some great options: - Use sunflower oil instead of olive oil for a nut-free version. - Swap balsamic vinegar with apple cider vinegar for a different tang. - Maple syrup can be replaced with agave syrup for a vegan option. These substitutions keep the dish tasty while accommodating various diets. You can find the full recipe to get all the details you need and start cooking! Start with fresh Brussels sprouts. Look for firm, green ones. Trim the ends and cut them in half. This helps them cook evenly. Rinse them under cold water to remove dirt. In a large bowl, mix balsamic vinegar, maple syrup, Dijon mustard, garlic powder, salt, and black pepper. Whisk until smooth. This dressing will coat the Brussels sprouts and bring out their flavor. 1. Preheat your oven to 400°F (200°C). 2. Toss the halved Brussels sprouts with olive oil in the dressing bowl. Make sure every piece is coated. 3. Line a baking sheet with parchment paper. Spread the Brussels sprouts in a single layer. 4. Roast for 20-25 minutes. Stir them halfway to ensure even cooking. 5. For added crunch, sprinkle chopped pecans on top in the last 5 minutes. - Tips for achieving the ideal texture: Look for a crispy outside and tender inside. If they are not crispy enough, roast them a little longer. Trust your eyes, and enjoy the process! For more detailed instructions, check out the Full Recipe. To cook Brussels sprouts evenly, first cut them in half. This helps them cook through. Use a large baking sheet. Spread the sprouts out in a single layer. Crowding them can lead to steaming, not roasting. Stir them halfway during cooking for uniform browning. For crispy Brussels sprouts, start by preheating your oven to 400°F (200°C). The high heat helps them brown well. Use enough olive oil to coat each sprout. This promotes crispiness. Avoid overcrowding on the baking sheet. If needed, roast in batches. You can add ingredients to boost flavor. Try adding pecans for a nice crunch. Fresh thyme sprigs give a lovely aroma. A squeeze of lemon juice brightens the dish. For a spicy kick, sprinkle red pepper flakes. These additions make the dish even more exciting. For the complete recipe, check out the [Full Recipe]. {{image_4}} For a hearty twist, add protein to your Maple Balsamic Brussels Sprouts. Bacon brings a savory, smoky flavor. Just chop it into small pieces and cook it in the oven until crispy. Toss the cooked bacon with the sprouts before roasting. If you prefer a plant-based option, use tofu. Cut firm tofu into cubes, toss it with olive oil, and add it to the sprouts. Both options boost flavor and make the dish more filling. While maple syrup is the star, you can switch it up. Honey offers a floral sweetness that pairs well with balsamic vinegar. Use the same amount as the recipe calls for. Agave syrup is another great choice. It has a mild taste and is a bit sweeter, so you might want to use less, about 1.5 tablespoons. Experimenting with sweeteners lets you create your own unique flavor. Changing herbs and spices can transform your dish. Try rosemary or sage for an earthy taste. Just chop fresh herbs and sprinkle them over the sprouts before roasting. You can also add a dash of red pepper flakes for heat. This kick can balance the sweetness of the maple and balsamic. Get creative and make the dish your own! Check out the Full Recipe for more ideas. To keep leftover Maple Balsamic Brussels Sprouts fresh, cool them first. Place them in an airtight container. Store them in the fridge. They should stay good for about 3 to 5 days. Make sure to label the container with the date. This helps you track freshness. When reheating, I recommend using the oven. Preheat it to 350°F (175°C). Spread the Brussels sprouts on a baking sheet. Heat them for about 10 to 15 minutes. This keeps them crispy. You can also reheat in a skillet. Just add a little olive oil. This adds flavor and helps maintain the crunch. For freezing, let the sprouts cool completely. Place them in a freezer-safe bag or container. Remove as much air as possible. They can last for up to 3 months in the freezer. When you're ready to use them, thaw in the fridge overnight. Reheat in the oven for the best texture. Enjoy them from the freezer anytime! For the full recipe, check out Maple Balsamic Brussels Sprouts Delight. To make Maple Balsamic Brussels Sprouts vegan, simply swap the Dijon mustard for a vegan brand. Most brands are already vegan, but double-check the label. Also, ensure that the maple syrup is pure and not mixed with any non-vegan ingredients. This dish is naturally dairy-free, so you can enjoy it guilt-free. Yes, you can use frozen Brussels sprouts! Just remember to thaw them first. Drain any excess water and pat them dry. This step is key to getting crispy sprouts. Frozen sprouts may have a different texture, but they will still taste great when coated with the maple balsamic dressing. Maple Balsamic Brussels Sprouts make a great side dish. They pair well with: - Roasted chicken or turkey - Grilled pork chops - Quinoa or rice dishes - A hearty salad with nuts and cheese These flavors complement each other well. You can create a delicious meal by adding a protein and a starch. If your Brussels sprouts are soggy, it may be due to overcrowding on the baking sheet. Make sure you spread them out evenly for proper roasting. If they don’t brown well, increase the oven temperature slightly or leave them in for a few extra minutes. Also, remember to stir them halfway for even cooking. Keep these tips in mind to ensure tasty, flavorful sprouts every time. This post covered the key steps to make Maple Balsamic Brussels Sprouts. You learned about the main and optional ingredients, along with substitutions for diet needs. The step-by-step guide showed you how to prepare, dress, and roast the sprouts for a perfect dish. I shared tips for cooking and crispiness, plus variations and storage ideas. Now, you can enjoy these delicious Brussels sprouts anytime, with endless options to fit your taste. Happy cooking!

Maple Balsamic Brussels Sprouts Flavorful Side Dish

To make Moroccan Chicken Couscous, you will need: - 1 lb (450g) boneless, skinless chicken thighs - 1 cup couscous - 2 cups chicken broth - 1 medium onion, finely diced - 2 cloves garlic, minced - 1 carrot, finely diced - 1 zucchini, finely diced - 1 cup canned chickpeas, drained and rinsed - 1 teaspoon ground cumin - 1 teaspoon ground cinnamon - 1 teaspoon ground coriander - 1/2 teaspoon turmeric - 1/4 teaspoon cayenne pepper (optional for spice) - 2 tablespoons extra virgin olive oil - Salt and freshly ground black pepper to taste - Fresh cilantro, chopped, for garnish - Lemon wedges, for serving When cooking, you might need to convert measurements. Here are some quick conversions: - 1 cup = 240 ml - 1 tablespoon = 15 ml - 1 teaspoon = 5 ml - 1 lb = 450 g Feel free to customize your dish! Here are some optional ingredients: - Dried fruits like raisins or apricots for sweetness - Nuts such as almonds or pistachios for crunch - Additional spices like paprika or ginger for more flavor - Fresh vegetables like bell peppers or peas for more color {{ingredient_image_2}} First, heat two tablespoons of extra virgin olive oil in a large pot over medium heat. Add one finely diced onion and two minced garlic cloves. Cook them for about 3 to 4 minutes. You want the onion to become soft and clear. Next, add one pound of boneless, skinless chicken thighs to the pot. Season it with salt, pepper, one teaspoon of ground cumin, one teaspoon of ground coriander, one teaspoon of ground cinnamon, half a teaspoon of turmeric, and a quarter teaspoon of cayenne pepper if you like heat. Brown the chicken for 5 to 7 minutes. This step builds flavor. Now, stir in one finely diced carrot, one finely diced zucchini, and one cup of drained chickpeas. Pour in two cups of chicken broth, bringing the mixture to a gentle boil. Once it boils, reduce the heat and cover the pot. Let it simmer for 20 to 25 minutes. The chicken should be tender and cooked through. While the chicken simmers, prepare the couscous. Boil one cup of water in a separate bowl. Pour the boiling water over one cup of couscous in another bowl. Cover it with a lid or plastic wrap for 5 minutes. After that, fluff it gently with a fork to separate the grains. After the chicken is ready, remove it from the pot. Use two forks to shred the chicken into bite-sized pieces. Return the shredded chicken to the pot and stir it well with the broth and vegetables. When serving, create a bed of fluffy couscous on each plate. Spoon the chicken and vegetable mix over the couscous. Garnish with fresh chopped cilantro and add lemon wedges on the side. This adds a fresh zing to your dish. Now you have a delicious Moroccan Chicken Couscous to enjoy! To make fluffy couscous, start with boiling water. Use a ratio of 1 cup of water to 1 cup of couscous. Pour the boiling water over the couscous in a bowl. Cover it tightly with a lid or plastic wrap. Let it sit for 5 minutes without peeking. After that, use a fork to fluff the couscous. This step keeps the grains separate and light. Seasoning is key in Moroccan chicken couscous. Use a mix of spices like cumin, coriander, and cinnamon. These spices add warmth and depth to the dish. Always taste as you go. Adjust salt and pepper to your liking. For extra heat, add cayenne pepper. Fresh herbs like cilantro can brighten up the flavors at the end. You don't need fancy tools, but a few items help. A large pot is great for cooking chicken and veggies. A wooden spoon works well to stir everything together. A bowl for fluffing the couscous is also helpful. Having a good knife for chopping will make prep easier. These tools will make your cooking smooth and fun. Pro Tips Choose the Right Chicken: Opt for boneless, skinless chicken thighs for juiciness and flavor. They remain tender during cooking and absorb the spices beautifully. Perfectly Fluffy Couscous: For the best texture, let the couscous sit undisturbed after adding boiling water. This helps it absorb moisture evenly without clumping. Spice it Up: Feel free to adjust the cayenne pepper to your preferred spice level. You can also add a pinch of smoked paprika for a different flavor profile. Garnish for Freshness: Don't skip the fresh cilantro and lemon wedges! They add brightness and elevate the dish's overall flavor. {{image_4}} You can make a tasty vegetarian version of couscous. Just skip the chicken. Use more veggies like bell peppers, eggplant, and spinach. Add extra chickpeas for protein. Use vegetable broth instead of chicken broth. This option is just as filling and rich in flavor. If you want more protein, try adding nuts or seeds. Toasted almonds or pine nuts work well. You can also mix in tofu or tempeh for a plant-based protein boost. These additions will make the dish heartier and keep you full longer. Want to kick up the spice? Add more cayenne pepper or use harissa paste. This paste brings heat and flavor. Start with a small amount, then taste and adjust. You can also add fresh chili peppers for an extra kick. Adjusting spice can change the whole dish! To keep your Moroccan Chicken Couscous fresh, place it in an airtight container. Make sure it cools down to room temperature first. Store it in the fridge for up to 3 days. If you’re not eating it right away, freezing is a great option. When you’re ready to eat your leftovers, reheat them on the stove. Add a splash of water or broth to keep it moist. Heat over low to medium heat until warmed through, about 5-10 minutes. You can also use the microwave. Place it in a microwave-safe bowl. Cover it and heat for 2-3 minutes, stirring halfway. To freeze Moroccan Chicken Couscous, portion it into freezer-safe bags or containers. Make sure to remove excess air to prevent freezer burn. It can last up to 3 months in the freezer. Thaw it overnight in the fridge before reheating. This way, you’ll enjoy a delicious meal anytime! Moroccan Chicken Couscous comes from North Africa, mainly Morocco. This dish is a staple in Moroccan culture. Couscous is a popular grain in the region, often served with meat and vegetables. It reflects the rich flavors of Moroccan spices and herbs. This dish celebrates the blend of cultures, spices, and traditions found in Moroccan cuisine. Yes, you can use different meats! Lamb is a popular choice in Moroccan cooking. Beef or even seafood can also work well. Just make sure to adjust cooking times if using different proteins. Each meat brings unique flavors to the dish. You can also try tofu for a vegetarian option. To add heat, use cayenne pepper or harissa paste. Both give a nice kick! Start with a small amount and taste as you go. You can always add more spice. Consider adding fresh chili peppers or a dash of hot sauce for extra heat. Experimenting with spices can make the dish exciting! Moroccan Chicken Couscous pairs well with many sides. You could serve a simple green salad with lemon dressing. Roasted vegetables also complement the dish nicely. For a refreshing touch, try serving it with yogurt or tzatziki. Don’t forget to add warm bread to soak up the flavors! This blog post provided a clear guide to making Moroccan Chicken Couscous. We covered the key ingredients, step-by-step cooking, helpful tips, and tasty variations. Remember that you can customize the dish by adding different proteins or spices to suit your taste. Storing leftovers correctly ensures you enjoy the meal later. With these tips, you can easily create a delicious and comforting dish. Keep experimenting and have fun in your kitchen! Enjoy the flavors of Morocco.

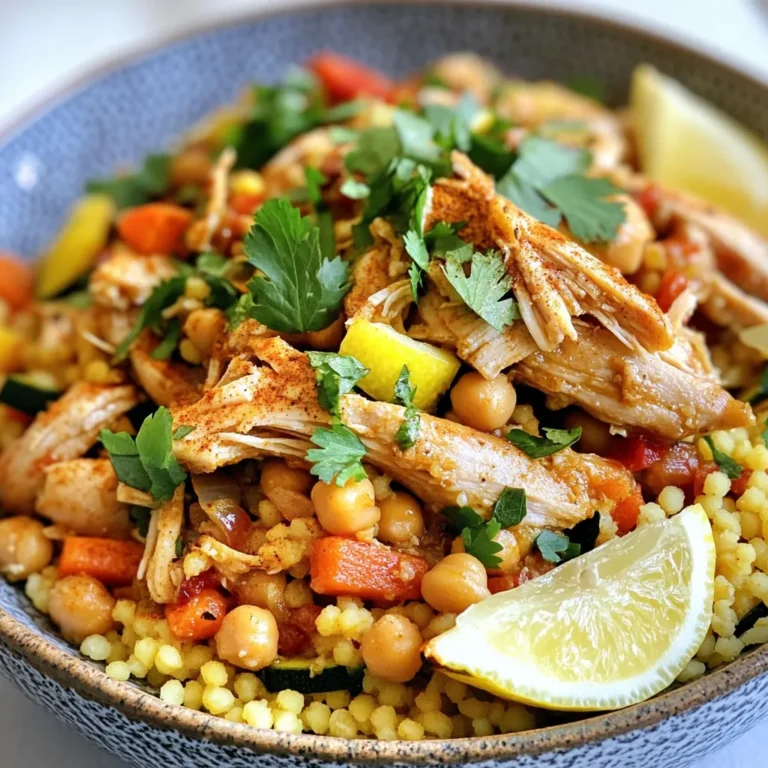
Moroccan Chicken Couscous Flavorful Comfort Meal

- 4 medium-sized russet potatoes - 3 tablespoons olive oil - 4 cloves garlic, minced - 1 teaspoon garlic powder - 1 teaspoon onion powder - ½ teaspoon smoked paprika - Salt and freshly ground black pepper, to taste - ½ cup freshly grated Parmesan cheese - Fresh parsley, finely chopped (for garnish) Choosing the right ingredients makes a big difference. I recommend using fresh russet potatoes. They have high starch content, giving fries a great texture. Look for firm potatoes without blemishes. Fresh garlic enhances the flavor of the fries. Use high-quality olive oil to ensure a rich taste. For the Parmesan, go with freshly grated cheese. It melts better and tastes far better than pre-grated options. While not necessary, garnishes add a nice touch. Fresh parsley brightens the dish and adds color. You can also try a sprinkle of chili flakes for a bit of heat. A drizzle of truffle oil can elevate the flavor. These small additions can make your garlic Parmesan air fryer fries even more special. {{ingredient_image_2}} Start by washing 4 medium-sized russet potatoes under cold water. Make sure to scrub well to remove dirt. Then, peel the potatoes using a vegetable peeler. Cut them into fries, about 1/4 inch thick. This size helps them cook evenly for that perfect crisp. Next, place the cut fries into a large bowl of cold water. Let them soak for at least 30 minutes. This step is very important. Soaking removes extra starch and helps the fries turn out crispy. While the fries soak, preheat your air fryer to 400°F (200°C). This will take about 5 minutes. Preheating is key for even cooking. Once the fries have soaked, drain the water. Pat the fries dry with a clean kitchen towel. Transfer them to a large mixing bowl. Drizzle 3 tablespoons of olive oil over the fries. Add 4 cloves of minced garlic, 1 teaspoon of garlic powder, 1 teaspoon of onion powder, and ½ teaspoon of smoked paprika. Season with salt and freshly ground black pepper to taste. Toss the fries until they are well coated in oil and spices. Now, arrange the seasoned fries in a single layer in the air fryer basket. If your basket is small, cook in batches to avoid overcrowding. Air fry for 15-20 minutes. Remember to shake the basket halfway through. This helps them brown evenly. In the last 3 minutes of cooking, open the air fryer. Sprinkle ½ cup of freshly grated Parmesan cheese generously over the fries. Close the air fryer and continue cooking until the cheese is melted and golden brown. Carefully remove the fries from the air fryer using tongs. Transfer them to a serving plate. For a burst of color, sprinkle freshly chopped parsley on top. Serve hot and enjoy your crispy, cheesy delight! To get your fries extra crispy, soak them in cold water for at least 30 minutes. This helps remove excess starch. Drain and dry the fries well before seasoning. A dry surface allows for better crisping. Make sure your air fryer is preheated to 400°F (200°C) before you start cooking. You can also spray a light coat of oil on the fries after seasoning for an extra crunch. Every air fryer is a bit different. If your fries are not as crispy as you want, increase the cooking time by 2-3 minutes. Check them halfway through the cooking time and give the basket a shake. This helps them cook evenly. If you prefer thicker fries, add a few extra minutes to ensure they cook through. If you need substitutes, there are options! Instead of russet potatoes, you can use sweet potatoes for a different flavor. If you don’t have fresh garlic, garlic powder works too. For cheese, nutritional yeast gives a cheesy flavor without dairy. You can also swap olive oil with avocado oil, which has a high smoke point. Adjust seasonings based on what you have at home. Pro Tips Soaking is Key: Soaking the cut fries in cold water for at least 30 minutes removes excess starch, resulting in crispier fries. Uniform Size Matters: Cutting the fries to an even thickness ensures they cook uniformly, preventing some from being overcooked while others remain undercooked. Don't Overcrowd: Air frying in batches prevents overcrowding, which can lead to uneven cooking and soggy fries. Fresh Parmesan for Best Flavor: Using freshly grated Parmesan cheese enhances the flavor and texture, ensuring a deliciously cheesy finish on your fries. {{image_4}} Want to kick up the heat? Add crushed red pepper flakes to your seasoning mix. Start with 1/2 teaspoon and adjust to taste. This small change makes a big impact and pairs well with the garlic. You can also add a splash of hot sauce before air frying for extra zing. Mix herbs into your fries for fresh flavors. Try adding 1 teaspoon of dried oregano or Italian seasoning to the seasoning mix. You can also use fresh herbs, like thyme or rosemary, for a more vibrant taste. Just chop them finely and toss them in with your fries before air frying. While Parmesan is a classic choice, feel free to experiment. Grated Pecorino Romano adds a sharper flavor. Or, for a creamier texture, use shredded mozzarella. You can even mix cheeses for a unique twist. Just remember to sprinkle the cheese on in the last few minutes of cooking for the best melt. To store leftover fries, let them cool first. Place them in an airtight container. Keep the container in the fridge for up to three days. Avoid stacking the fries too high. This helps keep them crispy. If you have extra seasoning, store that separately. To reheat fries, use your air fryer again. Set it to 350°F (175°C). Place the fries in the basket in a single layer. Heat for about 5-7 minutes. This will help restore their crispiness. You can also use a regular oven if needed. Bake at 375°F (190°C) for about 10 minutes. If you want to freeze the fries, do so before cooking. After cutting and soaking, pat them dry. Spread them out on a baking sheet in a single layer. Freeze for 1-2 hours until firm. Then, transfer them to a freezer bag. They can stay in the freezer for up to three months. When ready to cook, air fry them straight from the freezer. Just add a few extra minutes to the cooking time. Yes, you can use frozen fries. Just skip the soaking step. Frozen fries are often pre-cooked, so they will cook faster. Adjust the cooking time to about 10-15 minutes. Check them halfway through to ensure they crisp up nicely. You can bake these fries in the oven. Preheat your oven to 425°F (220°C). Arrange the seasoned fries on a baking sheet. Bake for 25-30 minutes, flipping halfway through. This method will give you a nice crunch, too. Garlic Parmesan fries taste great with many sauces. Here are some favorites: - Ranch dressing - Ketchup - Aioli - Spicy mayo - Barbecue sauce Experiment with these to find your favorite! To make these fries vegan, replace the Parmesan cheese. Use a plant-based cheese or nutritional yeast. You can also add more herbs and spices for flavor. This keeps the taste while making it vegan-friendly. Russet potatoes are the best choice for air frying. They have a high starch content, which gives fries a fluffy inside. Other good options include Yukon Gold and sweet potatoes. Choose ones that are firm and free of blemishes for the best results. In this blog post, I covered how to make delicious air-fried garlic Parmesan fries. We looked at key ingredients, preparation steps, and tips for the best results. I shared fun variations, storage tips, and answered common questions. These fries are easy, tasty, and sure to impress. Enjoy making them your own!

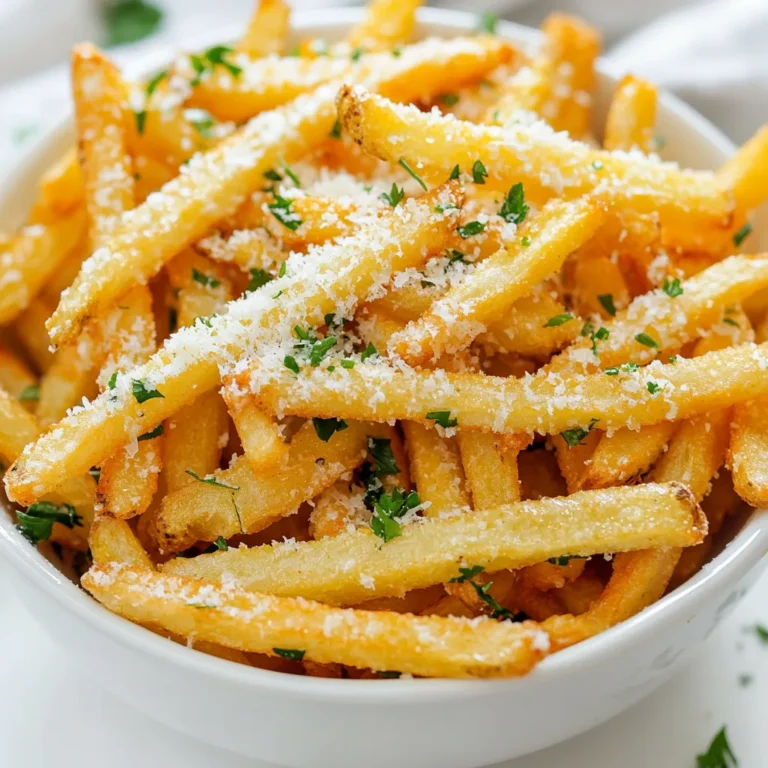
Garlic Parmesan Air Fryer Fries Crispy and Flavorful

To make BBQ Ranch Chicken Quesadillas, you need fresh and tasty ingredients. Here’s what you need: - 2 cups of shredded cooked chicken - 1 cup of your favorite BBQ sauce - 1/2 cup of creamy ranch dressing - 1 cup of shredded cheddar cheese - 1 cup of shredded mozzarella cheese - 1 medium red onion, thinly sliced - 1 bell pepper (red or green), thinly sliced - 8 large flour tortillas - Olive oil for grilling - Optional garnish: fresh cilantro, chopped Each ingredient plays a key role in your quesadilla's flavor. The shredded chicken absorbs the BBQ sauce and ranch dressing. The cheeses melt beautifully, adding creaminess. The onions and bell peppers add a fresh crunch. Use your favorite BBQ sauce to make it just right for your taste. Enjoy mixing these to create a delightful dish! {{ingredient_image_2}} - First, grab a large bowl. Add 2 cups of shredded cooked chicken. - Pour in 1 cup of BBQ sauce. Use your favorite type. - Add 1/2 cup of creamy ranch dressing. Stir the mix well. - Next, slice 1 medium red onion thinly. - Then, slice 1 bell pepper, red or green, also thinly. - Heat a non-stick skillet over medium heat. Drizzle some olive oil in the pan. - Place 1 large flour tortilla flat in the skillet. - On one half, sprinkle cheddar and mozzarella cheese evenly. - Spoon the BBQ ranch chicken mix on top of the cheese. Spread it out gently. - Add the thinly sliced onions and bell peppers on top. - Sprinkle a little more cheese for extra meltiness. - Carefully fold the tortilla over to form a half-moon shape. - Cook for about 4-5 minutes until golden brown. - Flip the quesadilla and cook for another 4-5 minutes. - Remove it from the skillet and let it cool slightly. - Slice it into wedges for easy serving. - Serve the quesadillas warm on a plate. - Offer extra ranch or BBQ sauce for dipping. - Optionally, add freshly chopped cilantro for color and flavor. To keep your quesadilla from sticking, use a non-stick skillet. Lightly coat it with olive oil before adding the tortilla. Heat the skillet over medium heat. A hot skillet helps the tortilla crisp up nicely. The best cooking temperature is medium. If it’s too hot, the outside may burn. If it’s too low, the cheese won't melt well. You want a golden brown, crunchy quesadilla. For a kick of spice, try adding a dash of cayenne pepper or chili powder to the chicken mixture. You can also use a spicier BBQ sauce for extra heat. When it comes to cheese, cheddar and mozzarella are great, but you could also use pepper jack. Pepper jack adds a nice creamy heat. Mixing different cheeses can enhance the flavor and texture of your quesadilla. Pro Tips Choose the Right Tortilla: Opt for large flour tortillas for a better fold and hold. If you prefer a healthier option, whole wheat tortillas also work well. Layering for Maximum Flavor: Layer the cheese both on the bottom and the top of the filling. This helps to keep the quesadilla intact while adding melty goodness. Cook on Medium Heat: Cooking on medium heat ensures the tortilla gets crispy without burning, while allowing the cheese to melt perfectly inside. Let Them Rest: Allow the cooked quesadillas to rest for a minute before slicing. This helps the cheese set slightly, making it easier to cut and serve. {{image_4}} You can easily change the proteins in these quesadillas. Instead of chicken, try shredded pork or beef. You can also use cooked shrimp for a fun twist. If you prefer plant-based meals, use black beans or chickpeas for protein. These swaps keep the dish tasty while meeting different diets. Want some heat? Choose a spicy BBQ sauce to kick up the flavor. You can also mix different BBQ sauces. For the cheese, use pepper jack for a bit of spice. Mixing in gouda or feta can add new depth. The great part is you can mix and match to find your favorite flavor! To keep your BBQ ranch chicken quesadillas fresh, follow these tips: - Refrigeration tips: Store the quesadillas in an airtight container. They can last up to three days in the fridge. Make sure to let them cool before sealing. This helps keep them crispy. - Freezing instructions: If you want to save them longer, freeze the quesadillas. Wrap each one tightly in plastic wrap. Then place them in a freezer bag. They can last up to three months in the freezer. When you are ready to eat, thaw them in the fridge overnight. You have a few options for reheating your quesadillas: - Stovetop vs microwave: The stovetop is best for crispy quesadillas. Heat a non-stick skillet over medium heat. Place the quesadilla in the pan and warm it for about 3-4 minutes on each side. For a quicker option, use the microwave. Heat on high for about 1-2 minutes. But note, they won’t be as crispy. - Oven reheating for best results: If you have several quesadillas, the oven is great. Preheat your oven to 350°F (175°C). Place the quesadillas on a baking sheet. Heat them for about 10-15 minutes. This keeps them warm and crispy all over. To make BBQ Ranch Chicken Quesadillas gluten-free, swap flour tortillas for gluten-free ones. Many brands offer tasty options that work well. Always check the label to ensure they are safe for your diet. The rest of the ingredients are naturally gluten-free, so you can enjoy this dish worry-free. Yes, using store-bought rotisserie chicken is a great idea! It saves time and adds flavor. Just shred the chicken and mix it with the BBQ sauce and ranch dressing. This makes cooking quick and easy, especially on busy days. BBQ Ranch Chicken Quesadillas pair well with many sides. Consider serving them with a fresh salad or some crunchy tortilla chips. You can also add salsa or guacamole for extra flavor. A side of corn or black beans can complete the meal nicely. Enjoy your tasty creation! This blog post covers how to make BBQ Ranch Chicken Quesadillas from start to finish. You learned about the key ingredients, thorough preparation steps, and cooking techniques. We discussed tips for perfecting your quesadilla and offered ways to customize it. Remember, the right flavors and storage methods matter too. Enjoy experimenting with these recipes and impressing your friends! Keep cooking and share your favorites. Simple steps lead to tasty meals. Happy cooking!

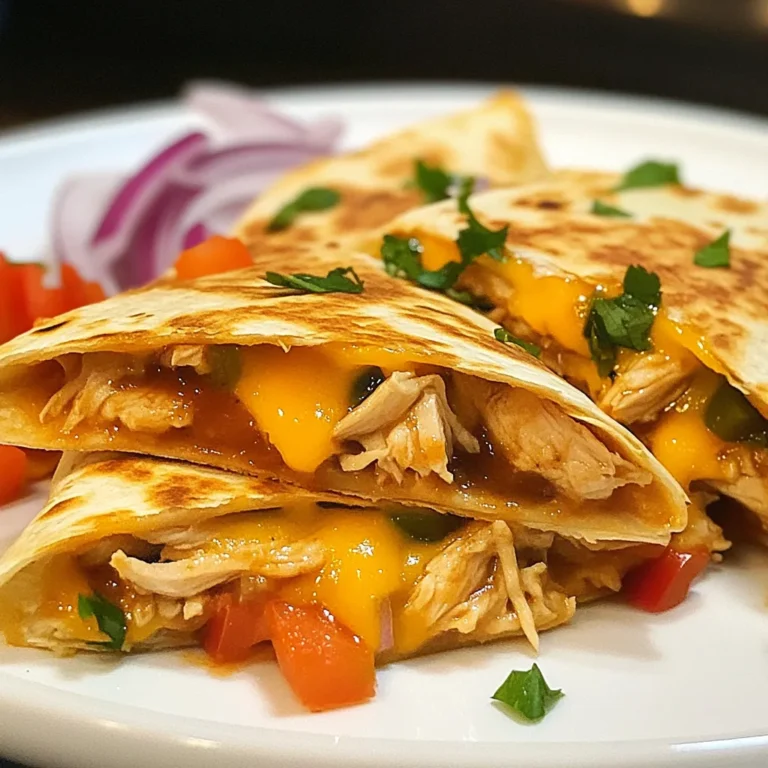
BBQ Ranch Chicken Quesadillas Flavorful and Easy Meal

- 1 lb flank steak - 2 tablespoons chipotle in adobo sauce, blended until smooth - 2 tablespoons fresh lime juice - 1 teaspoon ground cumin - 2 cloves garlic, finely minced - 1 teaspoon smoked paprika - 1 red bell pepper, thinly sliced - 1 green bell pepper, thinly sliced - 1 medium onion, thinly sliced - 2 tablespoons olive oil, divided - Flour or corn tortillas, for serving - Fresh cilantro leaves, for garnish For the best flavor, use fresh ingredients. The flank steak is key, as it is tender and juicy when cooked right. The chipotle in adobo adds a smoky heat that makes the dish pop. Fresh lime juice brightens up all the flavors, while cumin and smoked paprika deepen the taste. - Salt - Black pepper Don’t forget to season well! Salt and fresh black pepper enhance the taste of the steak and veggies. Always taste your marinade to make sure the balance is right. - Lime wedges - Additional cilantro Garnishes add a nice touch. Fresh lime wedges give a burst of freshness. Extra cilantro brings a lovely herbaceous note that complements the dish. You can also let your guests choose how much they want. {{ingredient_image_2}} - In a bowl, mix chipotle sauce, lime juice, cumin, garlic, and paprika. - Add salt and pepper to taste. - Place the flank steak in the bowl and coat it well with the marinade. - Cover with plastic wrap. Let it marinate for 30 minutes at room temperature. - For a stronger flavor, marinate in the fridge for up to 2 hours. - Heat 1 tablespoon of olive oil in a large skillet over medium-high heat. - Add sliced red and green bell peppers, plus onion, into the hot skillet. - Sauté for 5-7 minutes until the veggies are tender and start to caramelize. - Stir occasionally and season with salt and pepper. - Once done, transfer the vegetables to a plate and set aside. - In the same skillet, add the other tablespoon of olive oil. - Increase the heat to high. - Remove the steak from the marinade and discard any leftover marinade. - When the pan is hot, place the steak in it. - Cook for 4-5 minutes on each side for medium-rare. - For different doneness, adjust the cooking time. - After cooking, transfer the steak to a cutting board and let it rest for 5 minutes. - Slice the steak thinly against the grain for the best texture. - Return the sliced steak to the skillet with the cooked vegetables. - Warm everything together over low heat for a couple of minutes. - To warm tortillas, heat them in a dry skillet or microwave for a few seconds. - Fill each tortilla with the steak and vegetable mix. - Top with fresh cilantro leaves for added flavor. For the best steak, aim for medium-rare. This gives a juicy and tender bite. Use a meat thermometer to check the temperature. It should reach 130°F to 135°F. After cooking, let the steak rest for 5 minutes. This helps keep the juices inside. Fresh herbs can boost flavor. Add chopped cilantro or parsley right before serving. If you like heat, consider adding sliced jalapeños or a dash of hot sauce. These add a nice kick without overpowering the dish. A cast-iron skillet works best for this recipe. It heats evenly and gives a nice sear to the steak. If you don’t have one, a heavy stainless-steel skillet will do. For tortillas, choose between flour or corn. Both work well, so pick your favorite! Pro Tips Marinate for Maximum Flavor: Allow the steak to marinate for at least 2 hours in the refrigerator. This enhances the flavors and tenderizes the meat, making it more succulent. Use High Heat for Searing: Ensure your skillet is very hot before adding the steak. This creates a beautiful sear on the outside while keeping the inside juicy and tender. Cut Against the Grain: When slicing the steak, always cut against the grain. This technique shortens the muscle fibers, resulting in a more tender bite. Warm Tortillas Properly: Warm your tortillas on a skillet or directly over a flame for a few seconds. This helps them become more pliable and enhances their flavor. {{image_4}} You can switch out the flank steak for other proteins. Chicken fajitas work great. Simply use chicken breasts or thighs. Marinate the chicken just like the steak. Cook it until it's juicy and tender. Shrimp fajitas are another tasty option. Use medium or large shrimp. Grill or sauté them for a quick meal. Both options keep the flavors vibrant and fresh. If you want a meatless dish, try using tofu or tempeh. Tofu absorbs flavors well. Press it to remove excess water, then marinate as you would the steak. Tempeh has a nutty taste and good texture. Slice it thin and cook it like the steak. You can also substitute the steak and veggies with a mix of colorful bell peppers and onions. Add mushrooms for extra flavor and texture. Adjust the spice levels to suit your taste. If you like heat, add more chipotle sauce. You can also mix in jalapeños or a pinch of cayenne. For a sweeter touch, consider adding honey or agave to your marinade. Try different marinades, too. A citrus marinade with orange juice or pineapple can give a fun twist. Each variation brings new life to your fajitas and keeps dinner exciting. To store cooked fajitas, let them cool first. Place the fajitas in an airtight container. This keeps the flavors fresh and prevents spoilage. I recommend using glass or plastic containers with tight lids. Make sure to store them in the fridge. They will stay good for up to three days. The best way to reheat fajitas is on the stovetop. Heat a skillet over medium heat. Add a splash of water or broth to keep them moist. Stir gently until heated through. You can also use the microwave. Place the fajitas in a microwave-safe dish and cover it. Heat in short bursts, stirring in between, to keep the texture right. Yes, you can freeze fajitas! They freeze well for up to three months. Place the cooled fajitas in freezer-safe bags. Remove as much air as possible before sealing. When ready to eat, thaw them overnight in the fridge. Reheat on the stovetop or in the microwave for best results. This keeps them tasty and fresh. To add heat, use more chipotle in adobo sauce. You can also add sliced jalapeños or a dash of cayenne pepper. If you prefer a fresh touch, consider adding diced fresh chili peppers. Adjust to your taste for the perfect kick! Yes, you can prep most ingredients ahead of time. Chop the bell peppers and onion, and store them in the fridge. Marinate the steak the night before for richer flavor. Keeping everything ready makes cooking quick and easy! Fajitas pair nicely with rice, beans, or a fresh salad. You can serve them with guacamole, salsa, or sour cream for extra flavor. Don't forget tortilla chips for a crunchy side! Yes, these fajitas are great for meal prep! Store the cooked steak and veggies in an airtight container. They last for up to four days in the fridge. Just reheat when you're ready to enjoy. You learned how to make delicious Chipotle Lime Steak Fajitas using fresh ingredients. We covered marinating the steak, cooking vegetables, and assembling your fajitas. I shared tips for perfecting flavor and texture. Remember, you can customize these fajitas with different proteins or vegetables. Store any leftovers properly to enjoy later. With these easy steps and options, you can impress friends or family with a tasty meal. Enjoy your cooking journey and the joy of these flavorful fajitas!

Chipotle Lime Steak Fajitas Tasty and Simple Recipe

- 1 pound large shrimp, peeled and deveined - 4 cloves garlic, finely minced - 3 tablespoons extra virgin olive oil - Zest of 1 fresh lemon - Juice of 1 medium lemon - 1 teaspoon smoked paprika - ½ teaspoon red pepper flakes - Salt and freshly cracked black pepper to taste - 2 tablespoons fresh parsley, finely chopped Using fresh, high-quality ingredients makes a big difference. Fresh shrimp tastes sweet and tender. Quality olive oil adds rich flavor. Fresh garlic gives a strong aroma. The lemon zest brings bright notes. Each ingredient plays a key role. You want your dish to shine, and it starts with what you use. When buying shrimp, look for a few things. - Appearance: The shrimp should be shiny and firm. - Smell: Fresh shrimp should smell like the ocean, not fishy. - Color: Choose shrimp that are pink or gray. Avoid any with dark spots. - Texture: They should feel firm to the touch. If you can, buy shrimp that is wild-caught. This often means better taste and quality. {{ingredient_image_2}} Start by preheating your oven to 400°F (200°C). This heat will cook the shrimp well. While the oven warms up, line a baking sheet with parchment paper. This makes cleanup easier later. In a large bowl, mix the olive oil, minced garlic, lemon zest, and lemon juice. Add the smoked paprika, red pepper flakes, salt, and black pepper. Whisk everything together until it looks smooth and well mixed. This marinade is key to making the shrimp tasty. Now, add the peeled and deveined shrimp to the bowl. Gently toss the shrimp to coat them in the marinade. Let the shrimp sit for about 15 minutes. This step helps them soak up all the lovely flavors. Spread the marinated shrimp in a single layer on your baking sheet. Make sure they are not crowded. This helps them cook evenly. Place the tray in the oven and roast for 8-10 minutes. Watch closely until the shrimp turn pink and opaque. Remove them from the oven when they look perfect. Finally, sprinkle some fresh parsley on top for color before serving. To keep shrimp tender, watch the cooking time closely. Shrimp cook fast, usually in about 8-10 minutes. Once they turn pink and opaque, they are ready. If you leave them too long in the oven, they will become tough. A simple rule is to check them at 7 minutes. If they look done, take them out. To boost flavor, let shrimp marinate for 15 minutes. The marinade blends the garlic, lemon, and spices nicely. Fresh lemon juice and zest add brightness to the dish. You can also try adding herbs like dill or thyme for more depth. Adjust the red pepper flakes to control the heat level. This way, you can make it just right for your taste. Lemon garlic roasted shrimp pair well with many sides. Serve them with fluffy rice or creamy risotto. A fresh salad with greens and citrus complements the shrimp's flavors. For a hearty meal, consider roasted veggies or crusty bread. These options balance the dish and make your meal wholesome. Pro Tips Perfectly Cooked Shrimp: Keep an eye on the shrimp while roasting. They only need about 8-10 minutes to cook through. Overcooking can lead to a rubbery texture. Marination Magic: For even more flavor, consider marinating the shrimp for up to 30 minutes in the refrigerator. This allows the garlic and lemon to infuse deeper into the shrimp. Spice it Up: Adjust the amount of red pepper flakes based on your spice preference. You can also add a dash of hot sauce to the marinade for an extra kick. Garnish for Color: Fresh parsley not only adds color but also a fresh taste. You can substitute it with cilantro or chives for a different flavor profile. {{image_4}} If you like heat, try adding more red pepper flakes. Start with one teaspoon. You can also add a dash of hot sauce for extra zing. Mix it well in the marinade. This spicy twist will excite your taste buds and make each bite pop with flavor. For a fun twist, thread the shrimp onto skewers. You can use wooden or metal ones. Soak wooden skewers in water for 30 minutes to prevent burning. Marinate the shrimp as usual. Grill the skewers for about 5-7 minutes. This method gives you a great char and makes for an eye-catching dish. Add seasonal veggies for a complete meal. Bell peppers, zucchini, and cherry tomatoes work great. Toss the veggies in the marinade along with the shrimp. Place everything on the baking sheet. This way, you’ll have a colorful and healthy dish that’s full of flavor and nutrition. To store leftover lemon garlic roasted shrimp, place them in an airtight container. Make sure the shrimp cool down first. You can keep them in the fridge for up to three days. If you want to keep them longer, freezing is a better option. Always label the container with the date. When you are ready to eat the leftovers, reheat them gently. You can use the microwave, but be careful. Heat them in short bursts to avoid overcooking. I prefer using a skillet on low heat for even reheating. Add a splash of olive oil for extra flavor while warming. Freezing lemon garlic roasted shrimp is easy. First, let them cool completely. Then, place the shrimp in a single layer on a baking sheet. Freeze until solid, then transfer them to a freezer bag. Remove as much air as possible. You can freeze them for up to three months. When you are ready to eat, thaw them in the fridge overnight before reheating. Yes, you can use frozen shrimp. Just make sure to thaw them before cooking. Place the shrimp in the fridge overnight or run them under cold water to speed up the process. This way, they will soak up the marinade well. Lemon Garlic Roasted Shrimp pairs well with many sides. You can serve it with: - Rice - Quinoa - Pasta - A fresh salad - Roasted vegetables These sides balance the shrimp’s bright flavors and make a complete meal. Shrimp cook quickly. They are done when they turn pink and opaque. This usually takes about 8-10 minutes in the oven. Keep an eye on them to avoid overcooking. Overcooked shrimp become tough and chewy. Yes, you can prepare the marinade ahead of time. Just mix all the ingredients in a bowl and store them in the fridge. This saves time and helps the flavors develop. Marinate the shrimp just before cooking for the best taste. Yes, this recipe is great for meal prep. You can cook a large batch and store it in the fridge. It keeps well for up to three days. Just reheat in the oven or microwave when you’re ready to eat. This makes it easy to enjoy delicious meals throughout the week. In this blog post, we explored the key ingredients for Lemon Garlic Roasted Shrimp. Fresh, quality shrimp enhance flavors and textures. I shared tips for prepping, marinating, and roasting shrimp perfectly. You learned how to avoid overcooking and discovered flavorful variations. We also covered safe storage and reheating methods. I hope this guide helps you create a delicious dish that impresses everyone. Enjoy your cooking!

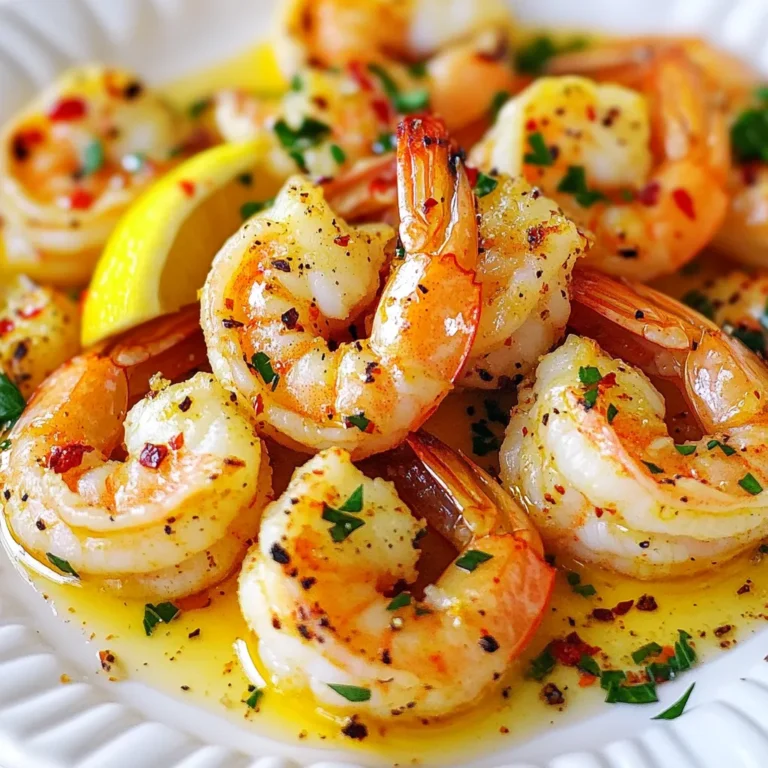
Lemon Garlic Roasted Shrimp Flavorful and Simple Meal

- 1 lb boneless, skinless chicken breast, diced into bite-sized pieces - 1 tablespoon olive oil - 1 medium onion, finely chopped - 3 cloves garlic, minced - 1 jalapeño pepper, seeded and finely diced - 2 cans (15 oz each) white beans (cannellini or great northern), drained and rinsed thoroughly - 4 cups chicken broth (preferably low sodium) - 1 teaspoon ground cumin - 1 teaspoon ground coriander - 1 teaspoon smoked paprika - ½ teaspoon salt (adjust to taste) - ¼ teaspoon freshly cracked black pepper - ½ cup cream cheese, softened to room temperature - 1 cup corn kernels (fresh, frozen, or canned, drained if canned) - Juice of 1 lime - Fresh cilantro leaves, for garnish - Sliced radishes and ripe avocado, for topping - Cream Cheese - Fresh Herbs - Avocado - Large pot - Chopping knife - Stirring spoon In this recipe for white chicken chili, you need key ingredients. The chicken gives the chili its heartiness. The beans add texture and protein. Broth adds depth and flavor. Spices like cumin and paprika create warmth and zest. For toppings, cream cheese adds creaminess. Fresh herbs like cilantro brighten the dish. Sliced avocado gives a cool, creamy bite. You can use any of these to make your chili more special. To cook, you’ll need a large pot to hold everything. A chopping knife helps you prep the veggies. A stirring spoon is key for mixing your chili as it cooks. This simple setup makes cooking easy and fun. {{ingredient_image_2}} Start by heating the olive oil in a large pot over medium heat. Once hot, add the finely chopped onion. Sauté the onion for about 5 minutes. It should turn soft and translucent. Next, add the minced garlic and diced jalapeño. Stir well and cook for 2 more minutes. You want the mix to smell great and the garlic to turn a light golden. Now, it’s time for the chicken. Add the diced chicken breast to the pot. Cook it, stirring often, for 6 to 8 minutes. You want to see the chicken turn white and no longer pink inside. This step is key for a tasty chili. Once the chicken is ready, mix in the drained white beans and chicken broth. Add the ground cumin, ground coriander, smoked paprika, salt, and black pepper. Stir everything well and bring the mixture to a gentle simmer. Reduce the heat to low and let it simmer for about 20 minutes. This allows all the great flavors to blend together. After 20 minutes, stir in the softened cream cheese and corn. Simmer for 5 more minutes. The cream cheese should melt and mix into the chili. Finally, squeeze in the juice of one lime and stir well. Choosing the right spice levels is key. Start with mild spices. You can always add more heat later. If you like it spicy, add more jalapeño. For a milder version, skip the jalapeño or use less. For a creamy consistency, cream cheese is great. Make sure it’s soft before adding. Stir it in slowly to blend well. You can also use sour cream for a tangy twist. To add more depth, try extra spices. A pinch of cayenne can boost the heat. You can also add a dash of oregano for earthiness. Fresh herbs like cilantro add brightness too. Simmering time matters. A longer simmer lets flavors blend. Aim for at least 20 minutes. This makes your chili taste even better. For sides, cornbread pairs well with chili. A fresh salad can balance the meal too. You can also serve it with tortilla chips for a crunchy bite. For a stunning presentation, garnish with cilantro and radishes. Sliced avocado adds color and creaminess. Serve hot in a nice bowl to impress your guests. Pro Tips Use Rotisserie Chicken: For a quicker option, you can substitute diced chicken breast with shredded rotisserie chicken. This saves cooking time and adds a delicious depth of flavor. Adjust the Heat: If you prefer a milder chili, skip the jalapeño or remove the seeds to reduce the spice level. Conversely, add more jalapeños or a dash of cayenne pepper for an extra kick. Fresh Herbs Matter: Garnishing with fresh cilantro not only enhances the flavor but also adds a vibrant color. Try adding other herbs like parsley or green onions for a fresh twist. Make It Ahead: This chili tastes even better the next day! Prepare it a day in advance and store it in the fridge. Reheat gently before serving to allow the flavors to meld beautifully. {{image_4}} You can easily change the protein in white chicken chili. Try using ground turkey or pork instead of chicken. They both add great flavor. If you want a vegan version, swap the chicken for tofu or tempeh. Use vegetable broth instead of chicken broth for a full vegan meal. You can also try chickpeas for added protein and texture. For a Mexican twist, add some diced tomatoes and chipotle peppers. These ingredients give a deep, smoky flavor. You can also add lime zest for brightness. If you prefer a Southwest style, top your chili with shredded cheese, crunchy tortilla strips, and fresh jalapeños. This adds texture and makes it even more fun to eat. White chicken chili is super versatile. You can serve it stuffed in warm tortillas for a tasty wrap. This makes it easy to eat while on the go. Another fun way is to serve it as a dip. Just place it in a bowl and offer tortilla chips on the side. Both styles let you enjoy this chili in unique and tasty ways. To keep your white chicken chili fresh, place it in a sealed container. Make sure it cools down first. Store it in the fridge for up to four days. If you want to keep it longer, you can freeze it. Use a freezer-safe container or a zip-top bag. It stays good in the freezer for about three months. When you’re ready to eat, there are a few good ways to heat it up. You can use the stove. Just pour the chili into a pot and heat it on low. Stir it often to keep it from sticking. You can also use the microwave. Heat it in short bursts, stirring in between. This helps keep the texture nice and creamy. In the fridge, your chili lasts about four days. After that, it might spoil. Watch for signs of spoilage, like a sour smell or mold. If it smells off or looks strange, it's best to toss it out. Always trust your nose and eyes when checking food! Yes, you can use canned chicken. It can save time and effort. Canned chicken is already cooked. This means you will not need to worry about cooking it thoroughly. However, canned chicken may lack flavor compared to fresh. You might want to season it more to boost the taste. Also, fresh chicken tends to give a better texture. If you choose canned, look for low sodium options for a healthier dish. If you need a substitute for cream cheese, try these options: - Sour cream - Greek yogurt - Silken tofu - Nutritional yeast (for a cheesy flavor without dairy) These alternatives can help make the chili lighter or dairy-free. Each option adds a unique flavor and texture. Just keep in mind that they may alter the taste slightly. White chicken chili can be mild or spicy based on your taste. The main ingredient for heat is jalapeño. You can adjust the spice level by: - Adding more or less jalapeño - Using a milder pepper, like a green bell pepper - Adding hot sauce for extra heat Taste as you cook, and adjust until it’s just right for you! White chicken chili is a simple dish that packs a lot of flavors. This blog shared key ingredients like chicken, beans, and spices, along with helpful tips. You learned about cooking techniques, serving suggestions, and variations to make it your own. As you try these recipes, remember that every ingredient plays a role in the taste. Enjoy your cooking, and don’t forget to experiment with new flavors to find what you love!

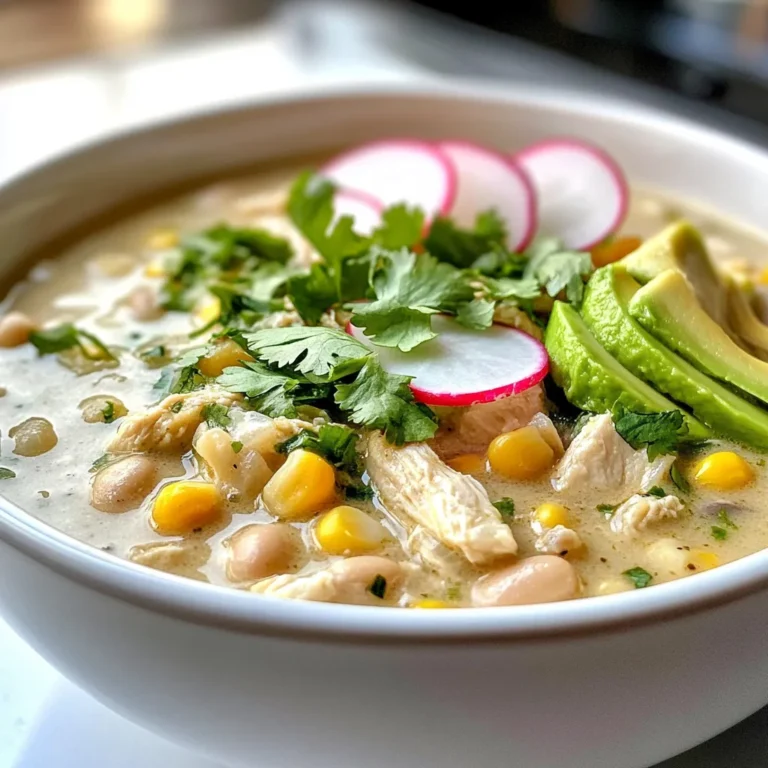
White Chicken Chili Flavorful and Hearty Meal Idea

To make the Caprese stuffed portobellos, gather these main ingredients: - 4 large portobello mushrooms, stems removed - 2 cups cherry tomatoes, halved - 1 cup fresh mozzarella balls, halved - 1/4 cup fresh basil leaves, roughly torn - 1/4 cup grated Parmesan cheese These ingredients work together to create a fresh and tasty meal. The mushrooms give a meaty texture. The tomatoes and mozzarella add creaminess and flavor. Basil brings a nice herbal touch. Next, you need some seasonings: - 2 tablespoons balsamic vinegar - 2 tablespoons extra virgin olive oil - Salt and freshly ground pepper, to taste - 1 clove garlic, minced - 1/4 teaspoon red pepper flakes (optional, for heat) The balsamic vinegar adds a sweet tang. Olive oil keeps everything moist. Salt and pepper enhance every bite. Garlic adds depth, while red pepper flakes can bring some heat. You can add a few optional ingredients for extra flavor: - Extra balsamic glaze for drizzling - More herbs like oregano or thyme Using these optional ingredients lets you customize your dish. A drizzle of balsamic glaze will add a sweet finish. More herbs can change the flavor profile to your liking. {{ingredient_image_2}} First, preheat your oven to 375°F (190°C). This step is key for even cooking. Make sure the oven is hot before you bake. A well-preheated oven helps the mushrooms cook just right. Next, grab a large mixing bowl. Combine the halved cherry tomatoes, mozzarella balls, and torn basil leaves in the bowl. Add minced garlic, balsamic vinegar, and olive oil. If you like heat, toss in the red pepper flakes. Season with salt and pepper. Mix everything gently until it’s all combined. This mixture brings fresh flavors together. Now, line a baking sheet with parchment paper. This makes cleanup easy. Place the portobello mushrooms on the sheet with the gill side facing up. Take a spoon and fill each mushroom cap with the Caprese mixture. Press down slightly to pack it in well. Sprinkle grated Parmesan cheese on top for extra flavor. Bake the stuffed mushrooms for 20-25 minutes. They will become tender, and the cheese will melt and bubble. When done, remove them from the oven and let them cool for a few minutes. Enjoy your delicious Caprese stuffed portobellos! When choosing portobello mushrooms, look for big, firm caps. They should be smooth and free from blemishes. The color should be dark brown, showing they are fresh. Avoid mushrooms that feel slimy or dry, as these may be old. If the gills are dark, that means they are ripe for cooking. You can also smell them; fresh mushrooms have a mild, earthy scent. Caprese stuffed portobellos shine on their own, but you can add flair! I love serving them on a bed of fresh arugula. The peppery leaves give a nice contrast to the rich mushrooms. Drizzle a bit of extra balsamic glaze on top for a sweet touch. You can pair them with crusty bread or a light salad. This makes for a colorful and tasty meal. For perfect mushrooms, preheat your oven to 375°F (190°C). Bake the stuffed portobellos for 20-25 minutes. Keep an eye on them; they should be tender and the cheese bubbly. If you want a crispy top, broil them for the last few minutes. Just watch closely to avoid burning! Let them cool for a few minutes before serving. This will help keep your fingers safe from heat. Pro Tips Choose Fresh Ingredients: Always opt for the freshest tomatoes and basil to enhance the flavor of your Caprese stuffed portobellos. Don’t Overcook the Mushrooms: Keep an eye on the baking time; overcooking can lead to mushy mushrooms. Aim for a tender texture. Add a Zesty Kick: If you love a bit of heat, don’t hesitate to increase the red pepper flakes or add a drizzle of hot sauce before serving. Experiment with Cheeses: Feel free to mix in other cheeses like goat cheese or feta for a unique twist on the traditional Caprese flavors. {{image_4}} You can easily make this dish vegetarian. Try using different types of cheese like feta or goat cheese. They add a nice tangy flavor. If you want a creamier texture, use ricotta cheese. You can also replace mozzarella with vegan cheese. This way, you keep the taste but cater to dietary needs. For those who want more protein, chicken or shrimp works well. Just sauté them before adding to the mix. You can chop cooked chicken breast and fold it into the Caprese mixture. If you like seafood, try adding cooked and chopped shrimp. This adds a savory taste and makes it heartier. Herbs can change the flavor a lot. Instead of basil, try parsley or oregano. Thyme adds a nice earthy taste. You can also mix in some chopped chives for a mild onion flavor. Experimenting with different herbs can lead to fun new flavors in your stuffed portobellos. To keep your Caprese stuffed portobellos fresh, let them cool first. Place them in an airtight container. Store the container in the fridge. They will stay good for up to three days. Make sure to keep them away from strong-smelling foods. This keeps their flavor intact. When you want to enjoy leftovers, preheat your oven to 350°F (175°C). Place the portobellos on a baking sheet. Cover them lightly with foil. Heat for about 10-15 minutes. This keeps them moist. You can also use a microwave. Heat them on a microwave-safe plate for 1-2 minutes. To freeze your stuffed portobellos, let them cool entirely. Wrap each one tightly in plastic wrap. Then place them in a freezer bag. Remove as much air as possible. This prevents freezer burn. They can last up to three months in the freezer. When you're ready to eat, thaw them in the fridge overnight before reheating. Yes, you can prepare Caprese Stuffed Portobellos ahead of time. I like to make the filling in advance. Just mix the cherry tomatoes, mozzarella, basil, garlic, balsamic vinegar, and olive oil. Store it in the fridge for up to one day. When you're ready to bake, fill the mushrooms and pop them in the oven. They will taste fresh and delicious. If you don't have fresh mozzarella, use these options: - Shredded mozzarella cheese - Goat cheese - Feta cheese These substitutes add a unique twist to your dish. Each cheese has its own flavor. Choose one that you enjoy! Yes, Caprese Stuffed Portobellos are naturally gluten-free. The main ingredients like mushrooms, tomatoes, and cheese do not contain gluten. This makes them a great choice for anyone with gluten allergies. Just make sure to check any additional ingredients, like seasonings, to ensure they are gluten-free. Enjoy this tasty meal without worry! Caprese stuffed portobellos are a tasty dish made with fresh ingredients. We covered main ingredients, seasonings, and optional flavors. I shared easy steps to prepare and bake them. You learned tips for selecting mushrooms and perfect serving ideas. I also explained different ways to mix up the dish and how to store leftovers. In conclusion, this dish is not only simple but also versatile. With these tips, you can enjoy a delicious meal anytime.

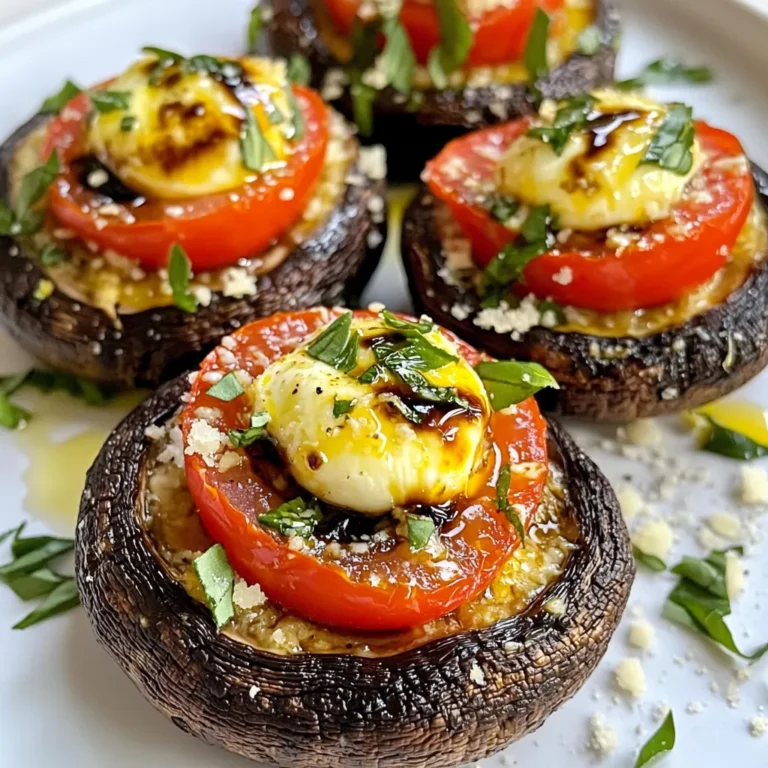
Caprese Stuffed Portobellos Flavorful and Easy Meal

To make these delicious stuffed shells, you will need the following ingredients: - 12 jumbo pasta shells - 2 cups fresh spinach, chopped - 1 cup ricotta cheese - 1 cup shredded mozzarella cheese - 1/2 cup grated Parmesan cheese - 1 teaspoon garlic powder - 1 teaspoon onion powder - 1/2 teaspoon salt - 1/4 teaspoon black pepper - 2 cups marinara sauce (store-bought or homemade) - Fresh basil leaves for garnish These ingredients come together to create a rich and cheesy filling that pairs perfectly with the marinara sauce. While ricotta and mozzarella are the stars here, you can try other cheese types for a twist: - Cottage cheese for a lighter filling - Goat cheese for a tangy flavor - Fontina cheese for creaminess - Cheddar cheese for extra sharpness These options can make your stuffed shells even more fun and tasty. To elevate your stuffed shells, consider these optional add-ins: - Chopped sun-dried tomatoes for a burst of flavor - Cooked ground meat or sausage if you want protein - Artichoke hearts for a unique taste - Red pepper flakes for some heat These add-ins can bring new life to your dish and cater to different taste preferences. Enjoy experimenting! {{ingredient_image_2}} Set your oven to 375°F (190°C). This step is key for perfect baking. Preheating helps the cheese melt evenly and keeps the pasta shells tender. Boil 12 jumbo pasta shells in salted water. Follow the package directions until they are al dente. Once you drain them, let them cool a bit. This helps prevent them from sticking together. In a large bowl, mix 2 cups of chopped spinach with 1 cup of ricotta cheese. Add half of the shredded mozzarella, 1/4 cup of grated Parmesan, 1 teaspoon of garlic powder, 1 teaspoon of onion powder, 1/2 teaspoon of salt, and 1/4 teaspoon of black pepper. Stir until smooth. This filling is creamy and packed with flavor. Take a spoon and fill each pasta shell with about 2 tablespoons of the spinach and ricotta mixture. Be generous but do not overfill. This way, they will seal better during baking. Spread 1 cup of marinara sauce on the bottom of a 9x13 inch baking dish. This creates a tasty base for your stuffed shells. Place the filled shells open side up in the dish. Pour the rest of the marinara sauce over them to keep everything moist and flavorful. First, cover the dish with aluminum foil. This helps prevent burning while the shells bake. Bake in the oven for 25 minutes. After that, remove the foil and bake for another 10 to 15 minutes. You want the cheese to be bubbly and golden brown. Once done, let it cool a bit before serving. To stop your pasta shells from sticking, use plenty of water. Add a generous pinch of salt to the boiling water. Stir the shells gently as they cook. Once they are al dente, drain them quickly. Rinse them briefly with cold water. This cools them down and helps keep them separate. For a great cheese melt, use fresh cheese. Mix mozzarella and Parmesan for a rich flavor. Layer the cheese on top just before baking. Cover the dish with foil for the first part of baking. This traps steam and helps the cheese melt evenly. Remove the foil later to let it brown. Seasonings make your dish pop. Use garlic powder and onion powder for depth. Add a bit of salt and black pepper for balance. Fresh herbs like basil can brighten the flavor. You can also try adding a pinch of red pepper flakes for some heat. Mix these into your filling for a tasty boost. Pro Tips Use Fresh Spinach: Fresh spinach adds vibrant flavor and texture to the filling. If using frozen spinach, ensure it is thoroughly drained to avoid excess moisture. Cheese Variations: Experiment with different cheeses like feta or goat cheese for a unique twist on the filling. This can enhance the flavor profile of the dish. Extra Sauce: If you love extra sauce, reserve some marinara to drizzle over the top before serving for a saucier texture and more flavor. Rest Before Serving: Allow the dish to cool for a few minutes after baking. This helps the filling set and makes it easier to serve without spilling. {{image_4}} You can keep these stuffed shells vegetarian or add meat. For a vegetarian dish, stick with the spinach and ricotta filling. However, if you want to add meat, try cooked ground beef or Italian sausage. Mix the meat into the spinach and cheese blend. This adds flavor and protein. You can also use shredded chicken for a different taste. Both options make the dish heartier and help satisfy meat lovers. While marinara sauce is classic, you can try different sauces too. Alfredo sauce adds creaminess and richness. You could use pesto for a fresh herbal note. If you love a kick, try a spicy arrabbiata sauce. Each sauce gives the dish a new twist. Choose a sauce based on your mood or what you have on hand. Mixing sauces can also create exciting flavor layers. If you need gluten-free options, look for gluten-free pasta shells. Many brands make these now, and they cook well. Check your local store for options. You can also make the filling with gluten-free ingredients. This way, everyone can enjoy this tasty meal. Gluten-free doesn't mean you lose flavor or texture. You still get a delicious dish that everyone loves. After cooking, you may have some cheesy spinach ricotta shells left. Store them in an airtight container. Keep the shells in the fridge for up to three days. If you want to keep them longer, freezing is a good option. To reheat the shells, preheat your oven to 350°F (175°C). Place the shells in a baking dish. Add a bit of marinara sauce on top to keep them moist. Cover the dish with aluminum foil. Bake for about 15-20 minutes, or until they are heated through. You can also use a microwave. Heat for 2-3 minutes, checking often. If you want to freeze the stuffed shells, do it before baking. Arrange the filled shells in a single layer in a baking dish. Cover tightly with plastic wrap and then foil. They can stay in the freezer for up to three months. When ready to eat, thaw them overnight in the fridge. Bake as directed, adding a few extra minutes to the cooking time. This keeps your meal prep easy and tasty! Yes, you can use other cheeses! Try using goat cheese for a tangy flavor. Feta adds a nice twist too. You can mix in cheddar for a sharper taste. To make the shells ahead, cook and stuff them first. Place them in a baking dish with sauce. Cover and chill in the fridge. When ready, bake them straight from the fridge. You may need to add a few extra minutes to the baking time. These stuffed shells pair well with a simple salad. A fresh Caesar salad works great. Garlic bread complements the meal nicely too. You can also serve them with steamed veggies for a healthy side. Spinach ricotta stuffed shells are easy and fun to make. You learned about key ingredients, like cheese and optional add-ins. The step-by-step guide makes preparation simple, from cooking the shells to baking them. I shared helpful tips to improve taste and avoid sticking. You can also explore tasty variations, including vegetarian and gluten-free options. Lastly, I covered how to store leftovers effectively. Now you can enjoy this delicious dish anytime!

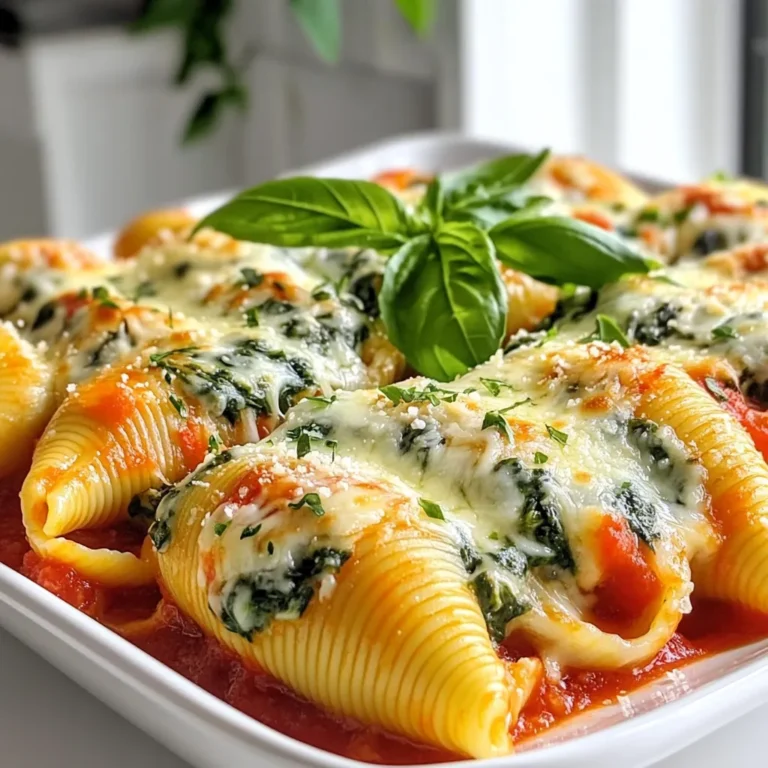
Savory Spinach Ricotta Stuffed Shells Easy Recipe

PREV 1 … 13 14 15 … 18 NEXT
mini chef kitchen

explore

DessertsDinnerAppetizersDrinks

Our Policies

  • Cookie Policy
  • Copyright Policy
  • Disclaimer
  • GDPR Policy
  • Terms Of Use
Back to Top
  • About
  • Contact Us
  • Privacy Policy
© 2025 mini chef kitchen