FREE DINNER EBOOK! Get your copy!
  • Cookie Policy
  • GDPR Policy
  • Disclaimer
  • Terms Of Use
  • Visit my other site: Fun Cookie Recipes
mini chef kitchen
  • Home
  • Dinner
  • Desserts
  • Drinks
  • Appetizers
  • Contact
  • About
  • Privacy Policy
  • Home
  • Dinner
  • Desserts
  • Drinks
  • Appetizers
  • Contact
  • About
  • Privacy Policy
  • Cookie Policy
  • GDPR Policy
  • Disclaimer
  • Terms Of Use
Visit my other site: Fun Cookie Recipes

HOME / CATEGORIES /

Latest

- 2 cups uncooked white rice - 4 cups vegetable broth (or water) - 1 jalapeño, finely chopped (seeds removed for milder flavor) - 1/2 cup fresh cilantro, finely chopped - Juice of 2 limes - 2 tablespoons extra virgin olive oil - 1 teaspoon garlic powder - Salt, to taste - Freshly cracked black pepper, to taste You can add more flavor and texture to your rice. Here are some ideas: - A pinch of cumin for warmth - Diced red onion for sweetness - Chopped bell pepper for color - Corn for a sweet crunch - Black beans for protein Using the right tools makes cooking easier. Here’s what you need: - Large pot with a lid - Medium skillet - Cutting board - Sharp knife - Measuring cups and spoons - Fork for fluffing the rice These ingredients and tools will help you create a vibrant side dish. Enjoy the cooking process as much as the eating! {{ingredient_image_2}} First, rinse 2 cups of uncooked white rice under cold water. Keep rinsing until the water runs clear. This step is key. It removes extra starch, making the rice fluffier. Next, put the rinsed rice in a large pot. Add 4 cups of vegetable broth or water. Bring it to a boil over medium-high heat. Once boiling, lower the heat. Cover the pot with a lid and let it simmer for about 15 minutes. While the rice cooks, let’s prepare the jalapeño. Take 1 finely chopped jalapeño and remove the seeds if you want less heat. Heat 2 tablespoons of extra virgin olive oil in a medium skillet over medium heat. Add the chopped jalapeño and sauté for 2-3 minutes. Stir it occasionally until it softens and smells great. This step adds a nice kick to your rice. After the rice is done cooking, take the pot off the heat. Let it sit, covered, for 5 minutes. This will help steam the rice and improve its texture. Once ready, fluff the rice gently with a fork. Now, mix in the sautéed jalapeño, 1/2 cup of finely chopped cilantro, and the juice of 2 limes. Add 1 teaspoon of garlic powder, salt, and freshly cracked black pepper to taste. Stir everything until it’s well combined. Taste it and adjust the seasoning if needed. Enjoy your zesty jalapeño cilantro lime rice! Rinsing rice is key to great texture. Start with 2 cups of uncooked white rice. Place it in a fine-mesh sieve or bowl. Run cold water over the rice. Swirl it gently with your hand. Keep rinsing until the water runs clear. This washes away excess starch. Less starch means fluffier rice. To control the heat, focus on the jalapeño. For a milder dish, remove the seeds. You can also use half a jalapeño. If you like it spicy, add an extra jalapeño. Taste the rice before serving. If it needs more spice, add a pinch of cayenne pepper or red pepper flakes. Fluffy rice is easy with a few steps. After cooking, let the rice sit covered for 5 minutes. This helps it steam and become tender. Then, use a fork to fluff it. This separates the grains nicely. Avoid stirring with a spoon, which can make it mushy. Enjoy that perfect fluff! Pro Tips Rinse for Fluffiness: Rinsing the rice under cold water helps to remove excess starch, resulting in fluffier cooked rice. Adjusting Spice Level: For a milder flavor, make sure to remove the seeds from the jalapeño before chopping. Fresh Ingredients Matter: Use fresh lime juice and cilantro for a vibrant taste that elevates the dish significantly. Taste and Adjust: Always taste the rice before serving; adjust the lime juice and salt to enhance the flavors to your liking. {{image_4}} You can easily make this dish vegan. Just use vegetable broth. The rice and veggies provide all the flavor. Keep it fresh by using ripe ingredients. For a twist, add avocado slices on top. This adds creaminess and richness. Want to make this a full meal? Add some protein. Grilled chicken works well. Chop it and mix it in after cooking. For a plant-based option, use tofu. Sauté the tofu until golden, then mix it with the rice. Both choices boost nutrition and flavor. Feel free to play with flavors. If you love basil, swap it for cilantro. It gives a sweet twist. You might also try parsley or green onions for a fresh touch. Experiment with spices too. Cumin or smoked paprika adds a nice kick. Make it your own! To keep your Jalapeño Cilantro Lime Rice fresh, place it in an airtight container. Make sure to cool the rice to room temperature first. This helps avoid moisture buildup. Store the container in the fridge for up to four days. If you want to keep it longer, freezing is a great option. When reheating, add a splash of water or broth to keep the rice moist. Place it in the microwave or on the stove. If using a microwave, heat for one minute, then stir and heat for another minute. On the stove, warm it gently over low heat. Stir often to avoid sticking. To freeze, use a freezer-safe container. Divide the rice into smaller portions for easy thawing. It will last in the freezer for up to three months. To thaw, move the rice to the fridge overnight. If you’re in a hurry, use the microwave. Heat it in short bursts until warm. Yes, you can use brown rice. Brown rice takes longer to cook than white rice. You need to adjust the liquid ratio and cooking time. Use 2.5 cups of vegetable broth for 1 cup of brown rice. Cook it for about 40-45 minutes. The rice will have a nutty flavor and a chewier texture. To boost the heat, add more jalapeños. You can leave some seeds in for extra spice. Another option is to include crushed red pepper flakes. If you like, try adding hot sauce into the mix. Start with a little, then taste and adjust. This rice pairs well with many dishes. Try serving it with grilled chicken or fish. It also complements tacos and burritos nicely. For a vegetarian option, serve it with black bean enchiladas. You can also add it to salads for a zesty kick. This blog post covered important steps to make Jalapeño Cilantro Lime Rice. I shared main and optional ingredients, plus tools you need. Next, I outlined step-by-step instructions to prepare the rice and mix in flavors. Tips on rinsing rice and adjusting spice levels help get the best results. You also learned about variations, storage, and answers to common questions. With these insights, you can create a dish that fits your tastes perfectly. Enjoy cooking and customizing your Jalapeño Cilantro Lime Rice!

Jalapeño Cilantro Lime Rice Flavorful Side Dish Recipe

- 2 boneless, skinless chicken breasts - 1 cup cherry tomatoes, halved - 1 cup fresh mozzarella balls, drained and patted dry - 1/2 cup balsamic vinegar - 2 tablespoons extra-virgin olive oil - 1 tablespoon honey - 1 clove garlic, finely minced - 1 cup fresh basil leaves, roughly torn - 1 teaspoon dried oregano When I make Balsamic Glazed Caprese Chicken, I focus on fresh, high-quality ingredients. The chicken breasts are the star of the dish. They soak up all the tasty flavors. The cherry tomatoes add a pop of color and sweetness. The fresh mozzarella gives a lovely creaminess that balances the dish. For the marinade, I use balsamic vinegar to add tang. The olive oil gives richness, while honey brings a hint of sweetness. This mix creates a wonderful glaze that coats the chicken perfectly. I never skip the flavor boosters. Fresh garlic brings a warm, aromatic note. Basil adds a bright, herbal touch that elevates the dish. Dried oregano gives it an earthy flavor that ties everything together. These ingredients work in harmony to create a delicious meal you can enjoy any night of the week. {{ingredient_image_2}} - Preheat your oven to 400°F (200°C). This step is key for even cooking. - Season both sides of the chicken breasts with salt and black pepper. This gives the chicken great flavor. - Heat a large, oven-safe skillet over medium-high heat. Add 2 tablespoons of olive oil. - Once the oil is shimmering, add the seasoned chicken. Sear each side for 4-5 minutes. Look for a nice golden-brown color. - In a small bowl, whisk together 1/2 cup balsamic vinegar, 1 tablespoon honey, 1 clove of minced garlic, and 1 teaspoon dried oregano. This glaze brings sweetness and depth. - Pour the glaze over the seared chicken in the skillet. Make sure the chicken is nicely coated. - Sprinkle 1 cup of halved cherry tomatoes, 1 cup of drained mozzarella balls, and 1 cup of torn fresh basil over the chicken. This adds color and flavor. - Carefully transfer the skillet to your preheated oven. - Bake for 20-25 minutes. The chicken should reach an internal temperature of 165°F (74°C) when done. - Once baked, let the chicken rest for 5 minutes. This helps the juices stay in the meat. - For presentation, plate the chicken and spoon some roasted tomatoes and mozzarella over the top. A drizzle of extra balsamic glaze and whole basil leaves make it look special. Enjoy your meal! To get a great sear, first manage your heat. Start with medium-high heat. This makes the oil hot enough to cook the chicken well. When the oil shimmers, it’s ready. Next, use salt and pepper wisely. Season both sides of the chicken breasts. This adds flavor and helps create a nice crust. Don’t rush this step; it makes a big difference. Balancing sweetness and acidity is key. Use the honey to add sweetness to the balsamic vinegar. This mix gives a rich flavor. If it tastes too sweet, add more vinegar. Adjust until it suits your taste. Using fresh ingredients also helps. Fresh basil, mozzarella, and tomatoes give bright flavors. They make the dish pop. Always try to use the freshest ingredients you can find. For side dish ideas, think of easy options. A simple green salad pairs well. Roasted vegetables also make a great choice. They complement the chicken’s rich flavors nicely. When it comes to wine, choose a light red. A Pinot Noir or Chianti works well. These wines enhance the flavors without overpowering them. Enjoy your meal! Pro Tips Resting the Chicken: Allowing the chicken to rest for a few minutes after cooking helps retain its juices, resulting in a more tender and flavorful dish. Choosing Fresh Ingredients: Opt for the freshest mozzarella, basil, and tomatoes you can find, as they significantly enhance the flavor profile of the dish. Perfect Balsamic Glaze: To intensify the sweetness and flavor of the balsamic vinegar, consider simmering it on the stove until it thickens slightly before adding it to the chicken. Experiment with Herbs: Feel free to mix in other herbs like thyme or rosemary for an added depth of flavor and a unique twist to the classic Caprese taste. {{image_4}} You can switch the chicken for turkey or pork. Both options cook well and add unique flavors. Turkey breasts are lean and tender, making them a great substitute. Pork chops bring a juicy, hearty taste. If you prefer plant-based meals, try using tofu or tempeh. These options soak up the balsamic glaze beautifully. Feel free to play with herbs and spices. Use fresh thyme or rosemary for a different taste. You can also add some chopped bell peppers for color and crunch. Seasonal veggies like zucchini or asparagus pair well too. Just roast them with the chicken for a tasty twist. Want to kick up the heat? Add red pepper flakes to the glaze. It gives a nice balance to the sweet balsamic. You can also experiment with different vinegars. Try apple cider vinegar for a fruitier taste or red wine vinegar for depth. Each option can make your dish more exciting. To keep your Balsamic Glazed Caprese Chicken fresh, store it in the fridge. Place the chicken in an airtight container. This keeps moisture in and prevents odors from mingling. Make sure to eat it within three days for the best taste. When you want to enjoy your leftovers, the best method is to reheat in the oven. Preheat your oven to 350°F (175°C). Place the chicken on a baking sheet and cover it with foil. This helps keep the chicken moist. Heat for about 15-20 minutes until warm. You can also use a microwave, but this may make the chicken a bit rubbery. If you want to save your chicken for later, it freezes well. Let the chicken cool fully before freezing. Wrap it tightly in plastic wrap, then place it in a freezer bag. This keeps the flavor and texture intact. When you’re ready to eat, thaw the chicken in the fridge overnight. This way, it stays juicy and delicious. You can pair this dish with many sides. Here are some tasty options: - Garlic bread - Steamed green beans - Roasted asparagus - Mixed green salad - Quinoa or rice These sides add flavor and color to your meal. They also balance the dish's richness. Yes, you can prepare Balsamic Glazed Caprese Chicken ahead of time. Here’s how: - Season the chicken and make the balsamic glaze. - Store them in separate containers in the fridge. - Combine them before cooking, or bake the chicken right away. This makes meal prep easy and saves time on busy days. Check the chicken’s internal temperature. It should reach 165°F (74°C) for safety. - Use a meat thermometer for the best results. - Insert it into the thickest part of the chicken. When it’s done, the juices will run clear and the meat will be firm. Yes, you can use balsamic glaze instead of vinegar. However, the flavor will change. - Balsamic glaze is sweeter and thicker. - It adds a rich, deep flavor to the dish. If you like a sweet taste, go for the glaze. If you prefer tang, stick with vinegar. This blog post covered how to prepare Balsamic Glazed Caprese Chicken. We looked at the key ingredients like chicken breasts, cherry tomatoes, and fresh mozzarella. I shared step-by-step instructions from searing to baking, plus tips for perfect flavor balance. You learned about variations and how to store leftovers. With this dish, you can impress anyone at the table. Enjoy experimenting with flavors and techniques to make it your own. Cooking can be fun and delicious!

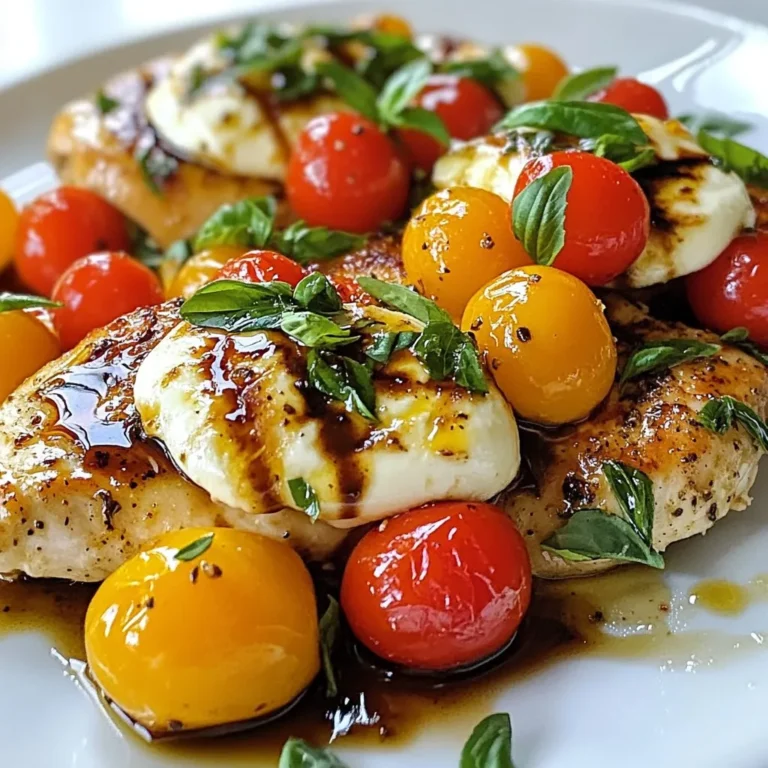
Balsamic Glazed Caprese Chicken Flavorful and Fresh Dish

To make these delicious cranberry orange sugar cookies, gather the following ingredients: - 2 ½ cups all-purpose flour - 1 teaspoon baking soda - ½ teaspoon baking powder - ½ teaspoon salt - 1 cup unsalted butter, softened - 1 cup granulated sugar - ½ cup packed light brown sugar - 1 large egg - 1 teaspoon pure vanilla extract - Zest of 1 medium orange - 1 tablespoon freshly squeezed orange juice - 1 cup dried cranberries, roughly chopped - Extra granulated sugar for rolling If you need to convert measurements, here are some common conversions: - 1 cup = 240 ml - 1 teaspoon = 5 ml - ½ cup = 120 ml - ½ teaspoon = 2.5 ml These conversions help if you need different measuring tools or methods. You can swap some ingredients if you have dietary needs or preferences: - Butter: Use coconut oil or vegan butter for a dairy-free option. - Sugars: Replace granulated sugar with coconut sugar for a lower glycemic index. - Egg: Use a flax egg (1 tablespoon flaxseed meal + 2.5 tablespoons water) for a vegan choice. - Cranberries: Try dried cherries or raisins if you don’t have cranberries. Feel free to get creative with these substitutions while keeping the cookie’s overall flavor intact! {{ingredient_image_2}} Start by preheating your oven to 350°F (175°C). This step is key for even baking. While the oven heats, line two baking sheets with parchment paper. This prevents sticking and makes cleanup easy. Next, grab a medium bowl. Combine 2 ½ cups of all-purpose flour, 1 teaspoon of baking soda, ½ teaspoon of baking powder, and ½ teaspoon of salt. Use a whisk to blend these dry ingredients well. Set this bowl aside for later. In a large bowl, use an electric mixer to cream together 1 cup of softened unsalted butter, 1 cup of granulated sugar, and ½ cup of packed light brown sugar. Beat this mix on medium speed until it looks light and fluffy. This should take about 3 to 4 minutes. Now, add in 1 large egg, 1 teaspoon of pure vanilla extract, the zest of 1 medium orange, and 1 tablespoon of freshly squeezed orange juice. Mix these on low speed until everything is fully combined. You want a smooth mixture with no lumps. Gradually add the dry ingredients to the wet mixture. Mix gently until just combined. Be careful not to overmix. This helps keep your cookies nice and soft. Take a cookie scoop or a tablespoon to portion out the dough. Roll each piece into a ball and then coat in extra granulated sugar. Place them on the baking sheets, spacing them about 2 inches apart. To help them bake evenly, gently press each ball with the back of a fork or your palm. Once baked for 10-12 minutes, remove the cookies from the oven. They should have lightly golden edges and soft centers. Let them rest on the baking sheets for 5 minutes. Then, transfer the cookies to cooling racks to cool completely. This step is crucial for that perfect chewy texture! To get soft and chewy cookies, follow a few easy steps. First, use room temperature butter. This helps create a light and fluffy mix. When you blend the butter with the sugars, beat until it looks pale and creamy. Avoid overmixing your dough after adding flour. Just mix until you see no dry spots. This keeps your cookies tender. Many bakers make simple mistakes. One common error is not measuring flour correctly. Too much flour makes cookies dry. Always spoon flour into your measuring cup and level it off. Another mistake is baking cookies too long. Keep an eye on them. They should look soft and slightly underbaked in the middle when you take them out. Using the right tools helps you succeed. Here are must-have items for baking these cookies: - Mixing bowls: At least two sizes to separate wet and dry ingredients. - Electric mixer: For creaming butter and sugars easily. - Measuring cups and spoons: Accurate measurements are key to great cookies. - Cookie scoop: Makes it easy to portion dough evenly. - Parchment paper: Prevents sticking and helps with easy cleanup. - Cooling racks: Ensures cookies cool evenly without getting soggy. By following these tips, you'll create delicious cranberry orange sugar cookies every time! Pro Tips Chill the Dough: For even better flavor and texture, chill the cookie dough for at least 30 minutes before baking. This allows the flavors to meld and can also help the cookies maintain their shape while baking. Use Fresh Cranberries: If you have access to fresh cranberries, consider using them instead of dried. They will add a tartness that pairs beautifully with the orange and sugar. Experiment with Spices: Add a pinch of cinnamon or nutmeg to the dry ingredients for a warm, spiced flavor that complements the orange and cranberry beautifully. Store Properly: To keep your cookies fresh for longer, store them in an airtight container at room temperature. You can also freeze the cookies for up to three months for a sweet treat anytime! {{image_4}} You can make your cranberry orange sugar cookies even better by adding nuts or chocolate. Chopped walnuts or pecans add a nice crunch. They pair well with the soft texture of the cookie. If you prefer chocolate, try adding chocolate chips. Dark chocolate brings a rich flavor that balances the sweetness. Mix in about ½ cup of nuts or chocolate to the dough. This small change makes a big difference. Change up the dried fruit for a new taste. Instead of cranberries, try dried cherries or apricots. Chopped dates also work well. These fruits can add different flavors and textures. For a tropical twist, use dried mango or pineapple. Just remember to keep the amount around 1 cup. This keeps the cookie moist and flavorful. Spices can add depth to your cookies. Consider adding a pinch of cinnamon or nutmeg for warmth. They bring a cozy feel, especially in the fall and winter. A touch of ginger can add a zing that complements the orange. If you want something unique, try cardamom. Just ¼ teaspoon of any spice can enhance your cookies' flavor. Be creative and adjust the spices to your taste! To keep your cranberry orange sugar cookies fresh, follow these tips: - Allow the cookies to cool completely on a rack. - Use an airtight container to store them. - Layer cookies between sheets of parchment paper. - Keep them in a cool, dry place. - Enjoy them within a week for the best taste. Storing the cookies properly helps maintain their softness and flavor. You want to avoid any moisture that can make them soggy. Freezing these cookies is a great way to save some for later. Here’s how to do it: - Place cooled cookies in a single layer on a baking sheet. - Freeze them for about two hours. - Once frozen, transfer them to a freezer-safe bag. - Remove air to prevent freezer burn. - Label the bag with the date. Frozen cookies can last up to three months. When you crave a cookie, just pull one out and let it thaw at room temperature. If you want to enjoy warm cookies, reheating is easy: - Preheat your oven to 350°F (175°C). - Place cookies on a baking sheet. - Heat for about 5-7 minutes. This method brings back that fresh-baked taste and soft texture. Avoid using the microwave, as it can make cookies tough. Enjoy your treats! Yes, you can make these cookies ahead of time. Prepare the dough and roll it into balls. Then, place them on a baking sheet and freeze. Once frozen, transfer them to a bag or container. When you're ready to bake, just take them out and bake from frozen. This method is great for busy days! Look for the edges to turn golden brown. The centers should still look soft. This means they will finish baking as they cool down. If you wait too long, the cookies can become hard, so be sure to check them around 10 minutes. If you don't have orange juice, you can use lemon juice instead. The flavor will change slightly but will still taste good. Another option is to use water with a bit of orange zest to keep some flavor. Yes, you can use fresh cranberries! However, fresh cranberries are tart. I recommend chopping them and adding a bit of extra sugar to balance the tartness. This will make your cookies sweet and flavorful. Store leftover cookies in an airtight container. Keep them at room temperature for up to a week. If you want them to last longer, freeze them. Just place them in a container or bag, and they can last up to three months. This blog post gave you a clear guide on baking cookies. We covered ingredients, step-by-step instructions, and tips for perfect texture. We also explored fun variations and proper storage methods. You now have the tools to bake great cookies. Remember, practice makes perfect. Enjoy your baking journey and share your tasty results! Happy baking!

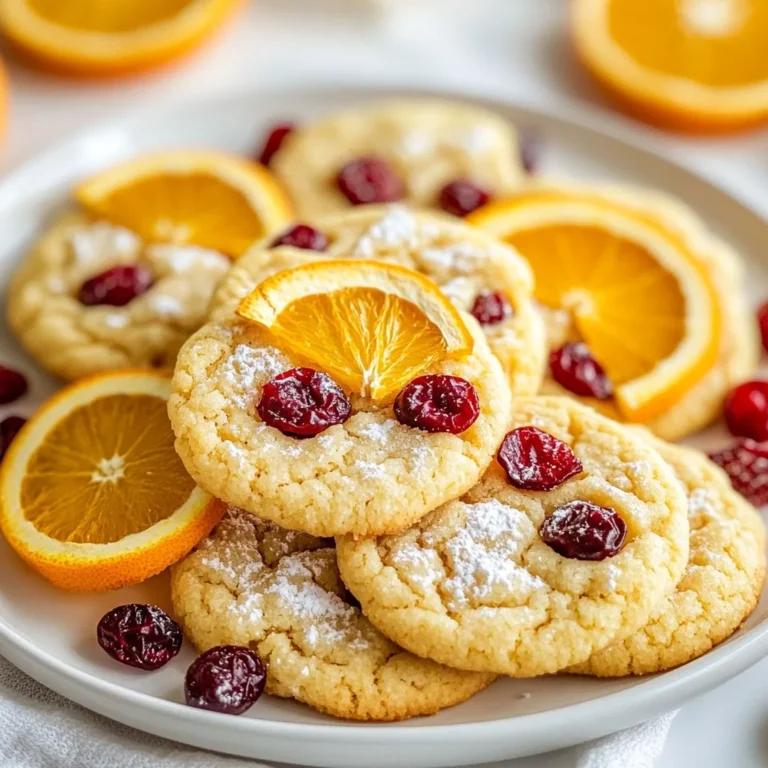
Cranberry Orange Sugar Cookies Simple and Tasty Treat

Cinnamon Swirl Coffee Cake Muffins have a simple list of ingredients. These ingredients work together to create a fluffy and flavorful treat. Here’s what you need: - 2 cups all-purpose flour - 1 cup granulated sugar - 2 teaspoons baking powder - 1/2 teaspoon baking soda - 1/2 teaspoon salt - 1 teaspoon ground cinnamon - 1/2 cup unsalted butter, softened - 1 large egg - 1 teaspoon vanilla extract - 1 cup buttermilk - 1/2 cup brown sugar - 1 tablespoon ground cinnamon (for swirl) - 1/4 cup chopped walnuts (optional) Each ingredient plays a key role. The all-purpose flour gives the muffins structure. Sugar adds sweetness and helps with browning. Baking powder and baking soda make the muffins rise. Salt enhances the flavors. Ground cinnamon is the star, bringing warmth and spice. Butter adds richness, while buttermilk keeps the muffins moist and tender. The egg helps bind everything together. The brown sugar and extra cinnamon create that delightful swirl. Walnuts give a nice crunch if you choose to add them. By using fresh and quality ingredients, you ensure the best flavor. Each bite bursts with cinnamon goodness. You will love how these muffins brighten up your morning or snack time. {{ingredient_image_2}} - Preheat oven to 350°F (175°C). - Line muffin tin with paper liners or grease. First, set your oven to 350°F (175°C). This heat helps the muffins rise well. Next, prepare your muffin tin. You can use paper liners or grease the cups with butter. This step keeps the muffins from sticking. - Whisk together flour, sugar, baking powder, baking soda, salt, and cinnamon. In a large bowl, mix the dry ingredients. Take your all-purpose flour, granulated sugar, baking powder, baking soda, salt, and ground cinnamon. Use a whisk to blend them well. This helps the muffins to rise and gives them a great flavor. - Cream softened butter with sugar until fluffy. - Add egg and vanilla, mixing until smooth. In another bowl, cream the softened butter with the sugar. Use a mixer or a spatula. Beat until it looks light and fluffy. This should take about 2-3 minutes. Then, add in the egg and vanilla extract. Mix until everything is smooth and well combined. - Gradually add dry ingredients to butter mixture alternating with buttermilk. Now, take the dry mix and add it to the butter mixture. Do this in three parts. Start and end with the dry mix. Between each part, pour in some buttermilk. Mix gently until combined. Do not overmix; this keeps your muffins light and fluffy. - Combine brown sugar and cinnamon in a small bowl. In a small bowl, mix the packed brown sugar with the tablespoon of ground cinnamon. Stir until the two are evenly combined. This mix adds a sweet, spicy swirl to your muffins. - Fill muffin cups and layer with cinnamon mixture. - Swirl batter and add walnuts (optional). Fill each muffin cup halfway with batter. Then, sprinkle a layer of the cinnamon mixture on top. Next, fill the cups with more batter until they are about three-quarters full. Take a toothpick or a knife and swirl the top layer of batter with the cinnamon mix. If you want, you can add chopped walnuts for extra crunch. - Bake for 18-22 minutes until done. - Cool muffins on a wire rack. Place the muffin tin in your preheated oven. Bake for 18-22 minutes. To check if they are done, insert a toothpick into the center of a muffin. If it comes out clean, they are ready. Let the muffins cool in the pan for about 5 minutes. After that, move them to a wire rack to cool completely. This helps them stay fluffy and tasty. To make light and fluffy muffins, I focus on two key points. First, I avoid overmixing the batter. This helps keep the muffins from becoming dense. I mix until just combined, then stop. Second, I use room temperature ingredients. This helps the butter and egg blend smoothly, which creates a better texture. For a lovely finish, I like to dust the muffins with powdered sugar. It adds a sweet touch without overpowering the flavor. Alternatively, I drizzle a simple glaze made of powdered sugar and milk on top. This adds a nice shine and extra sweetness. Sometimes, muffins can turn out dense. This often happens due to overmixing. If your muffins do not rise well, check the freshness of your baking powder. Old baking powder can lead to flat muffins. Always ensure your ingredients are fresh for the best results. Pro Tips Use Room Temperature Ingredients: Ensure that your butter, egg, and buttermilk are at room temperature before mixing. This helps create a smoother batter and ultimately results in fluffier muffins. Don’t Overmix the Batter: Mix the batter just until the ingredients are combined. Overmixing can lead to tough muffins, so be gentle and stop as soon as you don’t see any dry flour. Customize Your Swirl: Feel free to experiment with different spices like nutmeg or cardamom in the cinnamon swirl mixture, or add chocolate chips for a decadent twist. Check for Doneness: Use a toothpick or cake tester to check if your muffins are done. They should come out clean or with a few crumbs attached, but no wet batter. {{image_4}} You can make your muffins even more exciting. Try adding chocolate chips or blueberries. These sweet bites bring a nice surprise in each muffin. If you want a crunch, experiment with nuts and dried fruits. Chopped walnuts or pecans add great texture and taste. A good glaze makes muffins shine. You can try a lemon glaze for a zesty twist. It adds a fresh taste that pairs well with cinnamon. Cream cheese frosting is another yummy option if you like something sweeter. For extra crunch, top your muffins with streusel. It adds a delightful crispness to every bite. Want to make your muffins healthier? Use whole wheat flour instead of all-purpose flour. This swap adds fiber and nutrients. You can also substitute applesauce for butter. It keeps the muffins moist while cutting down on fat. These small changes can make a big difference! To keep your muffins fresh, store them in an airtight container. This helps retain moisture and flavor. It is best to keep them at room temperature. Avoid the fridge, as this can dry them out. You can freeze muffins for later use. Just wrap each muffin in plastic wrap. Then place them in a freezer bag. This helps avoid freezer burn. When you want to enjoy them, take them out. To thaw, leave them at room temperature for about 1-2 hours. You can also heat them in the microwave for 20-30 seconds. This restores their soft texture. Cinnamon swirl coffee cake muffins stay fresh for about 3-4 days at room temperature. If frozen, they can last up to 3 months. Enjoy them while they are fresh for the best taste! Yes, you can prepare these muffins in advance. Mix the dry ingredients and store them in a sealed bag. You can also mix the wet ingredients and keep them in the fridge. When you are ready to bake, just combine them. This method saves time and keeps the muffins fresh. If you don’t have buttermilk, mix 1 cup of milk with 1 tablespoon of vinegar. Let it sit for about five minutes. This will give you a great substitute. You can also use plain yogurt or sour cream mixed with water as alternatives. To check if the muffins are done, insert a toothpick in the center. If it comes out clean, they are ready. You can also gently press the top of the muffin. If it springs back, it is baked perfectly. Yes, you can use alternatives to all-purpose flour. For a gluten-free option, try almond or coconut flour. You may need to adjust the liquid in the recipe. Whole wheat flour is another good choice for added fiber. Just remember, each flour type may change the muffin's texture. You learned how to make delicious muffins with simple ingredients and steps. We covered techniques for mixing, baking, and custom flavors. Remember to keep an eye on your batter; overmixing can make muffins dense. You can try different toppings or swap ingredients for healthier options. Store your muffins correctly to enjoy them longer. Now, you can create the perfect treat for any occasion. Have fun baking!

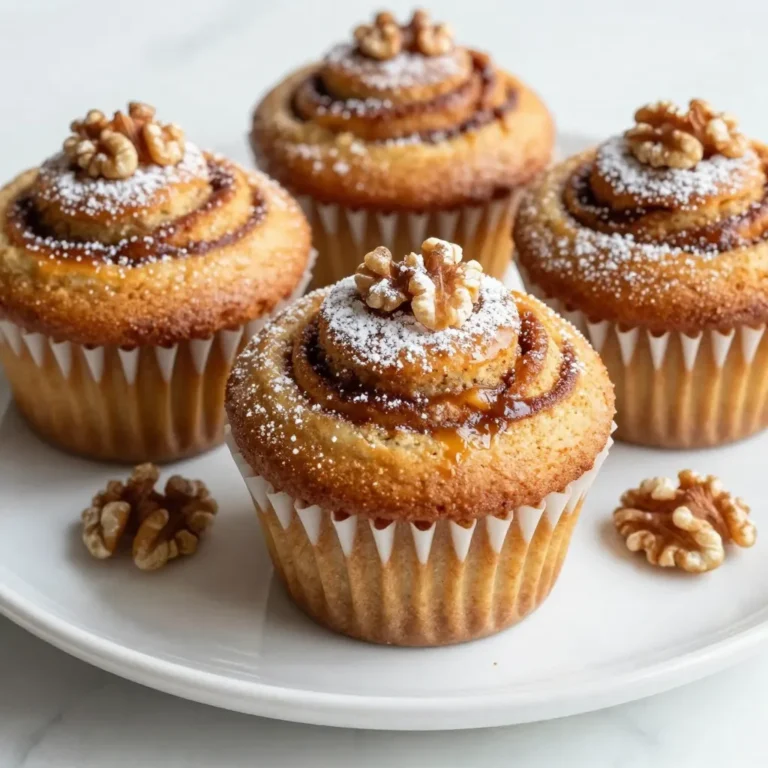
Cinnamon Swirl Coffee Cake Muffins Flavorful Delight

- 1 cup couscous - 1 cup vegetable broth - 1 medium cucumber, diced into small cubes - 1 cup cherry tomatoes, halved for a juicy bite - 1/2 red onion, finely chopped for a hint of sharpness - 1/4 cup freshly chopped parsley for freshness - 1/4 cup freshly chopped mint for a burst of flavor - 1/4 cup feta cheese, crumbled (optional for creaminess) - 1/4 cup extra virgin olive oil - 3 tablespoons freshly squeezed lemon juice - Zest of 1 lemon - Salt and pepper to taste - Medium saucepan - Large mixing bowl - Small bowl for dressing - Fork for fluffing couscous The main ingredients offer a fresh and colorful mix. Couscous provides a light base. The vegetable broth adds flavor right from the start. Fresh vegetables like cucumber, cherry tomatoes, and red onion add crunch and taste. The herbs, parsley, and mint, bring a bright pop. If you like, add feta cheese for some creaminess. For the dressing, olive oil gives richness. Lemon juice and zest add a bright kick. A sprinkle of salt and pepper enhances all the flavors. You will need a medium saucepan to cook the couscous. A large mixing bowl helps combine all the ingredients. A small bowl is for the dressing. Use a fork to fluff the couscous after cooking. With these simple ingredients and tools, you can create a vibrant Lemon Herb Couscous Salad. {{ingredient_image_2}} First, grab a medium saucepan. Pour in 1 cup of vegetable broth and heat it until it boils. Once it bubbles, add 1 cup of couscous and stir gently. Cover the saucepan with a lid and take it off the heat. Let it sit for about 5 minutes. This lets the couscous soak up all the broth. After 5 minutes, fluff the couscous with a fork. This step makes the grains light and airy. Allow it to cool for a few minutes before mixing it with other ingredients. While the couscous cools, wash and prepare your veggies. Dice 1 medium cucumber into small cubes. Halve 1 cup of cherry tomatoes for a fresh burst in every bite. Next, finely chop half of a red onion. For a fresh touch, chop 1/4 cup of parsley and 1/4 cup of mint. These herbs add a lot of flavor and brightness to the salad. In a separate small bowl, whisk together 1/4 cup of extra virgin olive oil, 3 tablespoons of freshly squeezed lemon juice, and the zest of 1 lemon. Add a pinch of salt and pepper. This dressing will bring all the flavors together. Make sure it blends well until it looks smooth. In a large mixing bowl, combine the cooled couscous with the diced cucumber, cherry tomatoes, red onion, parsley, mint, and crumbled feta cheese if you choose to add it. Pour the lemon dressing over everything. Use a spatula to gently toss all the ingredients together. Ensure everything is coated well with the dressing. Now, let the salad rest. This resting time helps the flavors blend nicely. You can let it sit for at least 15 minutes at room temperature. If you want to chill it, pop it in the fridge for a bit. Serving it cold or at room temperature gives the best taste. To avoid clumps in your couscous, follow these steps: - Use vegetable broth to add flavor. - Bring it to a good boil before adding couscous. - Stir the couscous right after you add it. - Cover the pot and let it sit for five minutes. This method gives you fluffy grains. Fluff the couscous with a fork after cooling. This breaks up any clumps and makes it light. For extra flavor, consider these tips: - Add a pinch of salt to the broth. - Mix in a bit of lemon zest while cooking. - You can even toss in some garlic powder for depth. Presentation makes a dish even more appealing. Here are some fun ideas: - Serve it in a colorful bowl to show off the bright veggies. - Use individual bowls for guests, garnished with mint and lemon wedges. - A sprinkle of extra feta cheese on top adds a nice touch. Best accompaniments include grilled chicken or fish. You can also serve it alongside hummus and pita. Thus, creating a full meal that is tasty and healthy. You can easily customize this salad to fit your tastes. Here are some ideas: - For a different grain, try quinoa or orzo instead of couscous. - Swap out the cucumber for bell peppers for crunch. - Use basil or cilantro instead of parsley and mint for a twist. If you have dietary needs, make these adjustments: - Omit feta for a dairy-free version. - Add chickpeas for protein if you want a vegetarian option. These small changes can make the salad yours while keeping it fresh and vibrant. Pro Tips Chill the Salad: For even better flavor, let the salad sit in the refrigerator for at least 30 minutes before serving. This allows the ingredients to marinate and blend beautifully. Customize Your Veggies: Feel free to add or substitute other veggies like bell peppers, radishes, or even roasted zucchini to enhance the texture and flavor of your salad. Herb Substitution: If fresh herbs are not available, you can use dried herbs. However, reduce the quantity as dried herbs are more concentrated in flavor. Make It a Meal: Add grilled chicken, chickpeas, or shrimp for a heartier version of this salad, turning it into a complete meal. {{image_4}} You can make your lemon herb couscous salad more filling by adding protein. Two great options are chickpeas and grilled chicken. - Chickpeas: They add a nice texture and boost fiber. Use one cup of canned chickpeas, drained and rinsed. - Grilled Chicken: This adds a savory touch. Dice one grilled chicken breast and mix it in for heartiness. Changing your ingredients based on the season keeps the salad fresh. - Spring: Add asparagus or peas for a sweet crunch. - Summer: Use ripe peaches or corn for a juicy twist. - Fall: Try adding roasted butternut squash for warmth and color. - Winter: Incorporate pomegranate seeds for a pop of flavor. Spices can take your salad to the next level. - Cumin: Adds a warm, earthy taste. Just a pinch can do wonders. - Paprika: Gives a hint of smokiness. Use it sparingly for a nice balance. - Red pepper flakes: For those who like heat, sprinkle some in for a spicy kick. These variations allow you to enjoy this salad in many ways, making it a great choice for any meal! To keep your Lemon Herb Couscous Salad fresh, store leftovers in an airtight container. Place it in the fridge. This will help maintain its taste and texture. It stays good for about 3 to 5 days. Before eating, check for any off smells or changes in texture. If it looks or smells funny, toss it out. If you want to save it for later, you can freeze couscous salad. First, make sure it’s completely cool. Then, portion it into freezer-safe bags. Remove as much air as you can. It can last in the freezer for up to 3 months. When you’re ready to eat, just thaw it in the fridge overnight. To reheat the salad, use the microwave. Warm it up for short bursts, about 30 seconds at a time. Stir it after each burst. This helps it heat evenly. If it seems dry, add a splash of vegetable broth or lemon juice. This keeps the flavor and texture nice. Avoid reheating more than once to keep it fresh. Yes, you can make this salad ahead. Prepare it a day before serving. This gives time for all the flavors to mix well. Store it in an airtight container in the fridge. If you want to swap couscous, try quinoa or orzo. Both options have a nice texture. Quinoa adds protein, and orzo has a fun shape. They both work well with the salad. To make a gluten-free version, use quinoa instead of couscous. Quinoa is naturally gluten-free. Check labels on store-bought broth to ensure it is gluten-free too. This salad lasts about 3 days in the fridge. Keep it in an airtight container. If the veggies start to lose crunch, it’s time to eat it! This blog post covered how to make a delicious couscous salad. We looked closely at key ingredients, helpful tools, and easy steps to cook and combine them. With tips on storage and variations, you can customize this dish to fit your taste. In my experience, cooking should be fun and rewarding. I hope you try this couscous salad. Enjoy exploring new flavors! You’ll love how simple it is to make.

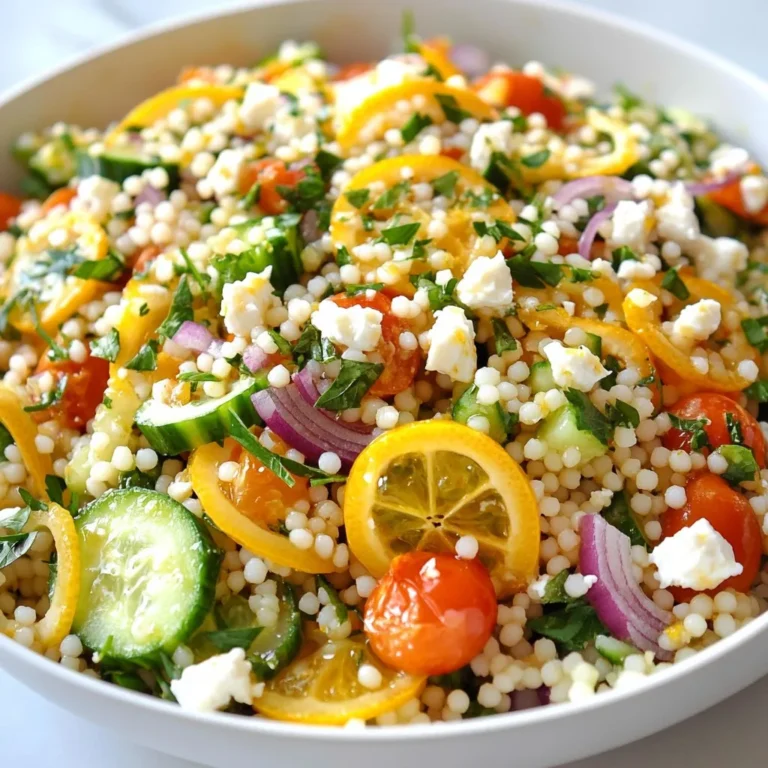
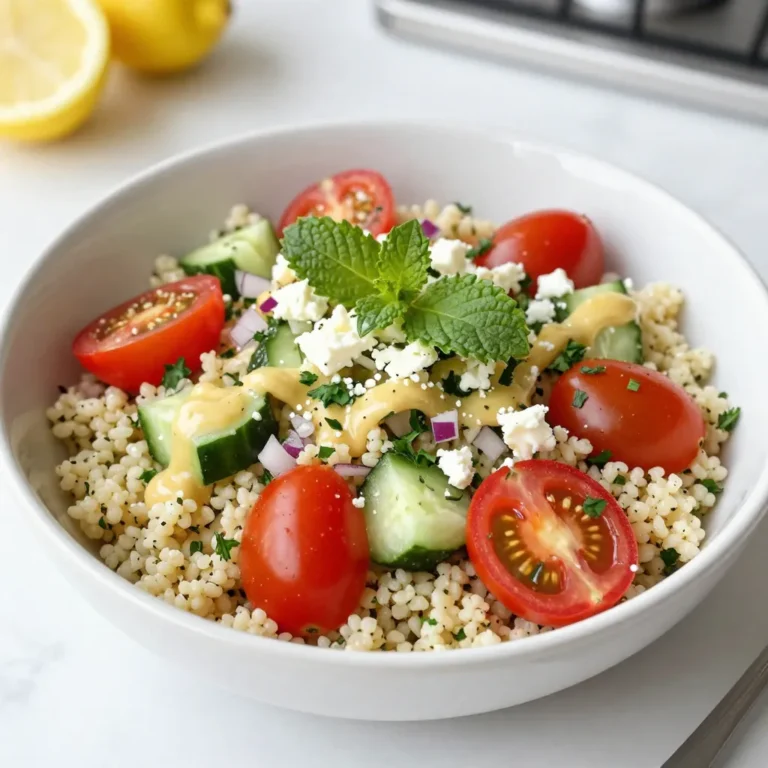
Lemon Herb Couscous Salad Fresh and Healthy Delight

- 4 medium zucchinis - 1 cup fresh basil leaves - 1/4 cup pine nuts - 1/4 cup grated Parmesan cheese - 2 cloves garlic, minced - 1/4 cup extra-virgin olive oil - Salt and freshly ground black pepper to taste - Cherry tomatoes, halved (for garnish) - Additional grated Parmesan cheese, for serving To make Pesto Parmesan Zucchini Noodles, you need key ingredients. First, grab four medium zucchinis. These will become your noodles, or zoodles, when you spiralize them. Next is fresh basil. You need one cup of these fragrant leaves for the pesto. Pine nuts add richness and a nice crunch. You will want a quarter cup of them. Parmesan cheese is essential for flavor. Use a quarter cup, grated, for the pesto and more for garnish. Don't forget garlic! Two cloves, minced, will give the dish great depth. Extra-virgin olive oil helps blend the pesto. You’ll need a quarter cup of this golden liquid. Season with salt and freshly ground black pepper to taste. Lastly, cherry tomatoes, halved, make a lovely garnish. With these ingredients, you are ready to create a tasty dish. Each one plays a role in making your meal fresh and delicious. Enjoy the process, and let the flavors shine! {{ingredient_image_2}} First, you need to turn the zucchinis into noodles. A spiralizer works best for this task. If you don’t have one, a vegetable peeler is a good option too. You can create long, ribbon-like strips with it. After slicing the zucchinis, place them in a colander. Lightly sprinkle some salt on them. This step helps pull out extra moisture. Let them sit for 10 to 15 minutes. This will help keep your dish from getting soggy. Now, let’s make the pesto. Grab your food processor and add the fresh basil leaves. Next, toss in the pine nuts, minced garlic, and grated Parmesan cheese. Pulse these ingredients until they are finely chopped. With the processor still running, slowly drizzle in the extra-virgin olive oil. This will help achieve a smooth and creamy consistency. Taste your pesto and add salt and freshly ground black pepper to suit your preference. Once the zucchini noodles have drained, give them a quick rinse in cold water. This removes excess salt. Pat them dry with paper towels. In a large mixing bowl, combine the zucchini noodles and your fresh pesto. Toss them gently until the noodles are evenly coated. Heat a large skillet over medium heat. Add the pesto-coated zucchini noodles. Sauté them for about 2 to 3 minutes. You want to warm them through while keeping a nice crunch. Be careful not to overcook them, or they will turn mushy. Now it’s time to plate your dish! Serve the zucchini noodles on individual plates. Garnish each serving with halved cherry tomatoes for color and flavor. Don’t forget to sprinkle more grated Parmesan cheese on top. This adds a nice touch to both flavor and presentation. Enjoy your fresh and vibrant meal! To keep your zucchini noodles from getting soggy, draining is key. After you spiralize or peel the zucchinis, sprinkle them with salt. This step helps draw out moisture. Let the noodles rest in a colander for 10-15 minutes. You’ll see water collect underneath. Rinse the noodles with cold water and pat them dry. This process makes sure your dish stays crisp and tasty. You can boost the flavor of your pesto Parmesan zucchini noodles with extra herbs and spices. Try adding fresh parsley or cilantro for a twist. A pinch of red pepper flakes can give it a nice kick. If you're feeling adventurous, add some lemon zest for brightness. These small changes can lift the dish to new heights. Creating a great pesto is easy and fun. If you run out of pine nuts, use walnuts or sunflower seeds instead. For a dairy-free option, swap the Parmesan with nutritional yeast. Store any extra pesto in an airtight container. You can keep it in the fridge for up to a week. Just drizzle a little olive oil on top to keep it fresh. This way, you can enjoy your homemade pesto longer. Pro Tips Choose Fresh Zucchini: Select firm, vibrant zucchinis for the best flavor and texture. They should feel heavy for their size and have a smooth, unblemished skin. Custom Pesto Variations: Experiment with different nuts or cheese in your pesto. Walnuts or cashews and pecorino cheese can give unique flavors to the dish. Cooking Time Matters: Keep a close eye on the zucchini noodles while sautéing. Aim for just 2-3 minutes to retain their crunch and avoid a mushy texture. Serving Suggestions: For added freshness, consider topping your dish with lemon zest or a drizzle of balsamic glaze just before serving. {{image_4}} You can add proteins to your dish for extra flavor. Chicken or shrimp pairs well with zucchini noodles. Simply cook the protein in a skillet before adding the noodles. You can also mix in more vegetables. Bell peppers, spinach, or broccoli enhance both taste and color. Sauté these veggies for a few minutes before adding the zucchini noodles. If you avoid gluten, this dish is already gluten-free. Zucchini noodles are a great substitute for pasta. For vegan options, swap the Parmesan cheese with nutritional yeast or a nut-based cheese. This keeps the rich flavor while making it plant-based. You can also make a vegan pesto using walnuts and basil without cheese. To store leftover zucchini noodles, place them in an airtight container. Make sure they are cool before sealing. Keep them in the fridge for up to 2 days. Zucchini noodles lose their crunch, so try to eat them fresh. For the pesto, place it in a separate container. Cover it tightly with plastic wrap. Press the wrap directly onto the surface to keep air out. Pesto stays fresh for about a week in the fridge. When reheating zucchini noodles, avoid the microwave. It makes them soggy. Instead, use a skillet over low heat. Add a splash of olive oil to help maintain texture. Heat for 2-3 minutes until warmed through. For the pesto, stir it into the noodles while reheating. This ensures each bite is tasty and fresh. Enjoy your meal! Zucchini noodles, or zoodles, are long strands made from zucchini. They serve as a healthy, low-carb substitute for pasta. You can enjoy them raw or cooked. Zoodles absorb sauces well, making them perfect for dishes like Pesto Parmesan Zucchini Noodles. Yes, store-bought pesto is a great time-saver. It can save you time while still adding flavor. Look for fresh or organic options for the best taste. Just remember to adjust the salt since some brands are saltier than homemade. If you do not have a spiralizer, use a vegetable peeler. Simply peel the zucchini into thin, flat ribbons. You can also use a box grater to create noodle-like strips. Both methods work well and create a fun texture. You can serve Pesto Parmesan Zucchini Noodles with grilled chicken or shrimp for added protein. A fresh salad or some crusty bread also pairs nicely. For a boost of flavor, consider adding toasted pine nuts or a sprinkle of crushed red pepper. This blog covered making delicious pesto parmesan zucchini noodles. You learned about the key ingredients, step-by-step instructions, tips, and variations. With this recipe, you can create a tasty meal that fits many diets. Proper storage and reheating keep your dish fresh, too. Remember, cooking is fun. Experiment with flavors and enjoy your culinary journey. Pesto parmesan zucchini noodles offer a healthy and satisfying meal. Dive into this recipe today, and impress your family or friends!

Pesto Parmesan Zucchini Noodles Quick and Easy Dish

- 1 cup graham cracker crumbs - 1/4 cup granulated sugar - 1/2 cup unsalted butter, melted The crust forms the base of the caramel apple cheesecake bars. I love using graham cracker crumbs for a sweet and crunchy base. The sugar adds a touch of sweetness, while melted butter binds the crumbs together. When mixed, they should feel like wet sand before pressing it into your pan. - 16 oz cream cheese, softened to room temperature - 1/2 cup granulated sugar - 2 large eggs - 1 tsp vanilla extract - 1/2 teaspoon ground cinnamon - 1 medium apple (preferably Granny Smith), peeled and diced into small pieces The cheesecake filling is rich and creamy. Cream cheese is the star ingredient, giving it a smooth texture. Sugar sweetens the mix, while eggs help it set. I always add vanilla extract for flavor and a hint of cinnamon for warmth. Don't forget to fold in diced apples; they add freshness and a nice bite. - 1/2 cup caramel sauce (store-bought or homemade) - 1/4 cup chopped pecans (optional, for added crunch) The caramel topping is what truly elevates these bars. You can use store-bought caramel for ease or make your own for a special touch. The pecans add a delightful crunch, but they're optional. Drizzling caramel over the chilled bars makes each bite a sweet joy. {{ingredient_image_2}} First, set your oven to 325°F (160°C). This temperature helps the cheesecake bake evenly. Line an 8x8 inch baking pan with parchment paper. Allow some paper to hang over the sides. This makes it easy to lift the bars out later. In a medium bowl, mix together: - 1 cup graham cracker crumbs - 1/4 cup granulated sugar - 1/2 cup unsalted butter, melted Stir until it looks like wet sand. Press this mixture into the bottom of the baking pan. Make sure it's even and firm. Place the pan in your preheated oven. Bake for about 10 minutes, until it turns light golden brown. After baking, let it cool while you make the filling. In a large bowl, use an electric mixer to beat together: - 16 oz cream cheese, softened - 1/2 cup granulated sugar Mix these until smooth and creamy, around 2-3 minutes. Then, add in 2 large eggs, one at a time. Mix well after each egg. Add 1 tsp vanilla extract and 1/2 teaspoon ground cinnamon. Now, fold in 1 medium apple, peeled and diced. I prefer Granny Smith apples for a tart bite. Make sure the apple pieces spread evenly in the batter. Gently pour the cheesecake mixture over the cooled crust. Smooth it out with a spatula. Tap the pan on the counter to remove any air bubbles. Return it to the oven and bake for 25-30 minutes. The center should be set but still jiggle slightly. After baking, turn off the oven. Leave the cheesecake inside for about an hour with the door slightly open. This helps prevent cracks. Once cooled, move the pan to the fridge. Chill for at least 3 hours or overnight. When you're ready to serve, take the bars out of the fridge. Drizzle 1/2 cup of caramel sauce over the top. If you like, sprinkle 1/4 cup of chopped pecans on top for extra crunch. Use the parchment paper to lift the cheesecake out of the pan. Cut it into squares. Serve these delicious bars chilled or at room temperature. Enjoy your rich and creamy treat! To get the best texture in your caramel apple cheesecake bars, follow these steps: - Use room temperature cream cheese: This helps create a smooth and creamy filling. Cold cream cheese leads to lumps. - Don’t overmix: Mix just until combined. Too much mixing can make the cheesecake dense. - Chill the bars properly: After baking, let them cool before chilling. This helps them set well. If you have dietary needs, here are some easy swaps: - Gluten-free crust: Use gluten-free graham cracker crumbs for the crust. - Dairy-free option: Substitute cream cheese with vegan cream cheese. - Egg replacements: Use flax eggs as a substitute. Mix 1 tablespoon of flaxseed meal with 2.5 tablespoons of water for each egg. A great look adds to the taste! Here’s how to present your cheesecake bars: - Serve on a nice platter: Choose a decorative plate for an elegant touch. - Add extra caramel: Place a small bowl of caramel sauce beside the bars for drizzling. - Garnish with apple slices: A few thin apple slices on top can enhance the look. A sprinkle of cinnamon is also nice! Pro Tips Choose the Right Apple: For the best flavor and texture, use tart apples like Granny Smith. They provide a nice contrast to the sweetness of the caramel and cheesecake. Soften Cream Cheese Properly: Make sure your cream cheese is at room temperature before mixing. This ensures a smooth and creamy filling without lumps. Tap to Remove Air Bubbles: After pouring the cheesecake mixture over the crust, lightly tap the pan on the countertop to release any air bubbles, ensuring a perfect texture. Chill Overnight for Best Results: While 3 hours of chilling is sufficient, letting the bars sit overnight in the fridge enhances their flavor and texture, making them even more delightful. {{image_4}} You can easily make these caramel apple cheesecake bars nut-free. Simply skip the pecans in the topping. This keeps them safe for those with nut allergies. If you want extra crunch, try using seeds instead. Sunflower seeds or pumpkin seeds work well. They add a nice texture without the nut risk. To make these bars gluten-free, swap out the graham cracker crumbs. Use gluten-free graham crackers or almond flour as a base for the crust. Make sure to check all other ingredients for gluten. This way, everyone can enjoy these delicious bars without worry. You can boost the flavor of these bars in fun ways. Try adding a pinch of nutmeg along with the cinnamon for more warmth. You could also mix in some caramel bits into the filling. This adds little pockets of gooey caramel. If you love spice, consider adding a touch of ginger or cardamom. These flavors pair well with apple and caramel. Store your caramel apple cheesecake bars in an airtight container. This keeps them fresh and moist. Place parchment paper between layers to prevent sticking. Always let them cool completely before storing. This helps avoid soggy bars. You can keep these cheesecake bars in the fridge for up to five days. Make sure to cover them well. They taste great cold or at room temperature. If you notice any change in smell or texture, it’s best to toss them. You can freeze these cheesecake bars for up to three months. Cut them into squares before freezing. Wrap each piece tightly in plastic wrap, then place them in a freezer bag. Thaw them in the fridge when you're ready to enjoy. This way, you’ll have a tasty treat ready anytime! Yes, you can! While I love Granny Smith apples for their tartness, you can choose any apple you like. Honeycrisp, Golden Delicious, or Fuji apples work well too. Each type gives a unique flavor to the bars. Just make sure to peel and dice them into small pieces. Making homemade caramel sauce is easy! Here’s a simple method: - In a saucepan, combine 1 cup of granulated sugar and 1/4 cup of water. - Heat over medium heat until the sugar dissolves. - Let it boil without stirring until it turns a deep amber color. - Remove from heat and carefully add 1/2 cup of heavy cream. Be cautious, as it will bubble up. - Stir until smooth and add a pinch of salt for flavor. Let it cool before drizzling over your cheesecake bars for a rich taste. Absolutely! You can make these bars a day or two ahead. After baking and chilling, cover them well and store them in the fridge. This makes them perfect for parties or potlucks. Just drizzle the caramel on top right before serving for the best flavor. This blog post covered how to make tasty cheesecake bars. We looked at key ingredients for the crust, filling, and caramel topping. Then, we followed easy steps to bake and chill these delicious bars. I shared tips for perfect texture and variations for dietary needs. You also learned the best ways to store and serve them. Enjoying these treats is simple and fun. You can customize them to fit your tastes. Now it's time to get cooking!

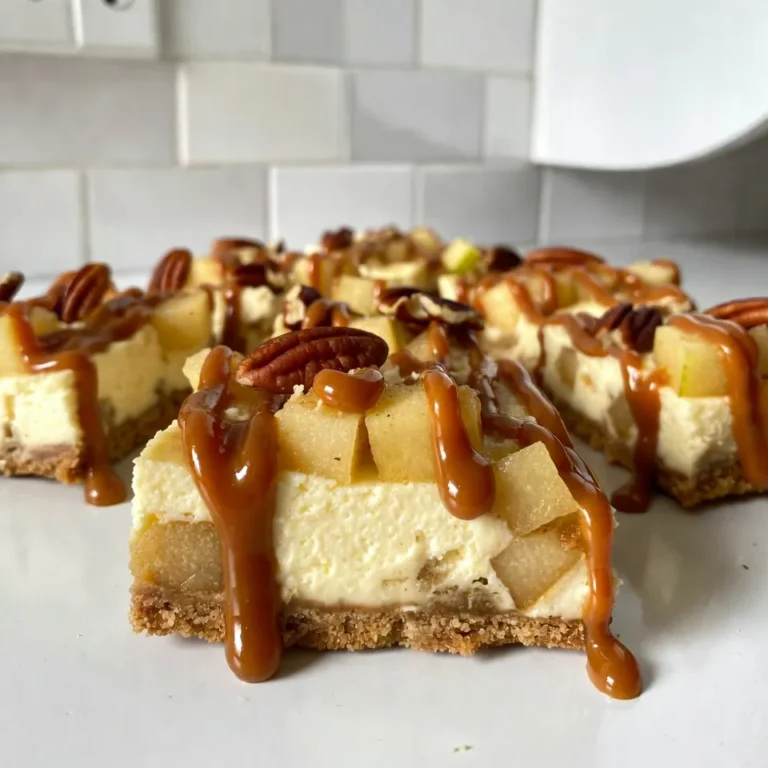
Caramel Apple Cheesecake Bars Rich and Creamy Delight

To make a tasty Lemon Herb Couscous Salad, you need these key ingredients: - 1 cup couscous - 1 1/4 cups vegetable broth (or water) - 1 cup cherry tomatoes, halved - 1 cucumber, diced - 1/2 red onion, finely chopped - 1 cup fresh parsley, finely chopped - 1/2 cup fresh mint, finely chopped - Zest and juice of 1 large lemon - 3 tablespoons olive oil - Salt and pepper to taste - 1/4 cup feta cheese, crumbled (optional) These ingredients come together to create a flavorful dish that is fresh and bright. Want to enhance this salad even more? Here are some optional ingredients you can use: - 1 bell pepper, diced - 1 avocado, diced - A handful of olives, sliced - A pinch of chili flakes for heat These additions can bring new flavors and textures to your salad. If you don’t have some ingredients, don’t worry! Here are simple substitutions you can use: - Use quinoa instead of couscous for a gluten-free option. - Swap vegetable broth for chicken broth for added flavor. - Try different herbs like basil or cilantro instead of parsley and mint. - Use lime juice instead of lemon juice for a citrus twist. These swaps allow you to customize the salad to suit your taste and what you have on hand. {{ingredient_image_2}} Start by boiling 1 1/4 cups of vegetable broth in a medium pot. Once it boils, remove the pot from the heat. Stir in 1 cup of couscous, making sure it’s fully covered. Cover the pot with a lid and let it sit for 5 minutes. This helps the couscous absorb the liquid. After 5 minutes, use a fork to fluff the couscous. This step makes it light and fluffy. Let it cool for a bit so it won’t warm up the veggies. In a large bowl, add 1 cup of halved cherry tomatoes, 1 diced cucumber, and 1/2 finely chopped red onion. Toss these together gently. This mix adds color and crunch to your salad. You can also add 1 cup of fresh parsley and 1/2 cup of fresh mint later. These herbs make the dish fragrant and fresh. Now it’s time to combine everything. Fold the cooled couscous into the vegetable mix. Make sure all the flavors blend well. Next, grab a small bowl. Squeeze the juice of 1 large lemon into it. Add its zest, 3 tablespoons of olive oil, salt, and pepper. Whisk this dressing until it’s smooth. Drizzle it over the salad and toss it gently. If you like, sprinkle 1/4 cup of crumbled feta cheese on top for a tasty finish. Enjoy your Lemon Herb Couscous Salad! To fluff your couscous just right, follow these steps. After cooking, let it rest for 5 minutes. This allows it to absorb all the liquid. Then, grab a fork and gently fluff it. Use the fork to separate any clumps. This method keeps the couscous light and airy. Using fresh veggies makes your salad vibrant and tasty. Always choose firm tomatoes and crisp cucumbers. They add texture and flavor. Wash them well before cutting. For the red onion, chop it finely. This helps spread the flavor evenly. Fresh herbs like parsley and mint should be bright and fragrant. Chop them just before adding to keep them fresh. Presentation matters in any dish. Serve your salad in a large, colorful bowl. This makes it eye-catching. For a nice touch, add sprigs of fresh herbs on top. Lemon wedges around the bowl add a pop of color. This not only looks great but also gives a hint of flavor when served. Pro Tips Use Fresh Herbs: Fresh parsley and mint elevate the flavor of the salad; don’t substitute with dried herbs for the best taste. Chill Before Serving: Allow the salad to chill in the refrigerator for at least 30 minutes before serving to enhance the flavors. Customize Your Veggies: Feel free to add other vegetables like bell peppers or radishes for added crunch and color. Perfect Lemon Zest: Use a microplane to zest the lemon for a finer texture and more intense flavor in your dressing. {{image_4}} You can easily boost the protein in your Lemon Herb Couscous Salad. Adding grilled chicken or shrimp makes it heartier. You can also use chickpeas for a tasty vegetarian option. Simply toss in about one cup of cooked protein. This change adds flavor and keeps you full longer. Feel free to play with the herbs in this salad. Basil or cilantro can add a new twist. Dill gives a fresh, bright taste that pairs well with lemon. You might also try using lemon balm for a unique flavor. Mix and match to find your favorite combinations. Adapt this salad to the seasons by changing the veggies. In summer, add sweet corn or bell peppers for color. In fall, try roasted squash or apples for a warm touch. Use whatever is fresh and in season to keep the dish vibrant and flavorful. This way, you enjoy the best ingredients all year round. After enjoying Lemon Herb Couscous Salad, you may have some leftovers. It's important to store them well to keep the flavors fresh. First, let the salad cool to room temperature. Then, place it in an airtight container. This helps to lock in moisture and prevents the salad from drying out. You can keep it in the fridge for up to three days. Make sure to check for any signs of spoilage before eating. For the best storage, use glass containers or BPA-free plastic ones. Glass is great because it doesn't stain and is easy to clean. Choose a container that fits the amount of salad you have. If you have a large batch, use a bigger container. If you have smaller servings, divide them into smaller containers. This way, you can grab a portion easily. Freezing Lemon Herb Couscous Salad is not the best option. The fresh veggies and herbs may lose their crunch and flavor when thawed. However, if you want to freeze it, leave out the fresh ingredients like tomatoes and cucumber. Cooked couscous can freeze well. Store it in a freezer-safe bag or container. Just remember to use it within three months for the best taste. When you're ready to eat, thaw it overnight in the fridge and add fresh veggies before serving. Yes, you can make Lemon Herb Couscous Salad ahead of time. It tastes great after sitting for a few hours. You can prepare it in the morning for lunch or dinner. Just cover it and store it in the fridge. This salad can last up to three days. The flavors will blend nicely as it chills. You can serve this salad with many dishes. It goes well with grilled chicken or fish. You can also pair it with kebabs or wraps. For a lighter option, serve it with a soup. The fresh flavors of the salad brighten up any meal. No, this salad is not gluten-free. Couscous is made from wheat, which contains gluten. If you need a gluten-free option, use quinoa or rice instead. Both will give you a similar texture and flavor. You can still enjoy a tasty salad without gluten! You learned how to create a tasty Lemon Herb Couscous Salad. We covered main and optional ingredients for great flavor. You now know step-by-step how to prepare and mix it perfectly. Plus, I shared useful tips for serving and storing. This salad is flexible, so feel free to add protein or fresh herbs. Enjoy making this dish, and don't forget to share your favorite variations!

Lemon Herb Couscous Salad Fresh and Flavorful Dish

- 2 cups elbow macaroni - 1 cup cooked chicken, shredded - 1/2 cup celery, finely chopped - 1/2 cup red bell pepper, finely chopped - 1/4 cup red onion, finely chopped - 1/2 cup crumbled blue cheese - 3/4 cup mayonnaise - 1/4 cup hot sauce - 1 tablespoon apple cider vinegar - 1 teaspoon garlic powder - 1 teaspoon onion powder - Salt and pepper to taste - Fresh parsley, chopped To make Spicy Buffalo Chicken Macaroni Salad, you need a mix of simple ingredients. First, start with elbow macaroni and shredded chicken. Cooked chicken from a rotisserie works best. Next, add crunchy vegetables like celery, red bell pepper, and red onion for freshness. Blue cheese adds a savory kick, while mayonnaise makes it creamy. Hot sauce gives the dish its spicy flavor. Apple cider vinegar adds a slight tang. Seasoning with garlic powder, onion powder, salt, and pepper enhances the taste. Finally, fresh parsley will add color and flavor to your salad. Gathering these ingredients makes the process fun and easy. You can adjust the hot sauce based on your spice preference. Enjoy mixing these items to create a delicious dish! {{ingredient_image_2}} Start by boiling a big pot of salted water. The salt helps the pasta taste great. Add 2 cups of elbow macaroni to the water. Cook it for around 8 to 10 minutes. You want it to be al dente, which means it should still have a little bite. Once done, drain the pasta and rinse it with cold water. This stops the cooking and cools it down. Set it aside to cool fully. In a large bowl, mix 3/4 cup of mayonnaise with 1/4 cup of hot sauce. Add 1 tablespoon of apple cider vinegar, 1 teaspoon of garlic powder, and 1 teaspoon of onion powder. Sprinkle in some salt and pepper. Whisk it all together until it is smooth. Taste it to see if you want it spicier. You can add more hot sauce if you like more heat. Now, take your cooled pasta and add it to the sauce. Mix in 1 cup of shredded chicken, 1/2 cup of chopped celery, 1/2 cup of diced red bell pepper, and 1/4 cup of finely chopped red onion. Crumble in 1/2 cup of blue cheese. Use a spatula to gently fold everything together. Make sure every piece is covered in that tasty sauce. Taste it again and adjust salt or hot sauce if you want. Cover your bowl with plastic wrap or put the salad into an airtight container. Chill it in the fridge for at least 30 minutes. This time lets all the flavors mix well. Just before you serve, give the salad a good stir. Serve it in a bowl or a platter. For a nice touch, sprinkle some chopped fresh parsley on top. To cook perfect macaroni, use plenty of salted water. This adds flavor to the pasta. Cook the macaroni just until it's al dente. This means it should be firm but not hard. Drain it right away, then rinse under cold water. This stops the cooking and keeps it firm. To avoid mushy pasta, watch the time. If you cook it too long, it will get soft. Follow the package directions closely. You want it to hold its shape in the salad. Balancing flavors is key to a great salad. Use salt and pepper to enhance taste. The right amount of apple cider vinegar adds tanginess. You can adjust these to fit your liking. For heat, start with a small amount of hot sauce. Mix it in and taste. If you want more spice, add more sauce bit by bit. This way, you control how spicy it gets. When serving your salad, think about the dishware. A colorful bowl adds to the look. You can also serve it on a platter for a fun touch. Garnish your salad with fresh parsley. It adds color and freshness. You can also sprinkle extra blue cheese on top. This makes the dish look even more inviting. Pro Tips Choose the Right Chicken: Using rotisserie chicken not only saves time but also adds a depth of flavor to your salad. Feel free to use grilled or baked chicken for a healthier option. Adjusting the Heat: The amount of hot sauce can be tailored to your preference. Start with less if you're unsure, and gradually increase until you find your perfect spice level. Enhance Creaminess: For an extra creamy texture, consider adding a dollop of Greek yogurt or sour cream to the mayonnaise mixture. This also adds a tangy flavor. Let It Chill: Allowing the salad to chill for at least 30 minutes not only enhances the flavors but also helps the ingredients meld together beautifully, making each bite more delicious. {{image_4}} You can easily swap ingredients based on your needs or preferences. For a gluten-free option, use gluten-free elbow macaroni. These come in various grains like rice or corn, so you can still enjoy this salad without gluten. If you want a different protein, consider using canned chicken or turkey. You could also use diced tofu for a vegetarian option. This keeps the salad flavorful and satisfying without the meat. To make this dish even more exciting, add extra spices or herbs. A pinch of smoked paprika gives a nice smoky flavor. Fresh herbs like cilantro or dill can also boost the taste. Cheese is another way to change things up. If blue cheese isn’t your favorite, try feta or shredded cheddar. Each cheese adds its own twist, making the salad even more delicious. You can serve this salad in many creative ways. Turn it into a wrap by using a large tortilla. Just place the salad in the center and roll it up. This makes a great lunch option. Another fun idea is to serve it as a dip. Just place the salad in a bowl and use crackers or veggie sticks for dipping. This makes it perfect for parties or gatherings. To keep your Spicy Buffalo Chicken Macaroni Salad fresh, store it in the fridge. Use an airtight container for best results. This helps prevent any odors from mixing. Make sure the lid fits tightly. If you don’t have one, a covered bowl works too. Always let the salad cool before sealing it. If you find it needs a refresh, stir it gently. Add a bit more mayonnaise or hot sauce to revive the flavor. Serve it cold for that classic salad taste. Store leftovers in the fridge for up to three days. Keep an eye on it! If it smells off, throw it out. You can store this salad in the fridge for up to three days. Keep it in an airtight container. This helps keep the flavors fresh and the pasta firm. After three days, the salad may lose its taste and texture. Yes, you can make this salad a day before serving. Just follow the recipe and chill it in the fridge. This allows all the flavors to mix well. When you are ready to serve, stir the salad again for even flavor. No, this salad is not gluten-free due to the elbow macaroni. However, you can use gluten-free pasta instead. Many brands offer great options that taste just as good. Always check labels to ensure they meet your needs. Absolutely! You can swap hot sauce for your favorite brand. Some great options include sriracha or a chipotle sauce. Adjust the amount to fit your heat level. Each sauce adds a unique flavor twist to the dish. In this post, we explored how to whip up a delicious Spicy Buffalo Chicken Macaroni Salad. We covered the key ingredients like macaroni, chicken, veggies, and cheese. You learned the step-by-step process from cooking pasta to mixing the sauce, plus chilling for the best flavor. I shared tips for perfecting your salad and suggested fun variations. Remember, this dish shines when customized to your tastes. Enjoy creating your own version!

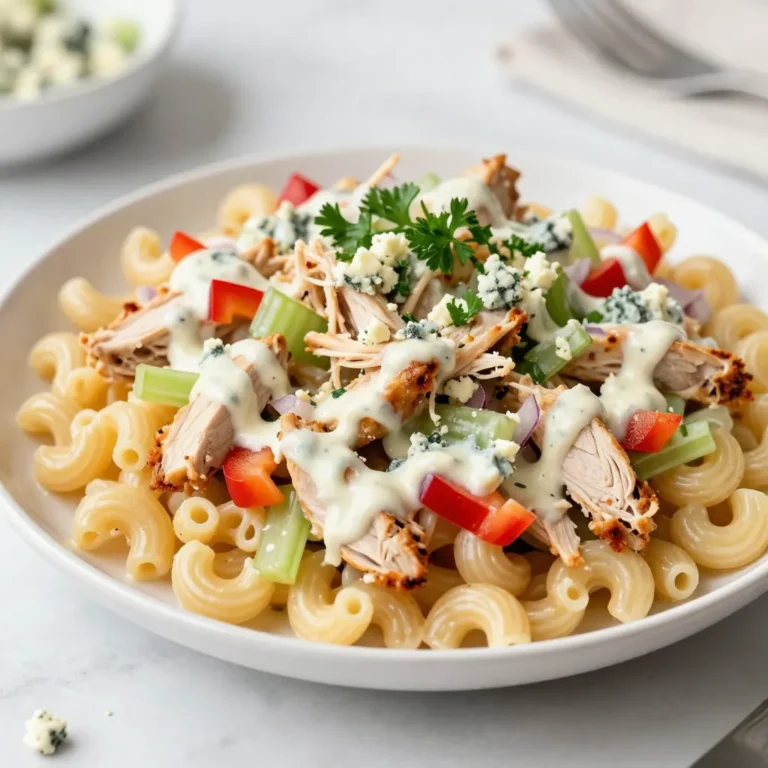
Spicy Buffalo Chicken Macaroni Salad Delightful Dish

To make the best jalapeño popper dip, gather these items: - 8 ounces of cream cheese, softened - 1 cup of sour cream - 1 cup of shredded sharp cheddar cheese - 1 cup of shredded mozzarella cheese - 1 cup of fresh jalapeños, finely chopped - 1/2 cup of crispy cooked and crumbled bacon (optional) - 1 clove of garlic, minced - 1 teaspoon of onion powder - 1/2 teaspoon of smoked paprika - 1/4 teaspoon of freshly cracked black pepper - Optional garnishes: fresh cilantro leaves or minced green onions - Serving options: tortilla chips or slices of baguette This dip has creamy, cheesy goodness. The jalapeños add a nice kick. You can adjust the heat by removing the seeds. The bacon gives a salty crunch, but you can skip it for a lighter dip. You can use fresh ingredients for a better taste. I always recommend sharp cheddar for a stronger flavor. The combination of cheeses creates a smooth texture. When you prepare this dip, you’ll love how easy it is. Just mix everything together, bake, and enjoy. This dish is perfect for parties or game days. {{ingredient_image_2}} First, you need to preheat your oven. Set it to 350°F (175°C). This helps your dip cook evenly and become bubbly. In a medium bowl, mix the softened cream cheese and sour cream. Use a hand mixer or whisk to blend until smooth. No lumps should remain. This creamy base is the heart of the dip. Next, fold in the fun stuff! Add the shredded sharp cheddar, mozzarella, and finely chopped jalapeños. If you like bacon, add the crumbled bacon too. Then, mix in the minced garlic, onion powder, smoked paprika, and black pepper. Stir until everything combines well. Now, transfer your cheesy mixture into a baking dish. An 8x8 inch (20x20 cm) dish works best. Spread it evenly across the bottom. Pop it into your preheated oven and bake for 20-25 minutes. The top should be golden brown and bubbly. When the dip is done, carefully take it out of the oven. Let it cool for a few minutes. This prevents burns. For a fresh touch, garnish with cilantro or green onions if you like. Serve your jalapeño popper dip warm. It pairs well with crunchy tortilla chips or slices of baguette. Each bite is full of cheesy, spicy goodness. Enjoy! You can control the heat by adjusting the jalapeños. Use fresh jalapeños for full spice. If you want less heat, remove the seeds and membranes. For a milder taste, consider using canned jalapeños instead. You can also mix in a bit of diced bell pepper for sweetness without the heat. While sharp cheddar and mozzarella are great, feel free to explore! Creamy fontina adds rich flavor. Pepper jack cheese gives an extra kick. You can also try a blend of cheeses for a unique twist. Always pick cheeses that melt well to keep the dip creamy. For this dip, an 8x8 inch baking dish works best. If you want a thinner layer, use a larger dish. A cast-iron skillet adds a rustic feel and keeps the dip warm. Glass dishes allow you to see the bubbling goodness inside as it bakes. You can prepare the dip ahead of time! Mix all the ingredients and store them in the fridge. Bake it just before serving. This saves time and is perfect for parties. If you have leftovers, store them in an airtight container. Pro Tips Use Fresh Jalapeños: Fresh jalapeños provide the best flavor and a nice crunch. If you prefer a milder dip, be sure to remove the seeds and membranes. Customize Cheese Choices: Feel free to mix in other cheeses such as pepper jack for an extra kick or cream cheese for a creamier texture. Make It Ahead: Prepare the mixture a day in advance and store it in the fridge. Just bake it right before serving for an easy party dish! Presentation Matters: Garnish with fresh herbs or slices of jalapeño before serving to make your dip look as good as it tastes! {{image_4}} You can make your dip even spicier. Start by adding more jalapeños. Use a mix of fresh and pickled jalapeños for more layers of flavor. You can also add diced green chilies or a splash of hot sauce. For extra richness, mix in some cream cheese with herbs or spices. This makes the dip bold and exciting! To make a vegetarian version, skip the bacon. Instead, add more veggies like chopped bell peppers or corn for a sweet crunch. You can also use vegan cheese to keep it plant-based. This dip stays creamy and rich while being friendly for vegetarians. Serve it with fresh veggies or pita chips for a healthy twist. If you want a low-carb dip, there are easy swaps. Replace sour cream with Greek yogurt for a protein boost. You can also use almond flour instead of breadcrumbs if you add any topping. Make sure to check the cheese labels. Many options are low in carbs. This way, you can enjoy the great taste without the extra carbs! To store your jalapeño popper dip, let it cool first. Then, transfer it to an airtight container. It will stay fresh in the fridge for about 3 to 5 days. Make sure to cover it well to keep it from drying out. When you want to enjoy it again, simply take it out of the fridge. You can freeze jalapeño popper dip too! Place the cooled dip in a freezer-safe container. Make sure to leave some space at the top, as it may expand when frozen. It can last for up to 2 months in the freezer. When you're ready to eat it, thaw it in the fridge overnight. Reheat your jalapeño popper dip in the oven or microwave. If using the oven, preheat it to 350°F (175°C) and bake for about 15-20 minutes. This will help it warm evenly. If using a microwave, heat in short bursts, stirring in between, until warm. You want to make sure it's heated through but not too hot. Enjoy that cheesy goodness! You can serve Jalapeño Popper Dip with many tasty options. I recommend using crunchy tortilla chips or slices of baguette. Both options make for great dippers. You can also try veggies like carrots and celery for a fresh crunch. If you store it right, Jalapeño Popper Dip lasts about 3 to 4 days in the fridge. Use an airtight container to keep it fresh. Make sure to let it cool down before sealing it. Yes, you can make this dip ahead of time. Prepare it, and then cover it and chill in the fridge. Bake it right before serving. This makes party prep much easier. Jalapeño Popper Dip can be spicy, but you can control the heat. If you want less spice, remove the seeds from the jalapeños. You can also use fewer jalapeños or swap them for a milder pepper. To make Jalapeño Popper Dip healthier, try using low-fat cream cheese and sour cream. You can also skip the bacon or use turkey bacon. Adding more veggies like bell peppers can boost nutrition without losing flavor. This blog post guides you through making a tasty Jalapeño Popper Dip. You learned the key ingredients, like cream cheese, cheddar, and jalapeños. I shared step-by-step instructions to help you bake it perfectly. We discussed customizing heat levels and offered tips for serving. This dip is fun for parties or a cozy night in. Whether you enjoy it spicy or mild, you can adapt it to your taste. Remember, sharing is part of the joy, so dig in and enjoy with family or friends. Happy dipping!

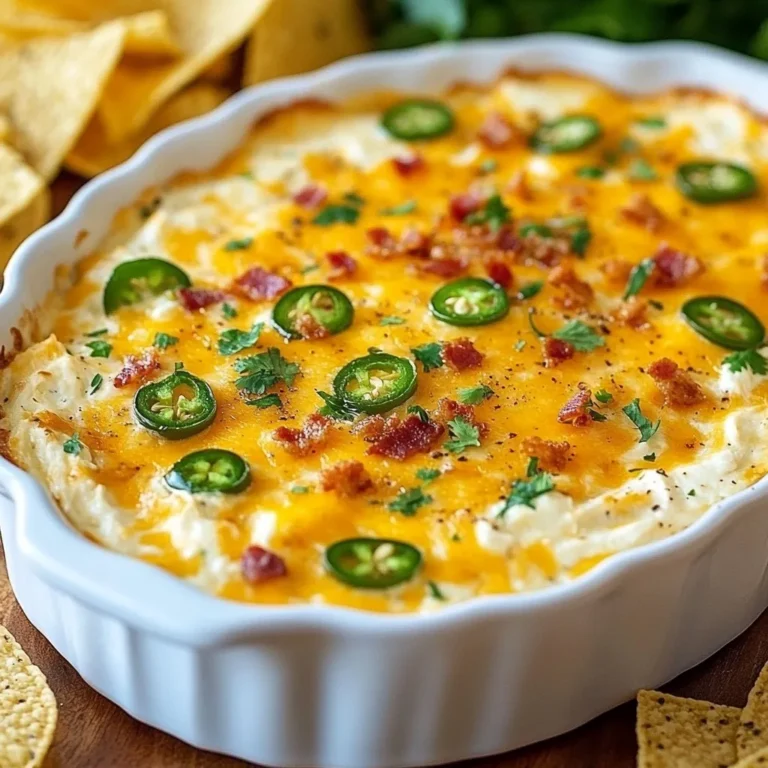
Jalapeño Popper Dip Flavorful and Easy Recipe

PREV 1 … 41 42 43 … 49 NEXT
mini chef kitchen

explore

DessertsDinnerAppetizersDrinks

Our Policies

  • Cookie Policy
  • Copyright Policy
  • Disclaimer
  • GDPR Policy
  • Terms Of Use
Back to Top
  • About
  • Contact Us
  • Privacy Policy
© 2026 mini chef kitchen