FREE DINNER EBOOK! Get your copy!
  • Cookie Policy
  • GDPR Policy
  • Disclaimer
  • Terms Of Use
  • Visit my other site: Fun Cookie Recipes
mini chef kitchen
  • Home
  • Dinner
  • Desserts
  • Drinks
  • Appetizers
  • Contact
  • About
  • Privacy Policy
  • Home
  • Dinner
  • Desserts
  • Drinks
  • Appetizers
  • Contact
  • About
  • Privacy Policy
  • Cookie Policy
  • GDPR Policy
  • Disclaimer
  • Terms Of Use
Visit my other site: Fun Cookie Recipes

HOME / CATEGORIES /

Latest

To make delicious Pumpkin Spice Granola, gather these main ingredients: - 2 cups rolled oats - 1 cup chopped nuts (walnuts or pecans work best) - 1/2 cup pumpkin seeds (pepitas) - 1/2 cup unsweetened shredded coconut - 1/2 cup pure maple syrup - 1/4 cup melted coconut oil - 1 teaspoon pure vanilla extract - 1 tablespoon pumpkin pie spice - 1/2 teaspoon sea salt These ingredients combine to create a crunchy and flavorful snack. The oats provide a good base, while nuts and seeds add healthy fats. You can customize your granola with these fun add-ins: - 1/2 cup dried cranberries or raisins - Dark chocolate chips for a sweet twist - Sunflower seeds for extra crunch - Other spices like cinnamon or nutmeg for more flavor Feel free to mix and match based on your taste. Each add-in brings a unique touch to your granola. This granola not only tastes great but also packs a nutritional punch. Here are some benefits: - Rolled oats: Good source of fiber, helps with digestion. - Nuts: Provide protein and healthy fats, good for heart health. - Pumpkin seeds: Rich in magnesium and zinc, boost energy levels. - Coconut: Contains healthy fats that can support weight loss. - Maple syrup: Natural sweetener with antioxidants. Each ingredient adds its own health benefits, making this granola a smart snack choice. Enjoy it knowing you are treating your body well! {{ingredient_image_2}} Start by preheating your oven to 300°F (150°C). This step is key for even baking. Line a baking sheet with parchment paper. This helps the granola not to stick. In a large mixing bowl, add the rolled oats, chopped nuts, pumpkin seeds, shredded coconut, pumpkin pie spice, and sea salt. Stir well until all dry ingredients mix evenly. This helps to blend flavors and textures. In another bowl, whisk together melted coconut oil, pure maple syrup, and vanilla extract. Mix until smooth. This will create a sticky mixture that binds the granola. Pour the wet mixture over the dry ingredients. Use a spatula to coat everything well. Spread the granola mix evenly on the baking sheet. Press down gently to form clusters. Bake for 25-30 minutes. Stir halfway to ensure even browning. Watch for a golden color and a lovely smell. Once baked, take the granola out and let it cool completely on the baking sheet. It will get crisp as it cools. After cooling, mix in the dried cranberries or raisins. Store your Pumpkin Spice Granola in an airtight container. It stays fresh for up to two weeks, but I bet it won’t last that long! To make your granola crunchy, press it down on the baking sheet. This helps create nice clusters. Bake it low and slow at 300°F. Stir halfway to avoid burning. Let it cool completely, as this helps it crisp up nicely. Try adding a pinch of cinnamon or nutmeg for extra warmth. You can also mix in some dark chocolate chips for a sweet twist. A splash of orange juice can add a zesty kick. Don’t forget to use fresh spices for the best flavor! No nuts? Use seeds like sunflower or flaxseed instead. Want it vegan? Replace honey with maple syrup or agave nectar. For gluten-free, pick certified gluten-free oats. If you’re avoiding coconut, swap coconut oil with another oil like vegetable or canola oil. Pro Tips Choose Quality Ingredients: Selecting high-quality nuts and pure maple syrup will enhance the flavor of your granola significantly. Customize Your Nuts: Feel free to mix and match different nuts, such as almonds or hazelnuts, to create your perfect blend. Store for Freshness: Keep your granola in an airtight container to maintain its crunchiness and flavor for longer. Experiment with Spices: Don’t hesitate to add a pinch of cinnamon or nutmeg for an extra layer of warmth and flavor in your granola. {{image_4}} You can make this granola nut-free by simply leaving out the nuts. Instead, try adding extra pumpkin seeds. They add crunch and nutrition. Sunflower seeds are another great option. They offer a similar texture without the nuts. If you want to change the flavor, try different spices. Cinnamon or nutmeg can add warmth. You can also mix in ginger for a spicy kick. Feel free to experiment with your favorite spices. Just use about the same amount as pumpkin pie spice. You can adjust the sweetness to fit your taste. If you like it sweeter, add more maple syrup. If you prefer less sweetness, reduce the syrup by a quarter cup. You can also swap maple syrup for honey or agave for a different flavor. These options work well in this recipe. To keep your Pumpkin Spice Granola fresh, store it in an airtight container. This helps to lock in flavors and maintain crunchiness. Place the container in a cool, dark spot, like a pantry. Avoid sunlight and heat, as they can make the granola stale. If possible, use a glass jar. It looks nice and helps you see what's inside. Your granola will stay fresh for up to two weeks when stored correctly. After that, it might lose its crunch and flavor. If you want it to last longer, consider freezing it. This way, you can enjoy it later without losing quality. Just make sure to let it thaw before eating. Here are easy ways to store your granola: - Airtight Bags: These are great for space-saving. Just squeeze out the air before sealing. - Glass Jars: They keep your granola fresh and look pretty on your shelf. - Plastic Containers: These are handy if you're packing snacks for on the go. Using these tips will keep your Pumpkin Spice Granola tasty and crunchy for longer! Yes, you can use honey instead of maple syrup. Honey gives a nice sweetness. Just remember, honey may make the granola a bit stickier. You can use butter or another oil, like olive or avocado oil. These options will still help bind the granola. Just melt the butter first before mixing. To make this recipe gluten-free, use certified gluten-free oats. Most oats are naturally gluten-free, but they can be cross-contaminated. Look for brands that ensure no gluten is present. You can find ready-made pumpkin spice granola in many grocery stores. Health food stores often carry a variety. Online retailers also offer options that you can order directly. Yes, this recipe is great for meal prep. You can make a big batch and store it. Just keep it in an airtight container to keep it fresh. Enjoy it for breakfast or as a snack throughout the week! This blog post covered how to create delicious granola from scratch. We explored key ingredients that form the base. I shared step-by-step instructions for mixing and baking. You learned tips for making crunchy clusters and flavorful variations. We also discussed storage methods to keep your granola fresh. In closing, making granola at home is easy and fun. You can customize it to fit your taste. Enjoy creating your perfect blend!

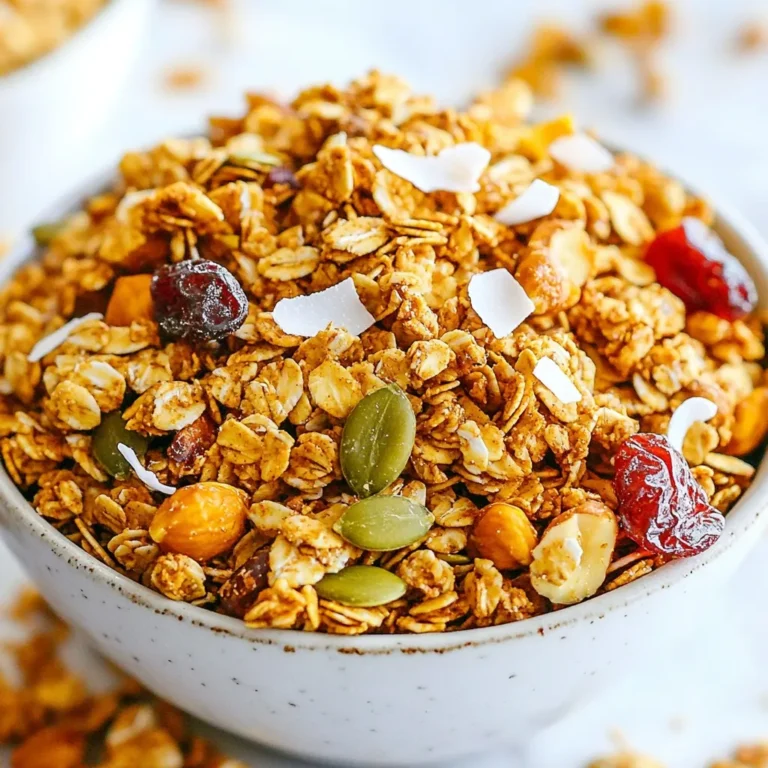
Pumpkin Spice Granola Crunchy and Healthy Snack

- 2 packages of ramen noodles (discard the included seasoning packets) - 2 cups coleslaw mix (a blend of cabbage and carrots) - 1 cup snap peas, trimmed and halved - 1 bell pepper, thinly sliced (choose any color for vibrancy) - 1/2 cup green onions, chopped (both white and green parts) - 1/4 cup vegetable oil - 2 tablespoons soy sauce - 1 tablespoon rice vinegar - 1 tablespoon honey or maple syrup - 1 teaspoon fresh grated ginger - 1/2 cup sliced almonds - 1/4 cup sesame seeds - Salt and pepper to taste To make the Crunchy Ramen Noodle Salad, you need a mix of fresh and vibrant ingredients. Start with ramen noodles, which form the base of this dish. They add a fun texture and absorb flavors well. Next, include a coleslaw mix for crunch. It brings together cabbage and carrots, adding color and nutrition. Snap peas add a sweet crunch. Their bright green color pops in the salad. A bell pepper adds sweetness and color too. You can choose any color you like. Green onions tie it all together with their fresh taste and mild onion flavor. The dressing is simple yet flavorful. Use vegetable oil, soy sauce, rice vinegar, and honey or maple syrup. Fresh grated ginger adds a nice zing. Combine these ingredients for a dressing that enhances all the salad elements. For optional toppings, consider sliced almonds and sesame seeds. They add crunch and a nutty flavor. A sprinkle of salt and pepper brings everything together. This mix of ingredients creates a fresh and flavorful salad that everyone will enjoy! {{ingredient_image_2}} To start, boil water in a large pot. Cook the ramen noodles for about 3-4 minutes. They should become soft but still firm. After cooking, drain the noodles and rinse them under cold water. This stops the cooking process. Set them aside to cool completely. Next, grab a dry skillet and heat it over medium heat. Add the sliced almonds and sesame seeds. Stir them often for about 3-4 minutes. They should turn golden brown and smell great. Stay alert—nuts can burn quickly. Once toasted, remove them from heat and let them cool. In a small bowl, mix vegetable oil, soy sauce, rice vinegar, honey or maple syrup, and grated ginger. Add a pinch of salt and pepper. Whisk these ingredients until smooth. This dressing should balance sweet and salty flavors well. In a large mixing bowl, add the cooled ramen noodles, coleslaw mix, snap peas, bell pepper slices, and chopped green onions. Don’t forget the toasted almonds and sesame seeds! Toss everything gently until evenly mixed. Cooling the noodles helps the salad stay fresh. Now, drizzle your dressing over the salad mixture. Toss gently to coat every ingredient. This helps all flavors blend nicely. Dress the salad just before serving to keep it crisp. For the best taste, cover the salad and chill it for at least 30 minutes. Chilling helps the flavors to mix well. When serving, use a large bowl or individual plates. Top with extra sesame seeds and green onions for a bright look. Enjoy your crunchy ramen noodle salad! - Start with fresh ramen noodles. They keep their crunch well. - Cook the noodles just right. Aim for 3-4 minutes, then rinse them. - Use fresh veggies like snap peas and bell peppers. Freshness adds great texture. - Adjust the soy sauce based on taste. If you like it salty, add more. - Use chili flakes or hot sauce for heat. Spice can enhance the salad's flavor. - Switch up the honey for maple syrup for a different sweetness. - Scale the recipe by adding more or less of each ingredient. - For a meal, add grilled chicken or tofu. It turns a side into a main dish. - If serving as a side, keep the portions smaller. This allows for variety in meals. Pro Tips Use Cold Water for Ramen: After cooking, rinse the noodles under cold water to stop the cooking process. This will help maintain their crunchy texture when mixed with the salad. Customize Your Vegetables: Feel free to swap or add any of your favorite vegetables. Cucumbers, carrots, or even radishes can add a unique twist to the salad. Make Ahead: This salad can be made in advance and stored in the refrigerator. Just keep the dressing separate until you’re ready to serve to maintain the crunchiness. Adjust the Sweetness: Depending on your preference, you can adjust the amount of honey or maple syrup in the dressing. Taste as you go to find your perfect balance! {{image_4}} You can change up the ingredients in your crunchy ramen noodle salad. Instead of the coleslaw mix, try using fresh spinach or kale. Shredded carrots also add a nice crunch. For snap peas, you can use sliced cucumbers or bell peppers. These swaps keep the salad fresh and exciting. When it comes to nuts, sliced almonds are great, but you can also use chopped walnuts or cashews. Each nut brings a different flavor and texture. Seeds like pumpkin or sunflower work well too. Experiment with what you have on hand! If you need a gluten-free option, you can swap the ramen noodles for rice noodles. They still give you that chewy texture you want. Make sure to check the dressing too; use tamari instead of soy sauce for a gluten-free choice. For a vegan option, replace honey with maple syrup. This keeps the sweetness without any animal products. The salad stays just as tasty and satisfying! Using seasonal veggies can make your salad even better. In summer, add fresh tomatoes or corn. In fall, roasted butternut squash or Brussels sprouts can add warmth. Seasonal ingredients often taste better and are easier to find. Don't forget about herbs! Fresh cilantro or basil can brighten the flavor. Just chop them finely and toss them in for a fresh twist. These small changes can make a big difference in how your salad tastes. To keep your crunchy ramen noodle salad fresh, use airtight containers. Glass or plastic containers work well. Store in the fridge for up to three days. If you leave it longer, the noodles may become soggy. You can enjoy this salad cold, but if you want to reheat it, do so gently. Microwave it for 30 seconds at a time. Stir between intervals to check warmth. To maintain the crunch, avoid using high heat. Yes, you can freeze this salad, but it's best to leave out the noodles. To prepare, pack the coleslaw mix, snap peas, and other veggies in a freezer bag. Store for up to three months. When ready to eat, thaw in the fridge and add fresh noodles later. Yes, you can make this salad ahead of time. It tastes even better after sitting. You can prepare it up to 24 hours in advance. Store it in the fridge until you are ready to serve. To keep ramen noodles crunchy, follow these steps: - Use uncooked noodles in the salad. - Rinse them in cold water after cooking. - Avoid adding dressing until serving time. These steps help keep the noodles crisp and tasty. Absolutely! Adding protein makes it more filling. Here are some great options: - Grilled chicken or shrimp - Tofu for a vegetarian option - Hard boiled eggs for extra flavor These proteins blend well with the salad. You can try different dressings for variety. Here are some tasty alternatives: - Peanut dressing for a nutty flavor - Asian sesame dressing for a bold taste - A simple lemon vinaigrette for freshness These dressings will add a new twist to your salad. Yes, this salad is great for meal prep! You can pack it in containers. Just keep the dressing separate until you are ready to eat. This keeps everything fresh and crunchy for your meals. This blog covered delicious ramen salad ingredients, dressings, and cooking steps. You learned how to mix flavors and achieve the perfect crunch. Ramen salads are easy to customize for your taste or dietary needs. Fresh ingredients matter, so choose wisely! Store leftovers properly to keep them tasty. Enjoy your healthy salad and share it with friends. Your kitchen will be the go-to spot for tasty meals!

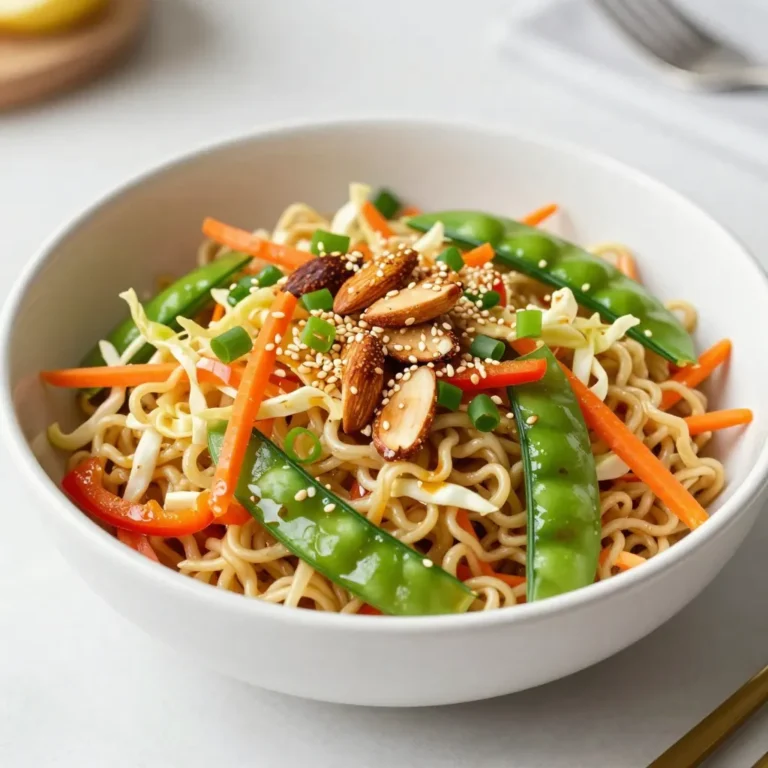
Crunchy Ramen Noodle Salad Fresh and Flavorful Mix

- 2 boneless, skinless chicken breasts - 1 tablespoon olive oil - Juice and zest of 2 limes The main ingredients create a fresh and zesty taste. The chicken breasts hold the marinade well. Olive oil adds moisture, while lime juice and zest bring bright flavors. - 1 teaspoon ground cumin - 1 teaspoon chili powder - 1 teaspoon garlic powder - Salt and pepper, to taste The seasonings pack a punch. Ground cumin adds warmth, while chili powder brings a subtle kick. Garlic powder enhances the overall taste, and salt and pepper balance the flavors. - 8 small corn tortillas - 1 cup shredded red cabbage - 1 ripe avocado, sliced - Fresh cilantro, for garnish - Lime wedges, for serving Taco essentials make each bite special. Corn tortillas are soft and perfect for wrapping. Shredded red cabbage adds crunch, while avocado gives creaminess. Fresh cilantro adds a pop of color and flavor, and lime wedges let you add more zest. {{ingredient_image_2}} First, gather a mixing bowl. Whisk together 1 tablespoon of olive oil, juice and zest of 2 limes, 1 teaspoon of ground cumin, 1 teaspoon of chili powder, 1 teaspoon of garlic powder, and salt and pepper to taste. This mix brings a bright flavor to the chicken. Next, add the chicken breasts. Make sure each piece is well-coated in the marinade. Cover the bowl with plastic wrap and let it marinate. You can leave it at room temperature for 30 minutes or refrigerate it for up to 2 hours. This helps the chicken absorb all the tasty flavors. Now, it’s time to cook the chicken. Preheat your grill or skillet over medium-high heat. You want it hot before adding the chicken. Take the marinated chicken out, shaking off any extra marinade. Place the chicken on the grill or skillet. Cook for about 6-7 minutes on each side. Check the internal temperature; it should reach 165°F (75°C). Once cooked, move the chicken to a cutting board and let it rest for 5 minutes. This keeps the chicken juicy and tender. While the chicken rests, warm up your small corn tortillas. You can do this on the grill or in the skillet for about 30 seconds on each side. They should be soft and slightly toasted. Next, slice the rested chicken into thin, bite-sized pieces against the grain. This ensures that each piece stays tender. Now comes the fun part—assembling the tacos! Start with a warm tortilla. Layer a few slices of the flavorful chicken in the center. Add a generous amount of shredded red cabbage for crunch and a few avocado slices for creaminess. To make your chicken tacos even tastier, you can add some great ingredients to your marinade. Try adding honey or agave for a touch of sweetness. You can also use orange juice for a fruity twist. Fresh herbs, like thyme or oregano, can really boost the flavor too. Using fresh herbs and spices is key. Fresh cilantro adds a bright taste. Try adding some chopped jalapeños for a spicy kick. Fresh lime juice is always a must; it brightens everything up. You can cook the chicken in different ways. Baking is an easy option if you prefer a hands-off method. Just season the chicken and pop it in the oven. Frying gives a nice crispy texture, but it can add extra oil. Grilling the chicken gives it a smoky flavor. It also leaves those beautiful grill marks. Cooking in a skillet can be quicker and easier. Both methods work well; it just depends on what you like best. When serving your tacos, presentation matters! Arrange the tacos neatly on a large platter. Add lime wedges and fresh cilantro in a small bowl on the side. This makes everything look inviting. For sides, consider serving black beans or rice. Both pair well with the zesty chicken. A cool drink, like a lime soda or iced tea, can balance the flavors nicely. Enjoy your meal! Pro Tips Marinate Longer for More Flavor: For the best taste, marinate the chicken for at least 2 hours in the refrigerator. This allows the flavors to penetrate deeply into the meat. Use Fresh Limes: Freshly squeezed lime juice and zest will give your tacos a vibrant, zesty flavor that bottled lime juice cannot replicate. Rest the Chicken: Always let your cooked chicken rest for a few minutes before slicing. This helps the juices redistribute, keeping the meat tender and juicy. Warm Tortillas Properly: Warming tortillas on a skillet or grill enhances their flavor and texture, making them more pliable and enjoyable to eat. {{image_4}} You can switch out chicken for beef or tofu. Beef adds a rich flavor. Use flank steak or ground beef for a hearty option. For a plant-based choice, tofu absorbs the zesty marinade well. Try firm tofu for the best texture. Seafood is another tasty choice for zesty tacos. Shrimp works wonderfully with lime. Just marinate and cook quickly. Fish like tilapia or mahi-mahi also tastes great. Use the same marinade for a fresh twist. For gluten-free tacos, use corn tortillas. They are naturally gluten-free and perfect for everyone. Check labels to ensure they meet your needs. If you want vegan or vegetarian options, use black beans or lentils. These add protein and a nice texture. You can still keep the zesty flavor by using the same marinade. Just skip the chicken and marinate your chosen protein. To add some heat, try jalapeños or a spicy sauce. Fresh jalapeños give a nice crunch and spice. You can also drizzle on hot sauce for extra kick. Switching up toppings and salsas can change the flavor too. Try mango salsa for sweetness or pico de gallo for freshness. Fresh herbs like mint or basil can also add a unique twist. To store leftover chicken, let it cool first. Place it in an airtight container. Refrigerate it right away. Use the chicken within three to four days for best taste. If you want to keep it longer, freeze it. Wrap the chicken tightly in plastic wrap or foil. Then, place it in a freezer bag. It can last up to six months in the freezer. To reheat cooked chicken, use a microwave or a skillet. If using a microwave, cover the chicken with a damp paper towel. This keeps it moist. Heat it in short bursts, checking often. In a skillet, add a splash of water and cover it. This helps the chicken heat evenly. For tortillas, store them in a sealed bag. When ready to eat, warm them again in a skillet. This will keep them fresh and soft. When storing tacos, keep them separate. Store the chicken, tortillas, and toppings in different containers. This helps prevent sogginess. If you have assembled tacos, eat them within a few hours. If you need to store them longer, take them apart. Place the chicken and toppings in separate bags. This way, you can enjoy crisp, fresh tacos later. To check if chicken is done, look for an internal temperature of 165°F (75°C). Use a meat thermometer for accurate readings. The chicken should also have a nice golden brown color. If the juices run clear and there is no pink, it is safe to eat. Yes, you can prepare these tacos ahead of time. Cook the chicken and store it in the fridge for up to 3 days. You can warm the chicken before serving. The tortillas can be heated right before you assemble. This makes meal prep easy and quick! If you don’t have lime, lemon works well too. Orange juice can add sweetness, while grapefruit juice offers a unique twist. Each citrus will change the flavor slightly, but they all add a nice zing to the chicken. You now have all the steps to make tasty chicken tacos. We covered key ingredients, cooking methods, and storage tips. You can customize them with different flavors and make them fit your diet. Enjoy making these tacos for a fun meal or gathering. With practice, you’ll impress everyone with your cooking. It’s easy and delicious! Happy cooking!

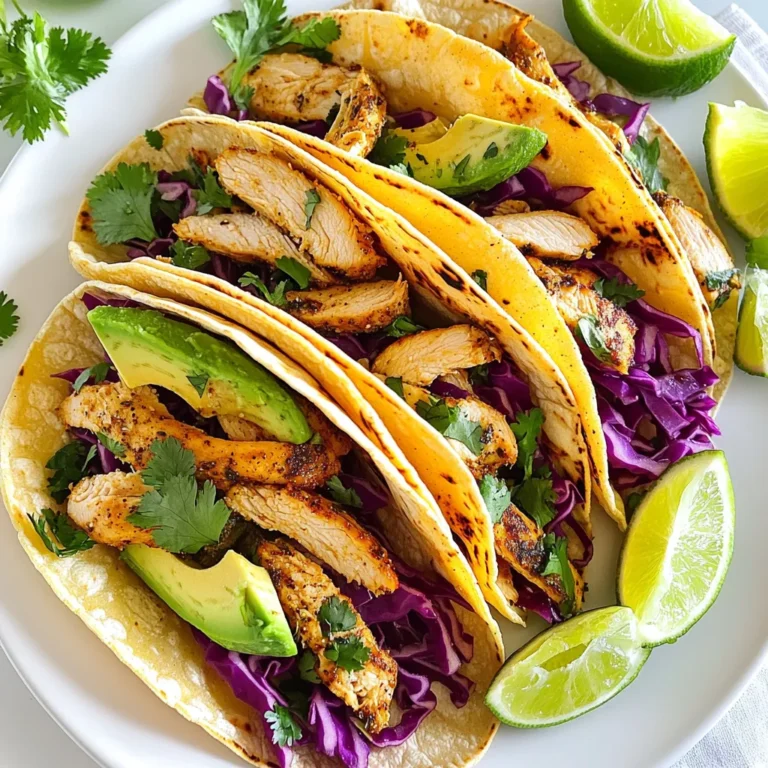
Zesty Lime Chicken Tacos Flavorful and Simple Meal

- 2 cups fresh blueberries - 2 ripe peaches - 1 tablespoon fresh lemon juice To make the best blueberry peach crisp, you need fresh fruit. Blueberries should be plump and juicy. Peaches must be ripe and fragrant. Rinsing the blueberries helps remove dirt. Slice the peaches thinly to ensure even cooking. The lemon juice brightens the flavors and keeps the fruit fresh. - 1 tablespoon honey or maple syrup - 1/2 cup packed brown sugar - 1/2 teaspoon ground cinnamon - 1/4 teaspoon sea salt For sweetness, you can use honey or maple syrup. Both work well in this recipe. Brown sugar adds moisture and a rich flavor. Ground cinnamon gives warmth and depth. A pinch of sea salt balances the sweetness. Each ingredient enhances the taste of the fruit. - 1 cup rolled oats - 1/2 cup all-purpose flour - 1/3 cup cold unsalted butter The topping is key to a great crisp. Rolled oats provide texture and chewiness. All-purpose flour binds the topping together. Using cold butter is crucial. It helps create a nice crumbly texture. Cut the butter into small cubes for easy mixing. The topping should be golden and crisp when baked. {{ingredient_image_2}} - Preheat your oven to 350°F (175°C). This step warms your oven for even baking. - In a medium bowl, combine 2 cups of fresh blueberries and 2 sliced peaches. - Add 1 tablespoon of lemon juice and 1 tablespoon of honey to the fruit. - Gently toss the fruit until it's all coated. - Transfer the fruit mix to an 8x8 inch baking dish. Spread it evenly. - In a large bowl, mix 1 cup of rolled oats, 1/2 cup of flour, 1/2 cup of packed brown sugar, 1/2 teaspoon of cinnamon, and 1/4 teaspoon of salt. - Stir these dry ingredients well to blend them together. - Add 1/3 cup of cold, cubed butter to the bowl. - Use a pastry cutter or your fingers to mix until it looks crumbly. - Evenly sprinkle the crisp topping over the fruit layer in the baking dish. - Place the dish in your preheated oven. - Bake for 30-35 minutes, until the topping is golden brown and the fruit bubbles. - Remove the dish from the oven and let it cool for 10 minutes before serving. Using cold butter is key for a crunchy topping. It helps create small chunks in the mixture. These chunks turn golden and crisp while baking. If you use warm butter, the topping will be flat and soggy. To avoid a soggy bottom, layer the fruit properly. Spread the fruit evenly in the baking dish. Make sure the topping covers all the fruit. This helps seal in the juices while it bakes. Serve your crisp warm for the best taste. Let it cool for about 10 minutes before serving. This helps the juices settle and makes it easier to scoop. For a special touch, add a scoop of vanilla ice cream on top. The warm crisp and cold ice cream create a perfect balance. You can also drizzle a bit of honey on top for extra sweetness. To boost the flavor, try adding nuts or coconut flakes to the topping. Chopped walnuts or pecans add crunch and richness. Coconut flakes bring a tropical twist that pairs well with the fruit. You can also infuse spices to make it unique. Consider adding a pinch of nutmeg or ginger. These spices can elevate the flavor and make your crisp stand out. Pro Tips Choose Ripe Fruits: For the best flavor, select peaches that are slightly soft to the touch and blueberries that are plump and firm. Make it Vegan: Substitute the butter with coconut oil or a plant-based butter to cater to vegan diets while maintaining delicious flavors. Experiment with Spices: Add a pinch of nutmeg or ginger to the oat topping for an extra layer of warmth and flavor. Serving Suggestions: Serve with whipped cream or yogurt in addition to vanilla ice cream for a refreshing twist. {{image_4}} You can easily swap peaches for nectarines or pears. Each fruit brings its own taste to the dish. Nectarines offer a sweet punch, while pears add a soft, juicy texture. If you want more berries, use mixed berries instead of just blueberries. A mix of strawberries, raspberries, and blackberries creates a colorful and flavorful twist. For a vegan option, use plant-based butter in place of regular butter. It keeps the crisp rich and tasty while being dairy-free. If you're gluten-free, opt for alternative flours like almond or oat flour. This change keeps the dish light and enjoyable without gluten. Add lemon zest to brighten the flavor of the crisp. This small change can make a big difference. You can also mix in a dash of almond extract for a nutty flavor. The almond extract adds warmth and depth to the dish, making it even more irresistible. Store your leftover blueberry peach crisp in a covered container. Keep it in the fridge. It stays fresh for about 3 to 4 days. The flavors meld nicely as it cools, making it even tastier the next day. You can freeze your blueberry peach crisp before or after baking. To freeze before baking, wrap it tightly in plastic wrap. Then place it in a freezer bag. If you freeze it after baking, let it cool first. Then wrap and store. It keeps well for about 2-3 months. To thaw, place it in the fridge overnight. You can also let it sit at room temperature for a few hours. To reheat your crisp, preheat your oven to 350°F (175°C). Place the crisp in an oven-safe dish. Warm it for about 15-20 minutes. This keeps the topping crisp and the fruit warm. Avoid microwaving it, as this can make it soggy. Enjoy your tasty dessert warm, perhaps with a scoop of vanilla ice cream! You can tell your crisp is ready by looking for a few signs. First, check the topping. It should be a nice golden brown. Next, look at the fruit. You want to see bubbling juices around the edges. If both look good, your crisp is done! Let it cool for a few minutes before serving. This helps the juices settle. Yes, you can prepare your blueberry peach crisp ahead of time. To do this, follow the steps until you add the topping. Cover the dish with plastic wrap and store it in the fridge. You can bake it the next day. Just add a few extra minutes to the bake time if it's cold from the fridge. If you don't have peaches, you can use other fruits. Nectarines work well and taste similar. You can also use ripe pears for a sweet twist. If you want a berry mix, try using raspberries or strawberries. These alternatives will give your crisp a different flavor but will still be delicious! This blog post shared simple steps to make a tasty blueberry peach crisp. You learned about fresh ingredients, sweeteners, and how to create a perfect topping. I also gave tips on achieving the right texture and serving ideas, plus variations and storage methods. In the end, this dessert is all about fun and creativity. Enjoy each bite, and feel free to experiment with flavors! Making this crisp will surely impress friends and family.

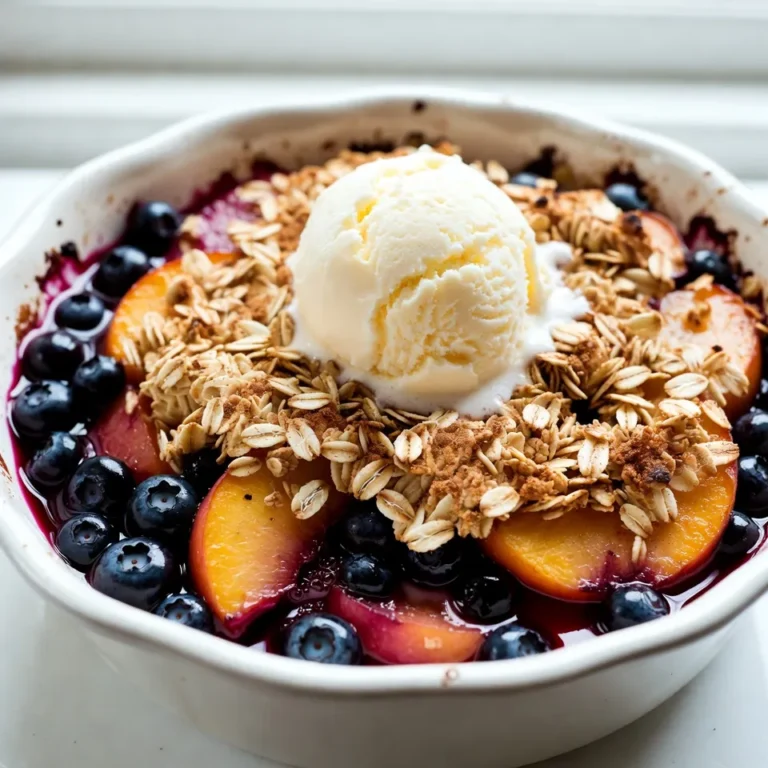
Blueberry Peach Crisp Irresistible Dessert Delight

- 12 oz pasta (fettuccine, penne, or farfalle) - 2 large red bell peppers, roasted and peeled - 1 cup heavy cream - 1 tablespoon extra virgin olive oil - 3 cloves garlic, minced - 1/2 teaspoon crushed red pepper flakes - 1/4 cup finely grated Parmesan cheese - Salt and freshly cracked black pepper to taste - Fresh basil leaves for garnish To make this creamy roasted red pepper pasta, you need some basic tools: - A baking sheet for roasting - A large pot for boiling pasta - A blender or food processor for the sauce - A large skillet for heating the sauce Want to add more flavor or nutrients? Consider these: - 1 cup baby spinach or arugula for a fresh touch - Extra Parmesan cheese for a richer taste - Grilled chicken or shrimp for protein - A squeeze of lemon for brightness This creamy roasted red pepper pasta is simple yet satisfying. The ingredients work together to create a rich and tasty dish. You can easily adjust the flavors to your liking, making it a perfect weeknight meal. {{ingredient_image_2}} To roast red peppers, first, preheat your oven to 450°F (230°C). Slice the peppers in half and remove the seeds. Place them cut-side down on a lined baking sheet. Roast for 20-25 minutes until the skins are charred. After roasting, put the peppers in a bowl and cover it with plastic wrap for 10 minutes. This helps loosen the skin for easy peeling. While your peppers steam, bring a large pot of salted water to a boil. Add your pasta—fettuccine, penne, or farfalle work great. Cook it according to the package directions until it’s al dente. Before draining, save about 1 cup of the starchy pasta water. After draining, set the pasta aside. Once the peppers cool, peel off their charred skin and chop the flesh. In a blender, combine the roasted peppers, heavy cream, minced garlic, and crushed red pepper flakes. Blend until smooth. This sauce packs a lot of flavor and creaminess. In a large skillet, heat olive oil over medium heat. Add your blended roasted red pepper sauce and heat for about 3-4 minutes. Stir in grated Parmesan cheese and season with salt and black pepper to taste. Next, add the cooked pasta to the skillet. Toss well to coat the pasta. If the sauce is too thick, add some reserved pasta water until it reaches your desired creaminess. You can fold in baby spinach or arugula for extra nutrients. Serve the creamy pasta in bowls or plates. Garnish with fresh basil leaves and a sprinkle of Parmesan cheese. For a special touch, drizzle a bit of olive oil on top. A dash of black pepper can enhance the look and flavor. Enjoy your delicious meal! Roasting peppers is key to deep, rich flavor. Start by preheating your oven to 450°F (230°C). Slice the red bell peppers in half and remove the seeds. Place them cut-side down on a lined baking sheet. Roast for 20-25 minutes until the skins are charred. After roasting, cover the peppers with plastic wrap for 10 minutes. This traps steam, making it easy to peel. Using fresh peppers will yield the best taste. Always check for any soft spots before buying. The sauce should be silky and smooth. After roasting and peeling the peppers, blend them with heavy cream and garlic. Start with a high speed to break down the peppers. If the sauce is too thick, add a bit of the reserved pasta water. This starchy water helps thin the sauce while keeping it creamy. Mix until you reach your desired consistency. Remember, the sauce will thicken as it heats, so adjust accordingly. You can boost the flavor in many ways. Add crushed red pepper flakes for heat. If you want more depth, consider adding a splash of balsamic vinegar. For a fresh twist, toss in some baby spinach or arugula before serving. These greens add color and nutrients. A sprinkle of fresh herbs like basil or parsley enhances the final dish. Always taste your sauce and adjust the seasoning with salt and pepper. Pro Tips Roasting Technique: Ensure the peppers are charred well for a deeper flavor; this adds a smoky sweetness to the sauce. Pasta Timing: Cook the pasta al dente; it will continue to cook slightly once mixed with the sauce, ensuring the perfect texture. Cheese Choice: For a more intense flavor, consider using Pecorino Romano instead of Parmesan for a unique twist. Color and Nutrition: Adding baby spinach or arugula not only enhances the nutritional value but also adds a lovely pop of color to the dish. {{image_4}} You can easily turn this dish into a vegetarian delight. Instead of using chicken or meat, focus on fresh veggies. For instance, add mushrooms, zucchini, or bell peppers. These veggies provide great texture and flavor. You might also toss in a cup of baby spinach or arugula for more nutrients. They wilt nicely in the hot pasta and sauce, adding color and taste. If you want to add protein, there are many tasty choices. Cooked chicken or shrimp works well with this creamy sauce. For a meat-free option, use chickpeas or lentils. They add protein and fiber. Simply mix them in after you combine the pasta and sauce. This step ensures they warm up without overcooking. For those who love a kick, spice up your pasta! Add more crushed red pepper flakes to the sauce. You can also mix in jalapeños or fresh chili peppers. If you want a smoky flavor, try adding chipotle peppers. These options give your dish a whole new level of heat and excitement. Just remember to adjust the spice to your taste! To store leftovers, place the pasta in an airtight container. Make sure the pasta is cooled down before sealing. You can keep it in the fridge for up to three days. If you want to store it longer, consider freezing. When reheating, use a skillet for the best results. Add a splash of water or extra cream to help loosen the sauce. Heat over medium-low heat for about 5-7 minutes. Stir often to heat evenly. You can also use the microwave, but check on it every minute to avoid overheating. To freeze, cool the pasta completely. Divide it into single servings and use freezer-safe bags or containers. Remove as much air as possible to prevent freezer burn. It can last up to three months in the freezer. When ready to eat, thaw it overnight in the fridge, then reheat. Yes, you can use other types of pasta. Fettuccine, penne, or farfalle work great. You can use whole wheat or gluten-free pasta too. Just make sure to adjust the cooking time according to the package. This dish pairs well with many pasta shapes, so feel free to experiment. To make this recipe healthier, you can reduce the heavy cream. You might try using Greek yogurt instead. You can also add more veggies. Spinach or arugula gives extra nutrients without many calories. Using whole grain pasta boosts fiber, making it a better choice. If you need a substitute for heavy cream, use coconut milk or almond milk. Silken tofu blended smooth can also work well. These alternatives keep the sauce creamy. Just remember that the flavor will change slightly, but it can still taste amazing. This blog post covered everything you need for a great pasta dish. We went over the key ingredients, step-by-step cooking, and helpful tips. You learned how to roast peppers, cook pasta, and make a rich sauce. We also explored variations and how to store leftovers. In the end, cooking can be fun and creative. Feel free to mix and match ingredients to suit your taste. Enjoy your meal!

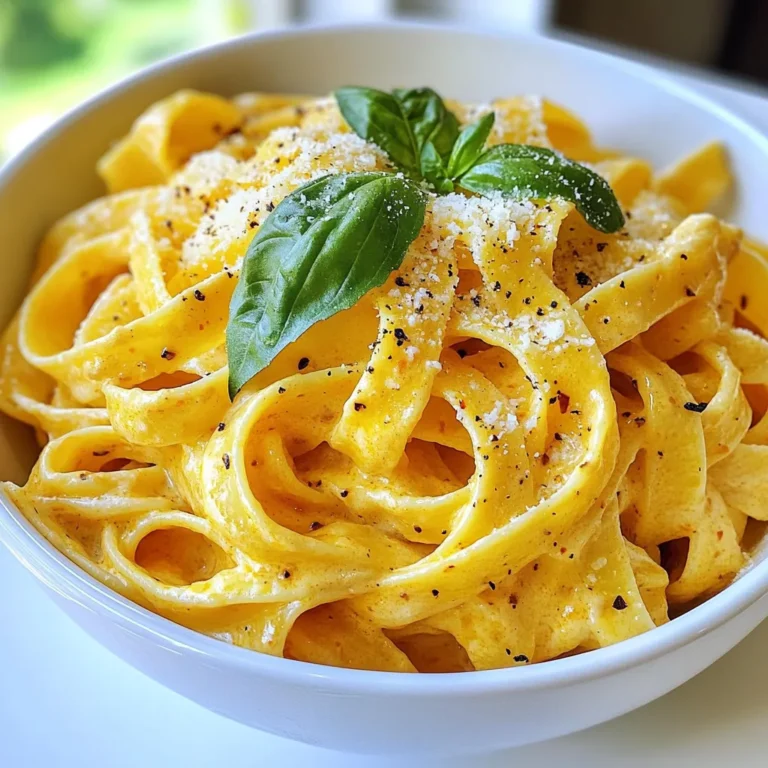
Creamy Roasted Red Pepper Pasta Easy Weeknight Dinner

- 8 oz egg noodles or rice noodles - 2 tablespoons sesame oil - 4 cloves garlic, finely minced - 1 tablespoon fresh ginger, freshly grated - 1 red bell pepper, thinly sliced - 1 cup broccoli florets - 1 cup snap peas - 2 medium carrots, julienned - 3 green onions, chopped (reserve some for garnish) - ¼ cup low-sodium soy sauce - 1 tablespoon rice vinegar - 1 tablespoon toasted sesame seeds - Salt and black pepper to taste - Optional: Fresh cilantro leaves for garnish To make this Sesame Garlic Noodle Stir Fry, you need a few key items. First, choose your noodles. I love using egg noodles or rice noodles, both work great. You’ll need about 8 ounces. Next, gather the flavor boosters. You want 2 tablespoons of sesame oil. This oil gives a rich, nutty taste. You’ll also need 4 cloves of garlic, finely minced, and 1 tablespoon of freshly grated ginger. These two add warmth and depth to the dish. Now, let’s talk vegetables. You can use many colorful options! Grab 1 red bell pepper, sliced thin. Add 1 cup of broccoli florets for crunch and color. 1 cup of snap peas adds a lovely sweetness. Don’t forget 2 medium carrots, cut into thin strips. Finally, use 3 green onions, chopped, but save some for later. For the sauce, you need ¼ cup of low-sodium soy sauce. This will bring saltiness and umami flavor. Add 1 tablespoon of rice vinegar for a nice tang. 1 tablespoon of toasted sesame seeds will finish it off. Season with salt and black pepper to taste. If you like, fresh cilantro leaves can add extra flavor. With these ingredients, you are ready to create a quick and delicious meal! {{ingredient_image_2}} - Step 1: Bring a large pot of water to a boil. - Step 2: Add 8 oz of egg or rice noodles. Cook until al dente. - Step 3: Drain the noodles and set them aside. - Step 4: Heat 2 tablespoons of sesame oil in a large skillet over medium heat. - Step 5: Add 4 minced garlic cloves and 1 tablespoon of grated ginger. Stir for about 30 seconds. - Step 6: Toss in the thinly sliced red bell pepper, 1 cup of broccoli florets, 1 cup of snap peas, and 2 julienned carrots. Stir-fry for 3-4 minutes until they are bright and tender-crisp. - Step 7: Gently add the drained noodles into the skillet. Use tongs to mix everything together. - Step 8: Pour in ¼ cup of low-sodium soy sauce and 1 tablespoon of rice vinegar. Stir well to coat all ingredients. - Step 9: Taste and adjust with salt and black pepper if needed. This method ensures every bite is full of flavor. Plus, it’s quick and easy! Enjoy your cooking time. - Use fresh ingredients for the best flavor. Fresh veggies give a bright taste. - Do not overcook the vegetables. They should stay crisp and colorful. - Keep the noodles slightly undercooked. This helps them absorb the sauce better. - For a nice presentation, use a large shallow bowl. It looks great and is easy to serve. - Suggested garnishes include extra green onions and toasted sesame seeds. They add color and crunch. - Pairing options can be a side of lime wedges or fresh cilantro for extra flavor. - Recommended cookware includes a spacious skillet or wok. A non-stick option works well too. - Best utensils for stir-frying are tongs or a spatula. They help toss the noodles and veggies. - Useful kitchen gadgets may include a garlic press and a grater for the ginger. These save time and effort. Pro Tips Cook Noodles Al Dente: Cooking the noodles just until al dente ensures they maintain their texture and won’t become mushy when combined with the stir-fry. Prep Ingredients Ahead: Have all your ingredients prepped and ready to go before you start cooking. Stir-frying is a quick process, and having everything on hand will make it easier. High Heat is Key: Use high heat when stir-frying to achieve that signature smoky flavor and to quickly cook the vegetables while keeping them crisp. Customize with Proteins: Feel free to add your choice of protein, such as chicken, shrimp, or tofu, for a heartier meal. Just ensure it's cooked through before adding the noodles. {{image_4}} You can add different proteins to your stir fry for extra flavor and nutrition. Here are some options: - Tofu - Chicken - Shrimp To cook proteins for the stir fry, follow these steps: 1. Tofu: Press it to remove excess water. Cut it into cubes. Sauté in the skillet until golden brown before adding vegetables. 2. Chicken: Cut it into thin strips. Cook it in the skillet until no longer pink, then add veggies. 3. Shrimp: Use peeled, deveined shrimp. Cook until they turn pink and opaque before adding noodles and sauce. If you want to make this dish vegan or vegetarian, consider these substitutions: - Use tamari instead of soy sauce for a gluten-free option. - Replace rice vinegar with apple cider vinegar if needed. For added veggies, try these: - Zucchini, sliced thin - Mushrooms, sliced - Spinach or kale, added at the end for quick wilting Want to add some heat? You can easily spice up your stir fry. Here are some ideas: - Add chili flakes while cooking. Start with a pinch and add more if you like. - Drizzle hot sauce over the finished dish for an extra kick. Consider your spice level preferences. If you like it mild, go easy on the spice. For a hotter dish, feel free to add more. Store leftovers in an airtight container. Keep them in the fridge. The dish lasts up to three days. Make sure it cools before sealing. This helps keep it fresh. To freeze, place the stir fry in a freezer-safe bag. Remove as much air as possible. This prevents freezer burn. It can last for up to three months in the freezer. For the best taste, use flat bags to save space. You can reheat it on the stove or in the microwave. For the stove, use low heat and add a splash of water. This keeps the noodles moist. In the microwave, cover it with a damp paper towel. This helps maintain texture and warmth. Stir halfway through to heat evenly. You can use gluten-free noodles to make this dish safe for everyone. Here are some good options: - Rice noodles - Quinoa noodles - Brown rice noodles These noodles work well and keep the flavor intact. Always check labels to ensure they are gluten-free. Yes, you can switch up the noodles for your taste. Here are some tasty alternatives: - Udon noodles - Soba noodles - Whole wheat noodles Each type brings a new flavor and texture, making your stir fry exciting. If you need to swap sesame oil, try these choices: - Olive oil - Peanut oil - Canola oil These oils change the flavor but still taste great. Use each one based on your taste and what you have at home. This blog post shared a easy, tasty stir-fry recipe that anyone can make. We covered key ingredients like noodles, fresh vegetables, and a simple sauce. I gave you step-by-step instructions to help you cook it perfectly. Remember to use fresh items for the best taste. Experiment with different proteins or spice levels to make it your own. Whether you want to store leftovers or change up flavors, these tips will help. Enjoy your cooking journey and create delicious meals your way!

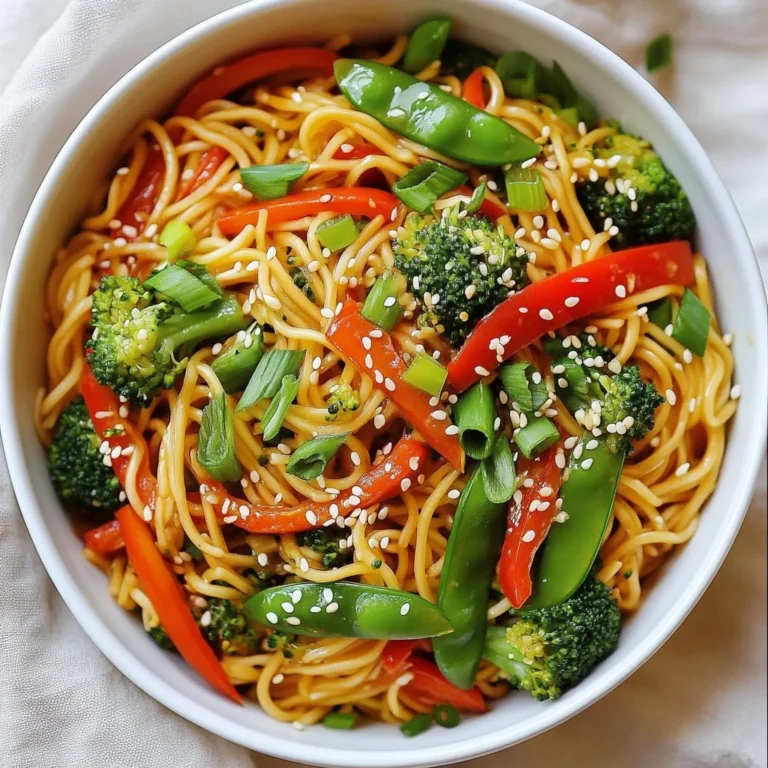
Sesame Garlic Noodle Stir Fry Flavorful and Quick Meal

- 4 boneless white fish fillets (e.g., tilapia or mahi-mahi) - 2 tablespoons paprika - 1 tablespoon cayenne pepper - 1 tablespoon garlic powder - 1 teaspoon onion powder - 1 teaspoon dried oregano - Salt and pepper to taste - 2 tablespoons olive oil - 8 small corn tortillas - 1 cup fresh pineapple, diced - ½ red onion, finely chopped - 1 jalapeño, minced (optional for added spice) - Juice of 1 lime - ¼ cup fresh cilantro, finely chopped Gathering the right ingredients is key. For the fish, I love using tilapia or mahi-mahi. They cook well and taste great. You will need a mix of spices to create the blackening blend. This includes paprika, cayenne pepper, garlic powder, onion powder, and oregano. Don't forget salt and pepper to enhance flavors. For the pineapple salsa, fresh ingredients make a big difference. Use ripe pineapple, red onion, and jalapeño if you like heat. Lime juice and chopped cilantro add freshness and balance. Finally, you'll need small corn tortillas to wrap everything up. This combination of ingredients makes the blackened fish tacos sing with flavor. {{ingredient_image_2}} To make the blackening spice blend, gather your spices. You need: - 2 tablespoons paprika - 1 tablespoon cayenne pepper - 1 tablespoon garlic powder - 1 teaspoon onion powder - 1 teaspoon dried oregano - Salt and pepper to taste In a small bowl, mix these spices. Stir well. This blend gives the fish a bold flavor. Next, take your fish fillets. Pat them dry with a paper towel. This step helps the spice stick better. Rub the spice mixture all over the fish. Make sure to cover both sides. Now, it's time to cook the fish. Heat a heavy skillet or cast iron pan over medium-high heat. Add 2 tablespoons of olive oil. Wait until the oil shimmers but doesn’t smoke. Carefully place the seasoned fish fillets in the pan. Cook them for about 3-4 minutes on each side. The fish should be opaque and have a nice char. When done, remove the fish from the skillet. Use a fork to flake the fish into bite-sized pieces. While the fish cooks, prepare the pineapple salsa. You’ll need: - 1 cup fresh pineapple, diced - ½ red onion, finely chopped - 1 jalapeño, minced (optional for added spice) - Juice of 1 lime - ¼ cup fresh cilantro, finely chopped In a mixing bowl, combine the diced pineapple, chopped red onion, and minced jalapeño. Squeeze in the lime juice and add the cilantro. Toss gently until mixed. Let the salsa sit for a few minutes. This helps the flavors meld together. Now, warm your tortillas. Heat them on a dry skillet over medium heat. You can also warm them over a flame for a few seconds. This makes them pliable and adds a slight toast. To assemble the tacos, place a generous portion of blackened fish on each warm tortilla. Top it with a spoonful of the colorful pineapple salsa. For a finishing touch, add extra lime wedges and a sprinkle of fresh cilantro. Enjoy your delicious tacos! To get the perfect char on your fish, heat your skillet well. Use medium-high heat. The oil should shimmer but not smoke. Cook the fish for about 3-4 minutes on each side. Look for a nice crust and an opaque center. For fish, I love using tilapia or mahi-mahi. These types are mild and flaky. They soak up the spices well and cook quickly. You can also try snapper or catfish for a tasty change. To boost the flavor of your salsa, add diced mango or chopped bell pepper. Both add sweetness and crunch. If you like heat, a pinch of chili flakes can spice it up. You can also switch fruits. Try peaches or strawberries for a fresh twist. These fruits mix well with pineapple and add a new layer of taste. Serve your tacos on a big platter. This makes them look inviting. Arrange lime wedges and extra salsa in small bowls nearby. Guests can add their own salsa as they like. For garnishes, sprinkle fresh cilantro on top. You can also add slices of avocado for creaminess. These details make your dish pop and impress your guests. Pro Tips Perfectly Seasoned Fish: Ensure your fish is well-coated with the spice blend for the best flavor. Allow it to sit for a few minutes before cooking to let the spices penetrate the fish. Control the Heat: Use medium-high heat for cooking the fish to achieve that perfect blackened crust without burning the spices. Adjust the heat as necessary based on your stovetop. Customize Your Salsa: Feel free to add other ingredients to the pineapple salsa such as diced bell peppers or cucumber for added crunch and flavor. Make Ahead: You can prepare the spice mix and pineapple salsa a day in advance. This saves time and enhances the flavors as they meld together overnight. {{image_4}} You can mix up the fish in your tacos. Try different fish options like salmon or cod. Each type gives a unique taste. If you want a vegetarian option, use grilled mushrooms or spicy jackfruit. Both can add great flavor and texture. Salsa can be fun to change! Use tropical fruits like mango or papaya for a sweet twist. You can also spice things up. Add more jalapeños or chili powder to make it hotter. Experimenting with fruits and spices can create exciting new tastes in your tacos. To keep your blackened fish tacos fresh, store leftovers in the fridge. Use an airtight container for best results. Make sure the fish and salsa are separate. Store them this way to keep the flavors fresh. It’s best to eat leftovers within two days. For reheating, use a skillet over low heat. This method keeps the fish moist. If you prefer, you can also microwave the fish briefly. Just cover it to prevent drying out. Heat the tortillas on the skillet for a few seconds. This keeps them soft and warm. You can freeze both the fish and the salsa. To freeze the fish, let it cool completely. Wrap it tightly in plastic wrap or foil. Place it in a freezer bag to avoid freezer burn. The salsa can go into a separate airtight container. When you want to use frozen fish, thaw it in the fridge overnight. You can also use the microwave on a low setting. For the salsa, thaw it in the fridge too. Use it within a month for the best taste. For blackened tacos, I recommend using boneless white fish fillets. Tilapia and mahi-mahi work great. These fish have a mild taste and cook well with the blackening spices. Their texture holds up nicely in a taco too. Yes, you can prepare parts of these tacos ahead of time. Cook the fish and make the salsa a few hours before serving. Store them separately in the fridge. When ready to eat, warm the tortillas and assemble your tacos. This makes it easy for a quick meal. The spice level can vary based on your preference. The cayenne pepper gives them a nice kick. If you like it milder, use less cayenne in the spice mix. You can also skip the jalapeño in the salsa. Adjust the heat to suit your taste! Fish tacos go well with many sides. Consider serving them with: - Cilantro lime rice - Black bean salad - Fresh corn on the cob - Chips and salsa These sides add color and flavor to your meal. Enjoy mixing and matching! You learned how to make tasty blackened fish tacos. We covered ingredients, preparation, and tips for a great meal. Perfecting flavors and presentation makes these tacos stand out. Explore variations like different fish or adding fruit to your salsa. With proper storage, you can enjoy leftovers later. These tacos are fun to make and share. Enjoy cooking and tasting every bite.

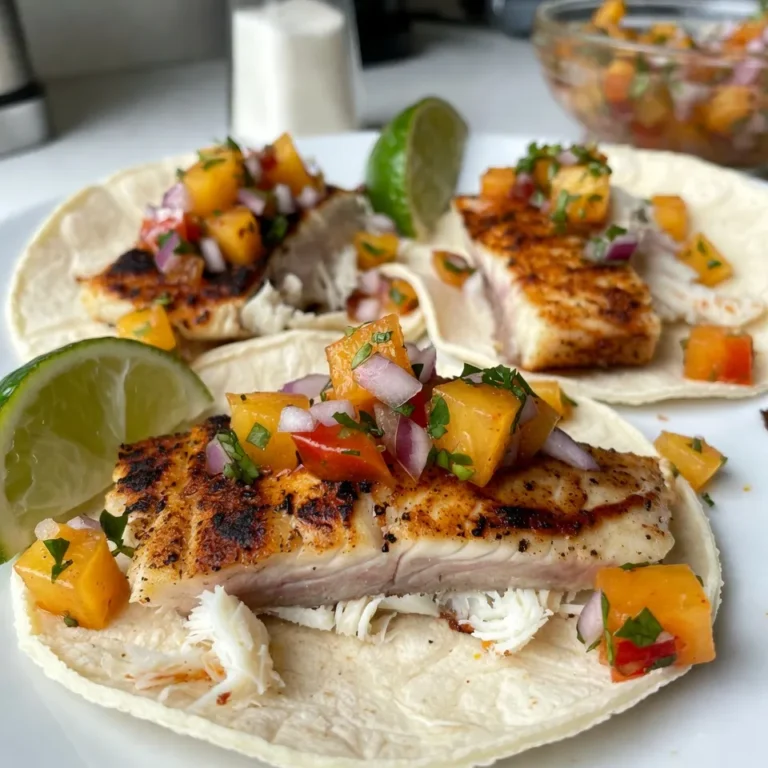
Blackened Fish Tacos with Pineapple Salsa Delight

- 1 cup quinoa, thoroughly rinsed - 2 cups water or vegetable broth for cooking - 4 cups fresh baby spinach, washed and dried carefully - 1 cup strawberries, hulled and sliced into thin pieces - 1/2 cup feta cheese, crumbled into small pieces - 1/4 cup walnuts, roughly chopped - 1/4 red onion, thinly sliced for a milder flavor - 2 tablespoons extra virgin olive oil - 2 tablespoons balsamic vinegar - 1 tablespoon honey for sweetness - Salt and freshly cracked black pepper to taste Start with one cup of quinoa. Rinse it well to remove bitterness. Use two cups of water or vegetable broth for cooking. The broth adds flavor. For the greens, choose four cups of fresh baby spinach. Make sure to wash and dry it well. Strawberries need to be hulled and sliced thinly. One cup will give a nice sweetness. Crumbled feta cheese, about half a cup, adds creaminess. Use a quarter cup of walnuts for crunch, and slice a quarter of a red onion for a mild taste. For the dressing, mix two tablespoons of extra virgin olive oil and two tablespoons of balsamic vinegar. Add one tablespoon of honey for a touch of sweetness. Season with salt and freshly cracked black pepper to taste. Fresh ingredients make a big difference in flavor. Quinoa is a great source of protein and fiber. It is gluten-free and packed with essential nutrients. Spinach offers vitamins A, C, and K. It also has iron and calcium. Strawberries are low in calories and high in vitamin C. They contain antioxidants that are good for health. Feta cheese adds calcium and protein. Walnuts provide healthy fats and omega-3s. Red onion contains antioxidants and adds flavor without being too strong. This salad is not only tasty but also healthy! {{ingredient_image_2}} To cook the quinoa, start by rinsing it well. This step helps remove the bitter coating. Next, in a medium saucepan, mix one cup of quinoa with two cups of water or vegetable broth. Turn the heat to medium and bring it to a boil. Once it boils, lower the heat. Cover the pot with a lid and let it simmer for about 15 minutes. The quinoa will become fluffy, and all the liquid will absorb. After cooking, remove it from heat and let it cool for a few minutes. To make the dressing, grab a small bowl. Add two tablespoons of extra virgin olive oil, two tablespoons of balsamic vinegar, and one tablespoon of honey. Sprinkle in a pinch of salt and pepper for flavor. Use a whisk to mix everything together. You want the dressing to be smooth and well-blended. This mix adds brightness to the salad. In a large mixing bowl, add the cooked quinoa first. Then, layer in four cups of fresh baby spinach, one cup of sliced strawberries, half a cup of crumbled feta cheese, and a quarter cup of chopped walnuts. Don’t forget to add a quarter of a thinly sliced red onion for extra taste. Drizzle the prepared dressing over the salad. Gently toss all the ingredients together. Be careful not to mash the strawberries or feta. Taste the salad and adjust the seasoning with more salt and pepper if needed. To cook quinoa, start with 1 cup of rinsed quinoa. Place it in a pot with 2 cups of water or broth. Bring it to a boil. Once it boils, lower the heat, cover, and simmer for 15 minutes. The quinoa will absorb all the water and become fluffy. Let it cool before adding it to your salad. This step makes sure your quinoa is light and tasty. To adjust flavors, taste the salad as you mix it. You can add more salt or pepper if needed. If you want more sweetness, drizzle in extra honey. For a tangy kick, add more balsamic vinegar. If you like crunch, add more walnuts. This way, you can tailor the salad to your liking. Make it your own by changing these flavors! When serving, use individual bowls or a large platter. This makes the salad look inviting. Garnish with extra strawberry slices and a sprinkle of feta. A sprig of mint adds color and fresh scent. Arrange the salad neatly to catch the eye. A well-presented dish makes it more enjoyable to eat. Enjoy your beautiful salad! Pro Tips Cook Quinoa Properly: Make sure to rinse the quinoa thoroughly before cooking to remove its natural coating, called saponin, which can give a bitter taste. Use Fresh Ingredients: For the best flavor, always use fresh spinach and ripe strawberries. Quality ingredients make a noticeable difference in taste. Customize Your Nuts: Feel free to substitute walnuts with pecans or almonds based on your preference, or omit them for a nut-free version. Adjust Dressing to Taste: The dressing can be adjusted by adding more honey for sweetness or vinegar for tanginess, depending on your personal preference. {{image_4}} You can change this salad by adding different fruits and nuts. Try blueberries or sliced apples for a twist. They add nice flavors and colors. You can also swap walnuts for almonds or pecans. These nuts give a crunchy bite. If you want a new taste, try different dressings. A lemon vinaigrette can brighten the salad. Just mix lemon juice, olive oil, and a pinch of salt. A creamy dressing, like yogurt-based ranch, works well too. It adds a rich taste and pairs nicely with strawberries. To make this salad vegan, skip the feta cheese. Instead, use avocado for creaminess. You can also add chickpeas for protein. They make the salad filling and tasty. Use maple syrup instead of honey for a vegan dressing. This keeps all flavors fresh and vibrant. To store leftovers of your strawberry spinach quinoa salad, use a clean, airtight container. Place the salad inside and seal it tightly. This helps keep it fresh. Store the container in the fridge. The salad stays good for about three days. If you have leftovers with dressing, consider separating it. This keeps the salad from getting soggy. To maintain freshness, follow these tips: - Use fresh ingredients when making the salad. - Wash and dry spinach and strawberries well to avoid excess moisture. - If you plan to eat the salad later, wait to add nuts and cheese until serving. This keeps them crunchy. - Store any extra dressing in a small jar. Shake it well before using. You do not need to heat this salad. It tastes best cold. If it feels dry after storing, add a tiny bit of dressing. Mix gently to revive the flavors. If you want a warm twist, try warming the quinoa alone, then mix it back in with fresh ingredients. This gives a nice contrast to the cold spinach and strawberries. Yes, you can try other grains! Quinoa is light and fluffy, but brown rice or farro works well too. These grains add texture and flavor. Just make sure to cook them according to package instructions. The salad lasts about three days in the fridge. Store it in an airtight container. The spinach may wilt after a day, but it should still taste great. If you want the best texture, eat it fresh. Strawberries are rich in vitamin C and antioxidants. They help your immune system and skin health. Spinach is packed with iron and vitamins A and K. It supports bone health and helps with energy. Together, they make this salad both tasty and healthy! This post covered how to make a delicious quinoa salad. We discussed key ingredients, step-by-step instructions, and helpful tips for cooking. You also learned about cool variations and how to store your salad for later. In the end, enjoy the process of making this fresh dish. Experiment with your favorite flavors and have fun! This salad is full of nutrients and easy to customize.

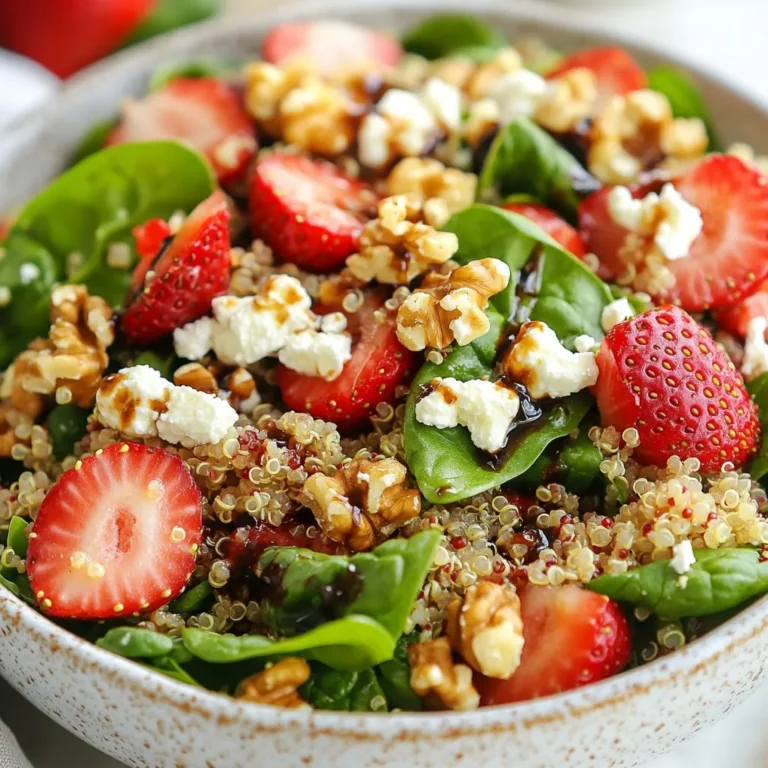
Strawberry Spinach Quinoa Salad Fresh and Flavorful Dish

For my spicy black bean enchiladas, you will need these ingredients: - 2 cups cooked black beans (or 1 can, thoroughly rinsed and drained) - 1 cup sweet corn kernels (fresh or frozen) - 1 cup diced bell peppers (any color you prefer) - 1 small onion, finely chopped - 2 cloves garlic, minced - 1 tablespoon extra-virgin olive oil - 1 teaspoon ground cumin - 1 teaspoon smoked paprika - 1 teaspoon chili powder - Salt and freshly ground black pepper, to taste - 8 corn tortillas - 2 cups enchilada sauce (store-bought or homemade) - 1 cup shredded cheese (sharp cheddar or Monterey Jack) - Fresh cilantro, roughly chopped, for garnish - Sliced avocado, for topping This recipe is naturally vegan if you skip the cheese or use a dairy-free option. You can also find gluten-free corn tortillas easily. This way, everyone can enjoy these spicy enchiladas! Serve your enchiladas with a dollop of sour cream for creaminess. Lime wedges add a nice zing on the side. Fresh cilantro on top brightens the dish too! These extras make every bite more delightful. {{ingredient_image_2}} To make spicy black bean enchiladas, gather your ingredients first. You will need black beans, corn, bell peppers, onion, garlic, and spices. Have corn tortillas and enchilada sauce ready too. This prep makes cooking easier. Start by heating olive oil in a skillet over medium heat. Add chopped onion and bell peppers. Cook these for about five minutes. The onion should turn soft and clear. Next, stir in minced garlic, cumin, smoked paprika, and chili powder. Add salt and pepper to taste. Cook for two more minutes to blend the flavors. Now, gently mix in the black beans and corn. Cook this for another three to four minutes. This helps all the flavors come together. Preheat your oven to 375°F (190°C). Pour half a cup of enchilada sauce into a baking dish. Spread it evenly across the bottom. Take a tortilla and add about a quarter cup of the filling in the center. Roll it tightly and place it seam-side down in the dish. Repeat this with all the tortillas. Once done, pour the remaining sauce over the tortillas, covering them well. Sprinkle the shredded cheese on top. Cover the dish with foil and bake for 20 minutes. After that, remove the foil and bake for another 10 minutes. This will make the cheese bubbly and golden. Let the enchiladas sit for a few minutes before serving. Garnish with cilantro and avocado slices for a fresh finish. To avoid sticking, coat the baking dish with enchilada sauce. Pour about 1/2 cup of sauce in the bottom. This layer helps the enchiladas lift out easily. Also, keep the tortillas warm before filling. You can wrap them in a clean kitchen towel or heat them in the microwave for a few seconds. Warm tortillas roll better and break less. When rolling tortillas, use a small amount of filling. About 1/4 cup works well. Place the filling in the center of the tortilla. Fold in the sides first, then roll it tightly from the bottom. Make sure the seam is down in the baking dish. This keeps the enchiladas from unrolling while baking. To amp up the heat, add more chili powder or a pinch of cayenne. If you want a milder flavor, reduce the chili powder. You can also mix in diced jalapeños for a fresh kick. Fresh herbs like cilantro add brightness. For a smokier taste, try adding chipotle powder. Experiment with different spices to find your perfect flavor balance. Pro Tips Use Fresh Ingredients: Fresh veggies and herbs enhance the flavor and texture of your enchiladas, making them more vibrant and delicious. Customize Your Heat: Adjust the spice level by adding diced jalapeños or using a spicier enchilada sauce for those who enjoy a fiery kick. Try Different Cheeses: Experiment with different types of cheese like pepper jack or queso fresco for a unique twist on the classic flavor. Let Them Rest: Allow the enchiladas to sit for a few minutes after baking; this helps them firm up and makes them easier to serve. {{image_4}} You can swap black beans for pinto or kidney beans. Both add a nice texture. If you want a different flavor, try using lentils instead. For cheese, sharp cheddar gives a bold taste. Monterey Jack melts smoothly, making it a great choice too. You can even use vegan cheese for a dairy-free option. Toppings can change the whole dish. Fresh salsa adds a zesty kick. Guacamole brings creaminess and richness. You can also use sour cream for a cooling effect. For a spicy twist, drizzle hot sauce on top. Finally, sprinkle some green onions or radishes for crunch. You can make these enchiladas in a slow cooker. Just layer everything inside. Cook on low for about four hours. If you prefer a skillet, heat it on medium. Cook the rolled enchiladas for about 20 minutes. Both methods will give you tasty results! You can store leftover enchiladas in the fridge. Place them in an airtight container. They stay fresh for up to 3 days. Make sure to cover the enchiladas well to keep them moist. If you want to save enchiladas for later, freezing is great. Wrap each enchilada in plastic wrap. Then, place them in a freezer-safe bag. They can last up to 3 months in the freezer. When ready to eat, thaw them overnight in the fridge. To reheat, preheat your oven to 350°F (175°C). Place the enchiladas in a baking dish. Add a splash of enchilada sauce on top to keep them moist. Cover with foil and heat for about 20 minutes. Remove the foil for the last 5 minutes to crisp the cheese. This way, they taste just like when you first made them! Yes, you can use flour tortillas. They offer a softer texture. However, corn tortillas hold up well with the filling and sauce. They also add a lovely flavor. If you prefer flour, just make sure to warm them first. This will help prevent tearing when you roll them. Enchiladas pair well with many sides. Here are some tasty options: - Mexican rice: Fluffy and seasoned, it complements the dish. - Refried beans: Creamy and hearty, they add a nice touch. - Guacamole: Fresh and creamy, it brightens the meal. - Sour cream: A dollop adds richness and coolness. - Lime wedges: A squeeze of lime brings a zesty punch. Making enchilada sauce at home is simple. Here’s a quick recipe: 1. Ingredients: - 2 tablespoons olive oil - 2 tablespoons chili powder - 1 teaspoon ground cumin - 1 teaspoon garlic powder - 1 can (15 oz) tomato sauce - Salt to taste 2. Instructions: - Heat olive oil in a pot over medium heat. - Add chili powder, cumin, and garlic powder. Stir for 1 minute. - Pour in the tomato sauce and mix well. - Simmer for 10 minutes, then season with salt to taste. This sauce adds a rich flavor to your enchiladas. This blog post covers everything you need for tasty enchiladas. We explored the key ingredients and dietary options. You learned how to prepare the vegetable filling and assemble the dish. Plus, I shared tips to avoid sticking and enhance flavors. Variations help you customize with different ingredients and sauces. Lastly, we discussed how to store and reheat leftovers for best results. Enjoy making delicious enchiladas that suit your taste and needs!

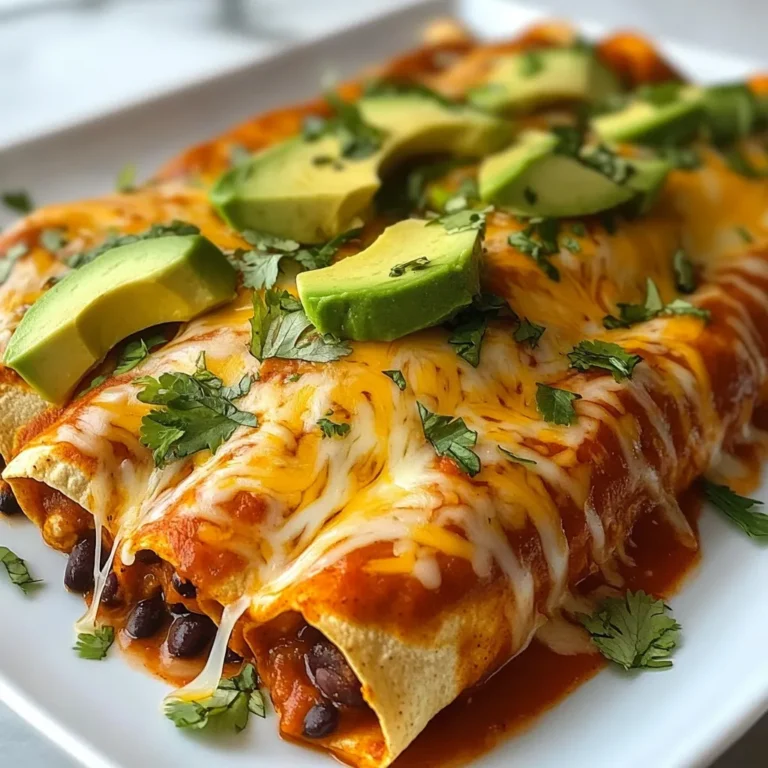
Spicy Black Bean Enchiladas Flavorful and Easy Recipe

- 1 cup mini pretzel twists - 1 cup chocolate chips (semi-sweet or milk chocolate) - 1 cup caramel candies, unwrapped - 1 tablespoon heavy cream (optional) - Sea salt, for a finishing sprinkle To make these treats, you need just a few simple ingredients. The mini pretzel twists bring the salty crunch. The chocolate chips offer rich sweetness, while the caramel candies add a gooey texture. If you want your chocolate drizzle to be smooth, use heavy cream. A sprinkle of sea salt at the end adds a nice touch. - Chopped nuts (like pecans or almonds) - Different types of chocolate (dark or white chocolate) - Flavored caramel (like sea salt or vanilla) - Crushed candies or sprinkles You can play with your ingredients. Chopped nuts add crunch and flavor. If you love dark chocolate, swap the semi-sweet chips. You can also try flavored caramel for a fun twist. Adding crushed candies or colorful sprinkles can make your bites even more festive. - Pretzels: Snyder’s, Rold Gold - Chocolate chips: Ghirardelli, Nestlé Toll House - Caramel candies: Kraft, Werther’s Original For the best taste, I recommend using reliable brands. Snyder’s and Rold Gold make great pretzels. Ghirardelli and Nestlé Toll House offer rich chocolate chips. Kraft and Werther’s Original are known for their delicious caramel candies. Using these brands will help you create the perfect Chocolate Caramel Pretzel Bites. {{ingredient_image_2}} First, turn on your oven and set it to 350°F (175°C). Next, grab a baking sheet and line it with parchment paper. This keeps the bites from sticking and makes clean-up easy. Now, spread out 1 cup of mini pretzel twists on the baking sheet. Make sure they don’t touch or overlap. This will help each bite cook evenly. Place 1 caramel candy on top of each pretzel. Center it well so it melts nicely during baking. Bake the pretzels in the oven for about 5 to 7 minutes. Keep an eye on them. You want the caramel to soften but not melt completely. After baking, take the tray out and let it cool for 2 minutes. This helps the caramel firm up a bit. Now, gently press a chocolate chip into each caramel. Make sure it sinks slightly for a good fit. For the chocolate drizzle, melt any leftover chocolate chips in a microwave-safe bowl. If you want a smooth drizzle, stir in 1 tablespoon of heavy cream. Heat it in 15-second bursts, mixing in between. Once melted, drizzle the chocolate over each pretzel bite. You can use a spoon or a piping bag for fun designs. Finally, sprinkle a touch of sea salt on top for extra flavor. Let the bites cool completely at room temperature or speed it up in the fridge. To get the best caramel texture, watch the bake time. Bake the pretzels with caramel for just 5 to 7 minutes. This softens the caramel without making it too gooey. Look for a soft but still shaped caramel. Let them cool for 2 minutes before adding chocolate. This cooling time helps the caramel firm up a bit. For smooth melted chocolate, use a microwave-safe bowl. Heat chocolate chips in 15-second bursts. Stir between each burst to avoid burning. If you want a creamier drizzle, add 1 tablespoon of heavy cream. This makes the chocolate nice and smooth. Keep stirring until the chocolate is fully melted. To drizzle chocolate evenly, use a spoon or a piping bag. If you use a piping bag, cut a small tip to control the flow. Drizzle the chocolate in a zigzag pattern for a fun look. Don't forget to sprinkle a little sea salt on top. This adds a nice touch to the sweet and salty mix. For a great display, arrange the bites on a nice platter. Pro Tips Use Fresh Caramels: Ensure your caramel candies are fresh for the best melting result. Stale caramels may not soften properly and can affect the texture. Choose the Right Chocolate: Semi-sweet or milk chocolate can be used based on your preference. For a richer flavor, consider using dark chocolate. Drizzle with Care: If using a piping bag for the chocolate drizzle, make sure the tip is small for precise control over the design. Experiment with Toppings: Feel free to add toppings such as crushed nuts or sprinkles along with the sea salt for added texture and flavor variations. {{image_4}} You can switch up the flavor of your Chocolate Caramel Pretzel Bites easily. Try using dark chocolate for a richer taste. Dark chocolate pairs well with the sweet caramel. You can also use flavored caramels like sea salt or vanilla. These small changes can create a new twist on the classic treat. Not everyone can enjoy regular pretzels. If you need gluten-free options, look for gluten-free pretzel brands. Many stores now sell them. You can also use dairy-free chocolate chips for a vegan treat. These swaps let everyone enjoy this sweet and salty snack. Want to make your pretzel bites even more fun? Add crushed candies on top. Crushed peppermint or toffee bits can add a great crunch. Sprinkles can also make your bites colorful and festive. You can even mix in nuts like chopped pecans or almonds for extra flavor and texture. Each of these twists makes your Chocolate Caramel Pretzel Bites unique and exciting. To keep your Chocolate Caramel Pretzel Bites fresh, use an airtight container. This helps lock in flavor and prevent them from getting stale. You can store them at room temperature for up to a week. If you live in a hot area, it’s best to keep them in the fridge. This will help maintain their texture and taste. To extend the shelf life, you can freeze the pretzel bites. Wrap each bite in plastic wrap or foil, then place them in a freezer bag. They can last for up to three months in the freezer. When you're ready to enjoy them, just take them out and let them thaw at room temperature. This method preserves the sweet and salty flavor perfectly. If you have leftovers, you may want to warm them up. Preheat your oven to 300°F (150°C). Place the pretzel bites on a baking sheet and heat for about 5 minutes. This helps melt the chocolate slightly and revives the caramel’s gooey texture. Avoid using the microwave, as it can make the pretzels chewy and less enjoyable. Chocolate Caramel Pretzel Bites can last about one week. Store them in an airtight container. Keep them in a cool, dry place. If you want them to last longer, you can refrigerate them. Just remember, the chocolate may lose its shine in the fridge. Yes, you can! Feel free to use regular pretzels or even chocolate-covered pretzels. For chocolate, dark chocolate or white chocolate works well too. You can mix and match to find your favorite flavor. Just keep in mind that the taste will change a bit with each swap. You can find pre-made Chocolate Caramel Pretzel Bites at many grocery stores. Check the snack aisle or the candy section. Some bakeries or specialty shops may offer them too. If you're in a hurry, online retailers also sell delicious options. Just make sure to read reviews for quality. You can make tasty Chocolate Caramel Pretzel Bites with ease. Using my step-by-step guide, you learned how to prepare, bake, and store them. Variations allow you to mix flavors, while tips ensure the perfect finish. Remember to choose good ingredients and store them to keep them fresh. Have fun experimenting with different toppings! These bites are sure to be a hit for snacking or sharing. Enjoy your baking journey and treat yourself to these delicious snacks!

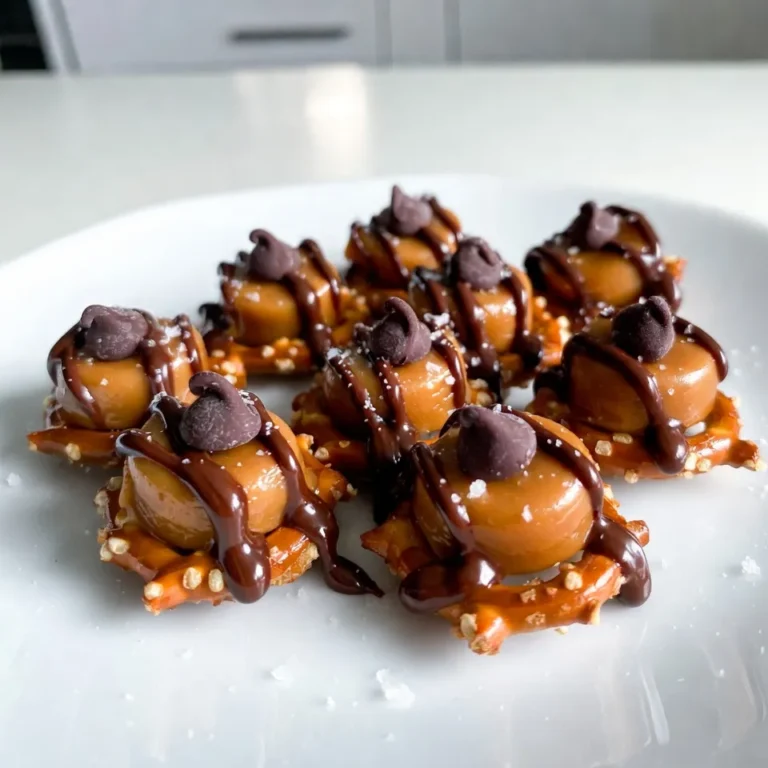
Chocolate Caramel Pretzel Bites Sweet and Salty Treat

PREV 1 … 5 6 7 … 49 NEXT
mini chef kitchen

explore

DessertsDinnerAppetizersDrinks

Our Policies

  • Cookie Policy
  • Copyright Policy
  • Disclaimer
  • GDPR Policy
  • Terms Of Use
Back to Top
  • About
  • Contact Us
  • Privacy Policy
© 2026 mini chef kitchen