FREE DINNER EBOOK! Get your copy!
  • Cookie Policy
  • GDPR Policy
  • Disclaimer
  • Terms Of Use
  • Visit my other site: Fun Cookie Recipes
mini chef kitchen
  • Home
  • Dinner
  • Desserts
  • Drinks
  • Appetizers
  • Contact
  • About
  • Privacy Policy
  • Home
  • Dinner
  • Desserts
  • Drinks
  • Appetizers
  • Contact
  • About
  • Privacy Policy
  • Cookie Policy
  • GDPR Policy
  • Disclaimer
  • Terms Of Use
Visit my other site: Fun Cookie Recipes

HOME / CATEGORIES /

Latest

- 1 cup orzo pasta - 2 cups fresh broccoli florets - 2 cups vegetable broth - 1 cup milk (or a dairy-free substitute) - 1 cup sharp cheddar cheese, freshly grated - 1 small onion, finely diced - 2 cloves garlic, minced - 1 teaspoon Dijon mustard - 1 tablespoon olive oil - ½ teaspoon crushed red pepper flakes - Salt and black pepper, to taste Gathering your ingredients is the first step to making creamy broccoli cheddar orzo. I love orzo pasta since it’s small and cooks quickly. For this dish, I use fresh broccoli florets to add a vibrant color and crunch. Vegetable broth gives the orzo a nice flavor base. You can use milk or a dairy-free substitute for creaminess. Sharp cheddar cheese is the star ingredient, making everything rich and cheesy. Next, the aromatics are key. Onion and garlic add depth to the dish. I like to use Dijon mustard for a hint of tang. Olive oil helps to sauté the onions and garlic, releasing their flavors. For a kick, consider the optional crushed red pepper flakes. They add warmth but are not needed if you prefer a milder flavor. Salt and black pepper round out the taste. These ingredients come together to create a comforting meal that’s easy to make and full of flavor. Plus, you can easily customize it to your liking! To start, heat 1 tablespoon of olive oil in a large pot over medium heat. Olive oil adds flavor and helps cook the onions nicely. Once the oil shimmers, add 1 small onion, finely diced. Sauté the onion for about 3-4 minutes. You want it soft and clear. Next, add 2 cloves of minced garlic and optional ½ teaspoon of crushed red pepper flakes. Cook for 1-2 more minutes. Stir often until the garlic smells great. Be careful not to burn it. Now, add 1 cup of orzo pasta to the pot. Toss it in the oil and onion mix. Let it toast for 1-2 minutes. This step adds a nice, nutty flavor. After that, pour in 2 cups of vegetable broth. Turn the heat up until it boils gently. Once boiling, reduce the heat to low. Let it simmer for 7-8 minutes. Stir now and then. You want the orzo to be firm but soft, and most of the liquid should be gone. While the orzo cooks, prepare the broccoli. Take 2 cups of fresh broccoli florets and steam them. You want them bright green and soft, which takes about 4-5 minutes. Steaming keeps the broccoli crunchy and fresh. Once cooked, set the broccoli aside. When the orzo is ready, stir in 1 cup of milk and 1 teaspoon of Dijon mustard. Mix it well to combine everything. Next, gradually add in 1 cup of freshly grated sharp cheddar cheese. Stir until the cheese melts into a creamy sauce. If the sauce gets too thick, add a splash more milk. Now it’s time to finish the dish. Gently fold the steamed broccoli into the cheesy orzo. Season with salt and black pepper to taste. Heat everything together for about a minute until warm. Your creamy broccoli cheddar orzo is ready to serve! Enjoy! To make your orzo creamy, control the sauce's thickness. Start with the right amount of milk. You can add more if it gets too thick. Stir continuously while adding cheese. This helps it melt evenly. For the best flavor, use sharp cheddar cheese. Its strong taste makes every bite special. You can also try Gruyère or Monterey Jack for a twist. Using pre-steamed broccoli saves time. It’s already tender and ready to mix in. You can find it in most stores. Using store-bought broth is quick and easy. Look for low-sodium options to control salt levels. Homemade broth can add depth but takes longer to prepare. Both choices work well, so pick what suits your time. To make your dish look great, use deep bowls. This adds height and showcases the orzo. Garnish with extra cheddar cheese and a sprinkle of black pepper. Adding a few broccoli florets on top makes it pop. Use colorful bowls to enhance the overall look. Enjoy serving this creamy delight! {{image_4}} You can switch up the veggies in this dish. Spinach adds a nice color and flavor. Peas also work well for a sweet touch. You can mix and match these veggies based on what you have. If you want more protein, add cooked chicken or shrimp. This will make your meal hearty and filling. Herbs can take this dish to the next level. Try adding fresh thyme or basil for a burst of taste. You can also spice things up with cayenne pepper. Just a pinch will give a nice kick without overpowering the dish. Experiment with flavors to match your mood. If you need a gluten-free option, look for gluten-free orzo. Many brands offer this, so check the store. For those avoiding dairy, you can use a dairy-free cheese. Nutritional yeast is a great choice, giving a cheesy flavor without the milk. Adjust the recipe to fit your diet while keeping it delicious. To keep your Creamy Broccoli Cheddar Orzo fresh, store any leftovers in an airtight container. Place the container in the refrigerator. It will last for about 3 to 4 days. Make sure to let it cool completely before sealing. This helps prevent moisture buildup. If you want to freeze the orzo, use freezer-safe bags or containers. It can stay frozen for up to 2 months. Just remember to label them with the date. When reheating, I suggest using the stovetop. This method helps maintain the creamy texture. Add a splash of milk or broth to the pot while warming. Stir gently over medium heat until heated through. You can also use the microwave. Just cover the bowl with a damp paper towel. Heat it in short bursts, stirring in between. Got leftovers? Transform them into a new meal! Add cooked chicken or shrimp for extra protein. You can even turn it into a soup. Just add more broth and toss in some spinach! Orzo pasta is a small, rice-shaped pasta. It cooks quickly and has a soft texture. You can use it in soups, salads, or main dishes. I love how orzo absorbs flavors, making it perfect for creamy dishes like this one. Yes, you can prepare Creamy Broccoli Cheddar Orzo in advance. Cook it fully and let it cool. Store it in the fridge for up to three days. When ready to eat, reheat it gently. Add a splash of milk to restore creaminess. To store leftovers, place them in an airtight container. Keep it in the refrigerator. Make sure to eat them within three days for the best taste. For longer storage, freeze portions in freezer-safe containers. Absolutely! To make Creamy Broccoli Cheddar Orzo vegan, swap the milk for a plant-based milk. Use a dairy-free cheese that melts well. Ensure your vegetable broth is free from animal products. This way, you keep all the creaminess and flavor. Yes, you can substitute many ingredients. Use any small pasta if you can't find orzo. You can add other veggies, like peas or spinach, for extra nutrition. For cheese, try a dairy-free option or a different cheese you enjoy. You learned how to make a creamy broccoli cheddar orzo dish. We covered the main ingredients, cooking steps, and useful tips. This meal is easy to customize based on your tastes. You can add different veggies or proteins for a unique twist. Storing and reheating leftovers is simple too. Enjoy this hearty dish hot or transform it into something new later. Cooking can be fun and rewarding, so dive in and try this recipe soon!

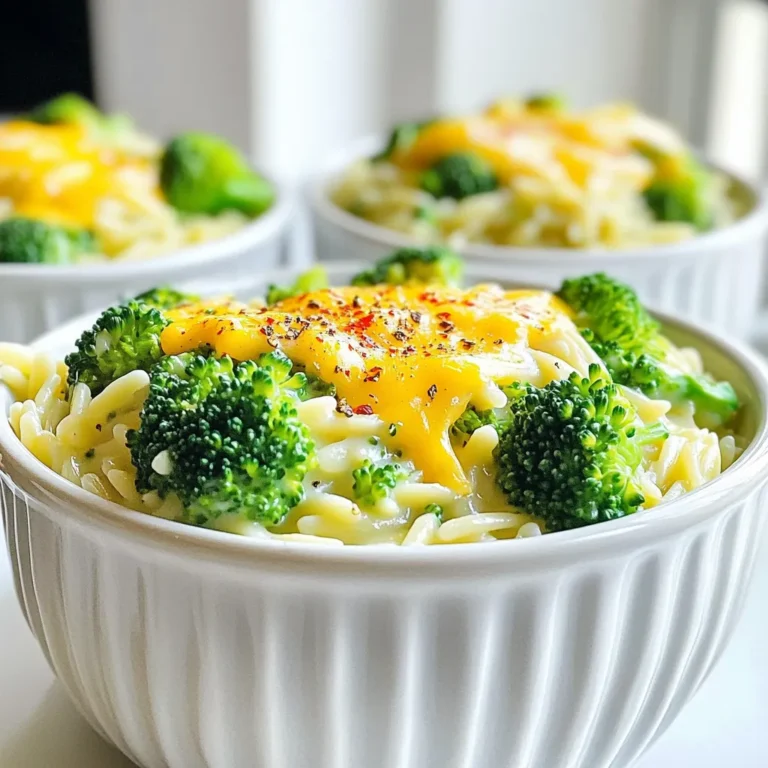
Creamy Broccoli Cheddar Orzo Simple and Comforting Dish

- 4 large eggs - 1 ripe avocado - 2 tablespoons plain Greek yogurt - 1 tablespoon Dijon mustard - 1 teaspoon fresh lemon juice - 1/4 teaspoon garlic powder - Salt and freshly ground black pepper to taste - 1/4 cup red onion, finely chopped - 1/4 cup celery, finely chopped - 1/4 cup fresh cilantro or parsley, finely chopped - 8 large romaine or butter lettuce leaves The main ingredients in this dish create a rich and creamy flavor. The eggs give protein, while the avocado adds healthy fats. Greek yogurt provides creaminess with less fat. Dijon mustard adds a nice kick. Each ingredient works together to make the salad tasty. - Chopped bell peppers - Diced pickles - Sliced olives - Hot sauce for some heat Feel free to add your own twist to this salad. Chopped bell peppers can add crunch. Diced pickles give a zing that some may enjoy. Sliced olives bring a briny flavor. Hot sauce can spice things up if you like heat. This salad packs a nutritious punch. Each serving is low in carbs while being high in protein. Here’s a quick breakdown: - Calories: About 250 per serving - Protein: 12 grams - Fat: 18 grams - Carbs: 10 grams These numbers can vary based on your ingredient choices. It’s a healthy option for lunch or a snack. You get great nutrients without heavy calories. Enjoy this fresh dish while knowing it supports your health. To boil the eggs, start by placing them in a medium saucepan. Cover the eggs with cold water. Turn the heat to high and bring the water to a rolling boil. Once it boils, cover the pot with a lid. Then, remove the pot from the heat and let it sit for 12 minutes. This method ensures perfectly cooked eggs. After the timer goes off, drain the hot water from the pot. Quickly move the eggs to a bowl filled with ice water. Let them cool for 5 minutes. This cooling method makes peeling the eggs easier. The cold water helps stop the cooking process too. While the eggs cool, grab a medium mixing bowl. Use a fork to mash the ripe avocado. Aim for a creamy consistency. Next, stir in the Greek yogurt, Dijon mustard, lemon juice, and garlic powder. Season with salt and freshly ground black pepper to taste. Mix everything until it is well blended. This creamy base makes the salad rich and flavorful. To peel eggs easily, start with fresh eggs. After boiling, cool them in ice water. This helps the shell come off smoothly. When peeling, do it under running water. The water helps separate the shell from the egg. Gently tap the egg on a hard surface to crack the shell. Then roll it lightly to loosen the shell. Choose avocados that feel slightly soft but not mushy. Gently press the skin; if it gives a bit, it’s ripe. Look for a rich green color under the skin. Avoid avocados with dark spots or blemishes. If they are hard, leave them at room temperature to ripen. You can speed up ripening by placing them in a paper bag with a banana. Serve the wraps on a colorful platter. Add extra herbs for a fresh touch. You can also include lemon slices to brighten the dish. Pair the wraps with carrot sticks or cucumber slices for crunch. If you want a bit of spice, add a dash of hot sauce. These wraps make a great light lunch or snack. {{image_4}} You can use many types of lettuce for your wraps. Romaine and butter lettuce work great. They hold the filling well and add a nice crunch. You can also try green leaf or iceberg lettuce for a different texture. Each type brings its own flavor and fun to the dish. Want to kick up the taste? Here are some fun ideas: - Chopped pickles for a tangy crunch. - Diced bell peppers for color and sweetness. - Sriracha or hot sauce for a spicy kick. - Chopped nuts like walnuts or almonds for extra crunch. These add-ins can take your avocado egg salad to the next level! You can easily adjust this recipe for different diets. For a vegan option, swap the eggs with tofu or chickpeas. Instead of Greek yogurt, use a plant-based yogurt. If you want a low-carb version, skip the lettuce wraps and serve the salad in a bowl instead. This makes it easy for everyone to enjoy! Store leftover salad in an airtight container. This keeps it fresh. The avocado egg salad lasts up to three days in the fridge. If you notice browning, stir gently to mix it in. This helps keep the salad looking fresh. To keep lettuce wraps fresh, store the filling and leaves separately. Wrap the lettuce leaves in damp paper towels. Place them in a plastic bag or container. This prevents them from wilting. For the salad, use a tight-sealing container. Combine just before serving for the best crunch. Freezing avocado egg salad is not ideal. The texture may change when thawed. Instead, consider freezing the egg salad without the avocado. You can add fresh avocado later. If you want to freeze it, use an airtight container. It can last up to three months in the freezer. Just remember to let it thaw in the fridge before you eat! Yes, you can make this recipe ahead of time. Prepare the avocado egg salad and store it in an airtight container. You can keep it in the fridge for up to three days. Just remember to assemble the lettuce wraps right before serving to keep the lettuce crisp. If you don't have Greek yogurt, you can use regular plain yogurt or even sour cream. Both options will add creaminess. If you want a dairy-free choice, try mashed silken tofu or a vegan yogurt. These swaps will keep your dish tasty and creamy. To keep your avocado from browning, add lemon juice to the mixture. It helps slow down the oxidation process. Another tip is to store the salad in an airtight container, pressing plastic wrap directly on the surface. This limits air exposure and keeps your salad fresh longer. In this blog post, we explored making avocado egg salad. We covered the main and optional ingredients and noted the nutritional benefits. I shared step-by-step instructions, tips for peeling eggs, and how to choose avocados. We also discussed fun variations, storage tips, and answered common questions. Keep this recipe handy for a healthy meal. It’s simple, tasty, and versatile. Enjoy your time in the kitchen!

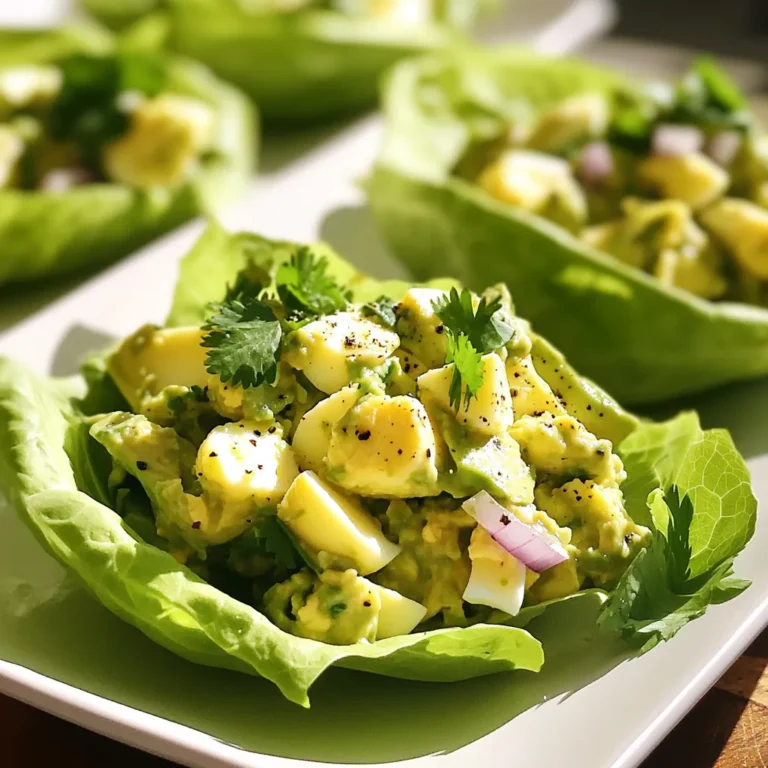
Avocado Egg Salad Lettuce Wraps Fresh and Simple Dish

- Dry Ingredients: - 1 ½ cups all-purpose flour - 2 tablespoons brown sugar - 1 tablespoon baking powder - 1 teaspoon ground ginger - 1 teaspoon ground cinnamon - ½ teaspoon ground nutmeg - ½ teaspoon salt - Wet Ingredients: - 1 cup milk (dairy or non-dairy) - 1 large egg - 3 tablespoons unsalted butter, melted - 1 teaspoon vanilla extract - Suggested Toppings: - Maple syrup - Whipped cream Gingerbread pancakes need simple yet flavorful ingredients. Start with all-purpose flour for a soft texture. Brown sugar adds a nice sweetness. Baking powder helps them rise. For that classic gingerbread taste, use ground ginger, cinnamon, and nutmeg. Don't forget salt to balance the flavors. For wet ingredients, you’ll need milk. It can be dairy or any non-dairy option you prefer. A large egg brings the mixture together, while melted butter gives richness. Finally, vanilla extract adds warmth and depth. To serve, consider maple syrup and whipped cream. They make the pancakes even more delightful. Enjoy the festive flavors and cozy vibes these gingerbread pancakes bring! {{ingredient_image_2}} First, gather your dry ingredients. In a big bowl, mix together: - 1 ½ cups all-purpose flour - 2 tablespoons brown sugar - 1 tablespoon baking powder - 1 teaspoon ground ginger - 1 teaspoon ground cinnamon - ½ teaspoon ground nutmeg - ½ teaspoon salt Whisk these items well until they blend fully. This step is key to even flavor. Next, prepare the wet ingredients. In another bowl, combine: - 1 cup milk (you can use dairy or non-dairy) - 1 large egg - 3 tablespoons unsalted butter, melted - 1 teaspoon vanilla extract Whisk this mixture until it is smooth. It should look creamy and well mixed. Now, it's time to mix. Slowly pour the wet mixture into the dry ingredients. Use a spatula to stir gently. Mix just enough to combine everything. It is okay if the batter has small lumps. Overmixing will make the pancakes tough. Get your skillet or griddle ready. Preheat it over medium heat. Lightly coat the surface with butter or cooking spray to stop sticking. For each pancake, pour about ¼ cup of batter onto the skillet. Watch for bubbles to form on the surface. This takes about 2 to 3 minutes. When you see bubbles, carefully flip the pancake. Cook for another 1 to 2 minutes. The pancake should turn a nice golden brown. Remove it from the skillet and keep warm on a plate. Repeat this for the rest of the batter. Serve your pancakes warm with maple syrup and a dollop of whipped cream. Enjoy! To make the best gingerbread pancakes, you need to ensure even cooking temperature. Heat your skillet over medium heat. If it's too hot, your pancakes may burn. If it’s too cool, they will be soggy. A good test is to sprinkle a drop of water on the skillet. If it dances and evaporates, you’re ready to cook. Using a non-stick skillet effectively is key. Even if your skillet is non-stick, a light coat of butter or cooking spray helps the pancakes slide right off. It also adds a nice flavor. Keep your spatula handy to flip them gently. This will help maintain their shape and texture. Stacking techniques can make your pancakes look amazing. Aim for a tall stack on a charming plate. For a wintery look, dust the top with powdered sugar. It looks like fresh snow! You can also sprinkle a bit of ground cinnamon on top to enhance the festive flair. For garnishing, consider adding a sprig of fresh mint or a cinnamon stick beside your stack. These simple touches elevate your dish and make it look even more inviting. Serve your pancakes warm with maple syrup and whipped cream to complete the festive experience. Pro Tips Perfect Pancake Thickness: For fluffier pancakes, ensure your batter is not too thin. If it seems runny, add a little more flour until you reach the desired consistency. Flavor Boost: For an extra kick of flavor, consider adding chopped crystallized ginger or a handful of chocolate chips to the batter before cooking. Consistent Cooking: Keep the heat at medium to prevent burning. Adjust as necessary, and always test the first pancake to gauge the temperature of your skillet. Storage Tip: If you have leftovers, store the pancakes in an airtight container in the fridge. Reheat in a toaster for a quick breakfast. {{image_4}} You can easily make gluten-free gingerbread pancakes. Instead of all-purpose flour, try using almond flour or coconut flour. These options add a nice flavor and texture. If you use almond flour, you may need less liquid. Coconut flour absorbs more moisture, so add a bit more milk to your batter. Making vegan gingerbread pancakes is simple too. Replace the egg with a flax egg. To make this, mix 1 tablespoon of ground flaxseed with 2.5 tablespoons of water. Let it sit for five minutes until it thickens. For the milk, use almond milk, soy milk, or oat milk. These dairy-free options keep the pancakes light and fluffy. Want to spice things up? Add chocolate chips or chopped nuts to the batter. They add a delightful crunch and rich flavor. You can also adjust the spice level. If you like it spicy, add more ginger or cinnamon. For a milder taste, use less of these spices. Mixing in a hint of maple syrup can also enhance the sweetness. Store leftover gingerbread pancakes in the fridge. Place them in an airtight container. They can last for up to three days. If you want to keep them longer, freezing is a great option. Stack the pancakes with parchment paper in between each one. This keeps them from sticking together. Wrap the stack tightly in plastic wrap, then place it in a freezer bag. They can stay fresh in the freezer for up to two months. Reheating pancakes is easy. You can use a microwave or a skillet. For the microwave, place pancakes on a plate. Heat them for about 20-30 seconds. Check if they are warm enough. If not, heat in 10-second bursts. For a skillet, preheat it over low heat. Place the pancakes in the skillet and warm for about one minute on each side. This method helps keep them fluffy and tasty. Enjoy your gingerbread pancakes warm with syrup and whipped cream! Yes, you can make these pancakes ahead of time. To store them, let the pancakes cool completely. Stack them with parchment paper between each one to prevent sticking. Place the stack in an airtight container. You can keep them in the fridge for up to three days. For longer storage, freeze them for up to a month. To reheat, simply place a pancake in the microwave for about 30 seconds. You can also use a toaster or an oven at 350°F for a few minutes. This keeps them warm and fluffy. If you want to swap out all-purpose flour, there are good options. You can use whole wheat flour for extra fiber. Almond flour is gluten-free and adds a nice flavor. Oat flour is another great choice and gives a unique texture. When using these alternatives, adjust the liquid in your recipe. Some flours may absorb more moisture, so start with less liquid and add more as needed. To make the pancakes more festive, you can add fun toppings. Try a dusting of powdered sugar for a snowy look. Add cranberries or pomegranate seeds on top for color. You can also make a spiced whipped cream. Just mix whipped cream with a pinch of cinnamon or nutmeg. Lastly, drizzle some caramel or chocolate sauce for an extra treat. We explored the ingredients, preparation, and cooking tips for delicious pancakes. You learned how to combine dry and wet ingredients, mix the batter, and achieve the perfect golden finish. We also discussed storage, reheating methods, and variations for gluten-free or vegan diets. Pancakes can be a fun treat any time. Use your creativity with flavors and toppings to make them yours. Enjoy the cooking process and share your pancake joy with others. Happy cooking!

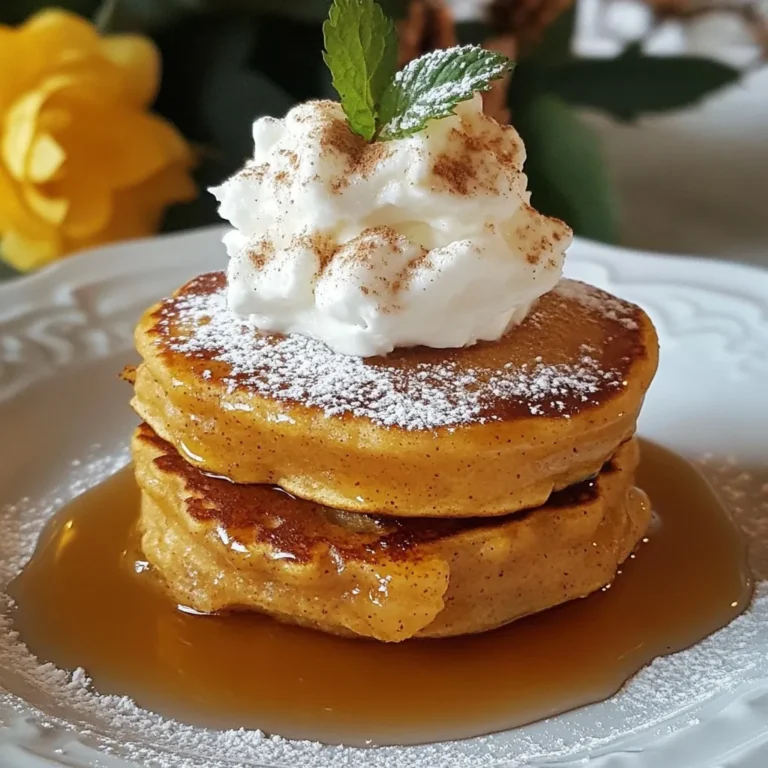
Gingerbread Pancakes Delightful and Festive Treat

To make this vegan chocolate peanut butter fudge, gather these items: - 1 cup natural peanut butter (creamy or chunky) - 1/2 cup pure maple syrup - 1/2 cup coconut oil, melted - 1/2 cup cocoa powder, unsweetened - 1 teaspoon pure vanilla extract - 1/4 teaspoon fine sea salt - 1/4 cup dairy-free chocolate chips - Optional: Chopped nuts or flaky sea salt for topping You can swap some ingredients if needed: - If you don’t have coconut oil, use any neutral oil like canola. - Maple syrup can be replaced with agave nectar for a similar sweetness. - Almond butter or cashew butter can replace peanut butter for a different taste. - Use carob powder instead of cocoa for a caffeine-free option. Choosing the best ingredients makes a big difference in flavor: - Pick natural peanut butter with minimal ingredients, like just peanuts and salt. - Look for pure maple syrup, not pancake syrup, for real flavor. - Choose organic cocoa powder for a richer taste and fewer chemicals. - Check that your coconut oil is fresh and smells pleasant, not rancid. - For chocolate chips, ensure they are dairy-free, especially if you have allergies. With these ingredients and tips, you can create a creamy, rich fudge that delights everyone! {{ingredient_image_2}} Making vegan chocolate peanut butter fudge is simple and fun. First, gather all your ingredients. You will need peanut butter, maple syrup, coconut oil, cocoa powder, vanilla extract, sea salt, and dairy-free chocolate chips. Prepare an 8x8 inch dish with parchment paper. This will help you lift the fudge out later. 1. Mix Peanut Butter and Coconut Oil: In a large bowl, add 1 cup of peanut butter and 1/2 cup of melted coconut oil. Whisk until smooth and creamy. 2. Add Remaining Ingredients: Slowly mix in 1/2 cup of maple syrup, 1/2 cup of cocoa powder, 1 teaspoon of vanilla extract, and 1/4 teaspoon of sea salt. Stir until everything blends well. 3. Fold in Chocolate Chips: Gently add 1/4 cup of dairy-free chocolate chips to the mix. Use a spatula to evenly spread them throughout the fudge. 4. Prepare the Dish: Line your baking dish with parchment paper. Leave some paper hanging over the edges for easy removal. 5. Pour Fudge Mixture: Pour the fudge mixture into the lined dish. Use your spatula to spread it evenly in the corners and smooth the top. 6. Add Toppings: If you like, sprinkle chopped nuts or flaky sea salt on top for added flavor and texture. 7. Chill the Fudge: Place the dish in the fridge. Let it chill for at least 2 hours until firm. 8. Cut the Fudge: Once set, lift the fudge out using the parchment overhang. Place it on a cutting board and cut it into squares or rectangles. - Use Room Temperature Ingredients: Make sure your peanut butter is at room temperature. This helps it mix smoothly with the coconut oil. - Whisk Thoroughly: Whisk the peanut butter and coconut oil well to avoid lumps. A smooth base makes for a creamy fudge. - Add Cocoa Gradually: When adding cocoa powder, do it slowly. This helps prevent clumping, ensuring a smooth chocolate flavor. - Mix Well: Stir continuously when adding the other ingredients. This keeps the mixture smooth and rich. Try these tips to create a perfect vegan chocolate peanut butter fudge. Enjoy the rich taste and creamy texture! When making vegan chocolate peanut butter fudge, avoid these common errors: - Not measuring ingredients carefully: Use measuring cups for accuracy. Too much or too little can change the texture. - Using hot coconut oil: Make sure the oil is melted but cool. Hot oil can make the fudge too runny. - Skipping the salt: A pinch of sea salt enhances the chocolate flavor. Don’t leave it out! - Not chilling long enough: Chill the fudge for at least two hours. This step is key for a firm texture. To take your fudge to the next level, try these tips: - Add a splash of coffee: A teaspoon of brewed coffee boosts chocolate flavor. It’s a simple way to deepen taste. - Mix in spices: A dash of cinnamon or cayenne can add warmth. Experiment to find what you like! - Incorporate textured toppings: Chopped nuts or a sprinkle of flaky sea salt gives a nice crunch and contrast. - Use flavored nut butter: Try almond or cashew butter for a twist on the classic peanut flavor. Presentation matters when serving your fudge. Here are some ideas: - Use a decorative platter: Lay the fudge squares on a pretty plate. It makes a great visual impact. - Garnish with fruit: Fresh berries or slices of banana add color and freshness. They also pair well with the fudge's richness. - Dust with cocoa powder: A light dusting adds elegance. It makes the fudge look more appealing. - Offer with tea or coffee: This pairing brings out the flavors and creates a delightful treat experience. These tips will help you create a fudge that looks as good as it tastes! Pro Tips Choose Quality Ingredients: Use high-quality natural peanut butter and pure maple syrup for the best flavor and texture in your fudge. Adjust Sweetness: If you prefer a sweeter fudge, feel free to add a little more maple syrup or a dash of agave syrup to taste. Let It Chill: Ensure you allow enough time for the fudge to chill in the refrigerator; this will help it set properly and achieve the right texture. Experiment with Flavors: Try adding a pinch of cinnamon or a splash of almond extract to the mixture for a unique flavor twist. {{image_4}} You can swap maple syrup for other sweeteners. Agave syrup works well, too. You can also use date syrup for a rich flavor. If you want a low-carb option, try erythritol. Just remember to adjust the amount to match the sweetness you like. This fudge is a great base. You can add different flavors easily. Try adding a tablespoon of almond extract for a nutty twist. For a fruity touch, add dried cherries or raspberries. You can also mix in a handful of chopped nuts for crunch. If you love spice, a dash of cinnamon can warm it up. If you have nut allergies, use sunbutter instead of peanut butter. This keeps it creamy and delicious. For those who can't have coconut, substitute with a light oil like canola or avocado oil. Always check labels to ensure that every ingredient is safe for your diet. To keep your vegan chocolate peanut butter fudge fresh, store it in an airtight container. This will help prevent moisture from getting in. You can keep it in the fridge for the best texture. If you want to enjoy it later, you can freeze it. Just make sure it is fully set before you store it. If you want to freeze the fudge, cut it into squares first. Place each piece in a single layer on a baking sheet. Freeze them for about two hours until they are firm. Then, transfer the squares to a freezer bag or container. This method helps prevent them from sticking together. You can keep the fudge in the freezer for up to three months. When stored in the fridge, the fudge will last for about one week. If you see any changes in texture or smell, it’s best to toss it. For the best taste, enjoy the fudge within a few days. If you freeze it, remember to let it thaw in the fridge overnight before enjoying. This will help keep it smooth and creamy! To make this fudge refined sugar-free, simply swap the maple syrup with a sugar alternative. You can use agave nectar or date syrup. Both options add natural sweetness without refined sugars. Just keep the same amount as the recipe calls for. Your fudge will still taste great and be healthy! Yes, you can use a different nut butter. Almond butter or cashew butter works well. Just keep in mind that it may change the flavor a bit. If you like the taste of those butters, you will enjoy the fudge just as much. Choose one that you love! The fudge takes about 2 hours to set properly in the fridge. Make sure it feels firm to the touch before you cut it. If you want to speed up the process, you can place it in the freezer for 30 minutes. Just don't forget about it! You want it set, not frozen solid. This blog post covered key aspects of making delicious fudge. We explored essential ingredients, helpful substitutions, and tips for choosing quality options. I shared a step-by-step guide and tricks to avoid common mistakes. You learned about variations to suit different diets and preferences. Finally, we discussed proper storage to keep your fudge fresh. Use these insights to create your perfect fudge. Enjoy every bite!

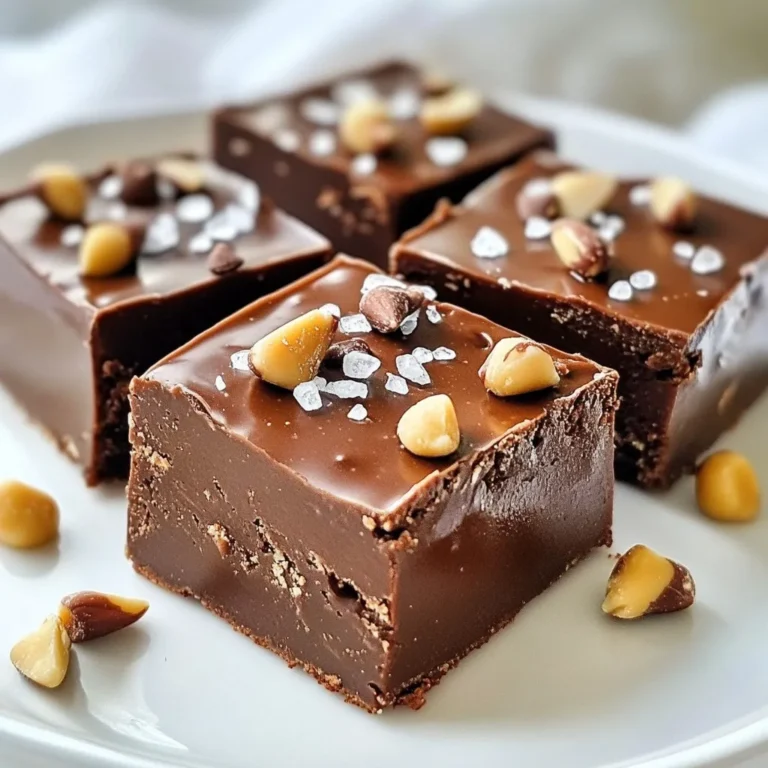
Vegan Chocolate Peanut Butter Fudge Rich and Creamy Treat

When making No Bake Pumpkin Chocolate Oat Bars, you need a few key ingredients. They work together to create a tasty treat that’s easy to prepare. Here's what you will need: - 1 cup rolled oats - 1/2 cup pumpkin puree - 1/4 cup almond butter (or your favorite nut butter) - 1/4 cup honey or maple syrup - 1/3 cup dark chocolate chips - 1 teaspoon vanilla extract - 1 teaspoon pumpkin spice - 1/4 teaspoon salt - 1/4 cup chopped nuts (walnuts or pecans) – optional Each ingredient plays a role. The rolled oats give the bars a chewy texture. Pumpkin puree adds moisture and flavor. Almond butter keeps everything together while adding healthy fats. Honey or maple syrup sweetens the mix without overpowering the pumpkin. Dark chocolate chips provide a rich, chocolatey contrast. Vanilla extract and pumpkin spice round out the flavor, making these bars cozy and comforting. You can also add chopped nuts for crunch. They add a nice texture and nutty flavor. Feel free to swap in your favorite nut butter or sweetener. This recipe is flexible and fun to customize! Start by taking a big bowl. Add the rolled oats, pumpkin puree, almond butter, and honey or maple syrup. Mix these ingredients well with a spatula. Make sure there are no dry spots or lumps. A good blend is key for taste. Next, pour in the vanilla extract, pumpkin spice, and salt. Stir the mixture quickly until everything is mixed. This step helps to create a smooth and even mixture. A uniform consistency is important for the best flavor. Now, grab an 8x8 inch baking dish. Line it with parchment paper. Leave some paper hanging over the sides. This makes it easy to lift out the bars later. It’s a simple trick that saves time. Transfer the mixture into the lined baking dish. Use a spatula or your hands to press it down evenly. Make sure to pack it in tight. This helps the bars keep their shape when you cut them later. Put the baking dish in the fridge for at least 2 hours. This chilling time is important. It helps the bars become firm and hold together well. You want the right texture for the best bite. Once the bars are firm, lift them out using the parchment paper. Place them on a cutting board. Use a sharp knife to cut them into squares or rectangles. For a nice touch, arrange the bars on a platter. Drizzle some melted chocolate on top for extra flair. Sprinkle a bit of pumpkin spice for a charming finish. - Store your bars in an airtight container to keep them fresh. - Place parchment paper between layers to avoid sticking. - In the fridge, they last about a week. - Freeze them for up to three months for longer storage. - For best taste, eat them fresh but enjoy them longer if needed. - To reduce sweetness, use less honey or maple syrup. - Try using a sugar substitute like stevia or monk fruit. - Start with half the amount, then taste and adjust. - Remember, natural sweeteners can change the flavor a bit. - Consider adding spices like cinnamon or nutmeg for warmth. - Try mixing in dried fruits like cranberries or raisins for added texture. - You can also use seeds like chia or flax for extra crunch. - Experiment with different nut butters for unique flavors. {{image_4}} You can switch the almond butter for many types. Peanut butter gives a strong taste. Sunflower butter is great for nut-free diets. Cashew butter adds creaminess. Each nut butter changes the flavor and texture. Experiment with what you like. Make sure all your ingredients are gluten-free. Regular oats may have gluten. Look for certified gluten-free oats instead. You can also use ground flaxseed as a base. This keeps the bars tasty and safe for everyone. If you want a vegan treat, swap honey for maple syrup. This keeps it plant-based and sweet. You can add chia seeds for extra nutrition. Dried fruit or coconut can also boost flavor. These options make the bars fun and healthy! Store your No Bake Pumpkin Chocolate Oat Bars in airtight containers. This helps keep them fresh. If you have no airtight container, use parchment wraps. Wrap each bar tightly to prevent them from drying out. The best temperature for storing these bars is in the fridge. They stay firm and tasty when kept cool. You can also leave them at room temperature for a short time, but they last longer in the fridge. To freeze your bars, cut them into squares first. Place the cut bars in a single layer on a baking sheet. Freeze them for about one hour. After they are firm, transfer them to a freezer-safe bag. Remove as much air as possible to avoid freezer burn. When you want to eat them, take them out of the freezer. Let them thaw in the fridge for a few hours. If you need them fast, you can thaw them at room temperature. Enjoy them as is or with a warm drink. Check your bars for signs of spoilage. If they smell off or have a strange color, don't eat them. You should also look for mold or an unusual texture. You can keep these bars in the fridge for about a week. If frozen, they can last for up to three months. Always label your containers with the date to track freshness. Yes, you can use quick oats. The texture will change a bit. Quick oats are finer than rolled oats. They absorb liquid faster and may make the bars softer. If you prefer a chewier texture, stick with rolled oats. You can make these bars even healthier with a few swaps. Use almond butter or peanut butter for healthy fats. Replace honey with mashed banana or applesauce for less sugar. Add seeds like chia or flax for more fiber. Consider using dark chocolate that is at least 70% cocoa for added health benefits. If you don't have pumpkin puree, sweet potato works well. Cooked sweet potato gives a similar taste and texture. Butternut squash is another great option. Just make sure to puree it until smooth. Yes, these bars are perfect for kids! They have wholesome ingredients and offer good nutrition. With oats, pumpkin, and nut butter, they are filling and tasty. Just check for nut allergies before serving. These bars will last about one week in the fridge. Store them in an airtight container to keep them fresh. If you want them to last longer, freeze them. They can stay good for up to three months if frozen. These no-bake pumpkin bars are simple and fun to make. We covered key ingredients, like oats and pumpkin puree, and went through each step from mixing to chilling. You can customize flavors and decide on sweetness levels. Don’t forget the tips on storage and freezing to keep them fresh. With these easy steps and variations, you can enjoy delicious treats year-round. Now, it’s time for you to whip up your own batch and share them with friends and family!

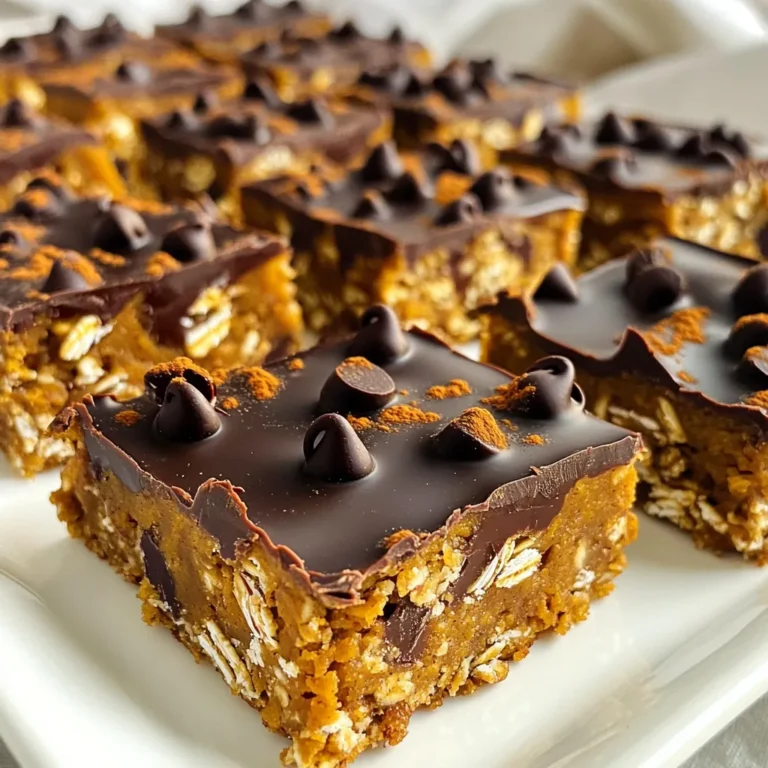
No Bake Pumpkin Chocolate Oat Bars Easy Recipe

- 1 ½ cups graham cracker crumbs - ½ cup unsalted butter, melted - 2 tablespoons brown sugar - 1 teaspoon cinnamon - 16 oz cream cheese, softened to room temperature - ¾ cup granulated sugar - 2 large eggs - 1 teaspoon vanilla extract - ½ teaspoon ground cinnamon - 1 medium apple, peeled and finely diced - ½ cup caramel sauce (store-bought or homemade) - 1 apple, thinly sliced for garnish When I make the Caramel Apple Cheesecake Tart, I gather all my ingredients first. This helps me stay organized. The crust is simple, mixing graham cracker crumbs, melted butter, brown sugar, and cinnamon. You want it to feel like wet sand. For the cheesecake filling, cream cheese is key. I let it sit at room temperature so it blends well. Adding sugar, eggs, vanilla, and cinnamon makes it smooth and sweet. I love using diced apples, which add a nice crunch and flavor. For the topping, I go for a rich caramel sauce and thin apple slices. This adds a beautiful finish to the tart. Using these fresh ingredients makes the tart taste great. Make sure to follow each step for the best result. Happy baking! - Preheat the oven to 350°F (175°C). - In a mixing bowl, combine 1 ½ cups graham cracker crumbs, ½ cup melted unsalted butter, 2 tablespoons brown sugar, and 1 teaspoon cinnamon. Mix well until it feels like wet sand. - Press the crumb mixture evenly into the bottom and halfway up the sides of a tart pan. - Bake for 8-10 minutes, until it is lightly golden. Let it cool completely. - In a large mixing bowl, beat 16 oz softened cream cheese with ¾ cup granulated sugar until smooth. - Add 2 large eggs, one at a time, mixing well after each addition. Stir in 1 teaspoon vanilla extract and ½ teaspoon ground cinnamon. - Gently fold in 1 finely diced apple. - Pour the cheesecake filling into the cooled crust. Spread it evenly with a spatula. - Bake for 30-35 minutes. The edges should be set, but the center will jiggle slightly. Turn off the oven and let the tart cool inside for 30 minutes. - Once the tart is cool, drizzle ½ cup caramel sauce over the top. - Garnish with thinly sliced apples arranged in a nice pattern. - Refrigerate the tart for at least 2 hours before serving. This helps the flavors meld and sets the filling. - Ensure butter is fully melted for even texture. - Press the crust firmly to avoid crumbling. When making the crust, melted butter binds everything together. It helps achieve a smooth texture, so take care to melt it fully. Pressing the crust tightly into the pan gives it strength. This way, each slice stays intact when you cut it. - Allow cream cheese to soften completely. - Avoid overmixing after adding the diced apple. Softened cream cheese blends well into a creamy filling. Let it sit out for about 30 minutes before mixing. When you add the diced apple, fold it gently. This keeps the apple pieces whole and adds nice texture. - Let the tart cool gradually in the oven. - Use a water bath if desired for even baking. After baking, turn off the oven and leave the tart inside. This slow cooling helps prevent cracks on the surface. If you want to be extra careful, use a water bath. It keeps the heat steady and helps the tart bake evenly. {{image_4}} You can change up the flavor of your caramel apple cheesecake tart easily. Adding spices like nutmeg or allspice to the filling gives a warm kick. It makes every bite special. You can also try different apple varieties. For example, Fuji or Gala apples can add a sweet twist. Each type of apple changes the taste and texture slightly. If you want a fun twist on the crust, you can swap graham cracker crumbs for crushed cookies. Chocolate cookies add a rich taste. You can also use a gluten-free crust option. Almond flour or oat flour works great for a gluten-free base. This keeps everyone happy at the table. Toppings can make your tart stand out. You can drizzle chocolate over the top for a sweet touch. Chopped nuts or crushed candies add a nice crunch. Think about using toffee bits or pecans for extra flavor. Getting creative with toppings makes your tart unique and exciting. To keep your caramel apple cheesecake tart fresh, refrigerate any leftovers. Use an airtight container. You can store it for up to 5 days. This helps maintain its creamy texture and flavor. Remember to keep the caramel sauce separate. Drizzle it on just before serving. This keeps the tart from getting soggy. If you want to save some tart for later, freezing is a great option. Wrap each slice tightly in plastic wrap. Then place the wrapped slices in a freezer bag. You can freeze them for up to 3 months. When you're ready to enjoy, thaw the slices in the fridge. This will help them regain their creamy goodness. Yes, you can use a pre-made tart crust if preferred. This saves time and effort. Just make sure it fits your tart pan well. A store-bought crust can still taste great with the filling. The edges should be set with a slight jiggle in the center. This means it will firm up as it cools. If it looks too wobbly, give it a few more minutes in the oven. Trust your eyes and feel for the right texture. Granny Smith or Honeycrisp apples are excellent choices. Granny Smith adds tartness, while Honeycrisp offers sweetness. You can mix both for a layered flavor. The crunchiness of these apples also holds up well in baking. Yes, prepare it a day in advance for maximum flavor melding. This allows the flavors to blend beautifully. Just keep it in the fridge, and it will be ready when you are. Enjoy it chilled for the best taste. This blog post covered the key steps to create a delicious apple cheesecake tart. We explored the ingredients for the crust, filling, and caramel topping. Then, I shared step-by-step instructions to assemble and bake your tart. With tips to ensure perfect texture and variations to suit your taste, you can easily customize the recipe. Remember, patience is key. Chill the tart before serving for the best flavor. Enjoy creating this treat that’s sure to impress!

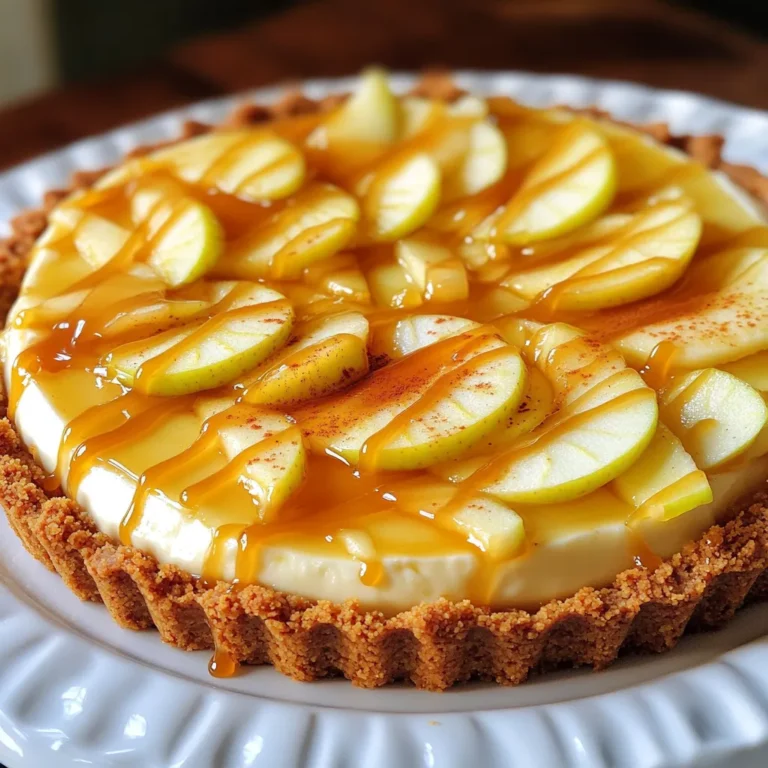
Caramel Apple Cheesecake Tart Delightful and Easy Recipe

- 4 cups vegetable broth - 1 can (14 oz) coconut milk - 2 tablespoons red curry paste - 1 cup broccoli florets - 1 cup snap peas - 1 red bell pepper, thinly sliced - 2 green onions, finely chopped - Fresh cilantro, for garnish - 1 tablespoon soy sauce - 1 tablespoon maple syrup - Salt and pepper, to taste - Lime wedges, for serving Coconut Curry Ramen brings warmth and comfort. The main ingredients set the stage for this dish. The vegetable broth forms a rich base. Coconut milk adds a creaminess that makes it special. Red curry paste gives it a bold flavor that excites your taste buds. Next, we have the vegetables and toppings. Broccoli florets add crunch and color. Snap peas bring sweetness and freshness. Thinly sliced red bell pepper adds more color and a slight crunch. Green onions give a nice bite. Fresh cilantro ties it all together with its herbaceous notes. Don’t forget the seasonings and condiments. Soy sauce adds depth and umami. Maple syrup balances the spice with a hint of sweetness. Salt and pepper help enhance all the flavors. Lime wedges are the finishing touch. A squeeze of lime brightens the dish, making each bite refreshing. These ingredients work together to create a flavorful and comforting meal. You can easily adjust the veggies or toppings to your taste. Enjoy crafting your own version of Coconut Curry Ramen! {{ingredient_image_2}} 1. Start by pouring 4 cups of vegetable broth into a large pot over medium heat. 2. Bring the broth to a gentle simmer. This should take just a few minutes. 3. Once it simmers, whisk in 1 can of coconut milk and 2 tablespoons of red curry paste. 4. Add 1 tablespoon of soy sauce and 1 tablespoon of maple syrup. Mix until smooth. 5. Let the broth simmer gently for about 5 minutes. This helps the flavors blend nicely. 1. Add 200 grams of ramen noodles to the pot. 2. Cook the noodles according to the package instructions, usually around 3-4 minutes. 3. Stir the noodles occasionally to make sure they do not stick together. 1. In the last minute of cooking, add 1 cup of broccoli florets, 1 cup of snap peas, and 1 red bell pepper, thinly sliced. 2. Stir gently. You want the veggies to stay crisp, not mushy. 1. Once cooked, remove the pot from heat. 2. Ladle the ramen into deep bowls. 3. Garnish each bowl with finely chopped green onions and fresh cilantro. 4. Serve with lime wedges on the side for a zesty touch. Enjoy your warm, flavorful meal! To make a perfect broth, focus on balance. Start with vegetable broth as your base. The coconut milk adds creaminess and sweetness. Mix in red curry paste for that warm kick. Simmer gently to let flavors blend. For ramen noodles, timing is key. Add them to your broth when it simmers. Follow the package instructions, usually about 3-4 minutes. Stir occasionally to prevent sticking. This ensures they cook evenly and stay tender. Adjust the spice levels by adding more or less red curry paste. If you like it spicy, try adding chili flakes or fresh chili. For a milder taste, reduce the curry paste. You can also add a dash of soy sauce for depth. Try swapping seasonings for a unique twist. Add ginger for warmth or garlic for aroma. A splash of lime juice enhances freshness. Experiment with herbs like basil or mint for new flavors. Serve ramen hot in deep bowls to showcase its beauty. The colorful veggies should stand out. Place lime wedges beside the bowls for a pop of color. This invites guests to squeeze fresh juice over their meal. Garnish each bowl with green onions and fresh cilantro. This adds flavor and a bright look. You can also sprinkle sesame seeds for extra crunch. Make it inviting and fun for everyone to enjoy! Pro Tips Tip Title: Use Fresh Ingredients: Fresh vegetables will enhance the flavor and texture of your ramen. Look for vibrant, seasonal produce for the best results. Tip Title: Adjust Spice Level: If you enjoy a bit more heat, consider adding sliced chili peppers or a dash of sriracha to your broth for an extra kick. Tip Title: Noodle Cooking Tips: To prevent your ramen noodles from becoming mushy, be sure to cook them just until al dente, as they'll continue to soften in the hot broth. Tip Title: Garnishing Wisely: Don’t skip the garnishes! Fresh herbs and lime juice add brightness and complexity to the dish, making it visually appealing and delicious. {{image_4}} You can swap proteins in this dish to suit your taste. Tofu is a great choice for a vegan option. It absorbs flavors well and adds a nice texture. If you prefer meat, chicken or shrimp works well too. Just cook them before adding to the broth. Adding different vegetables can change the dish. Try carrots for sweetness or mushrooms for umami. You can also use spinach or bok choy for a leafy green twist. The more colors, the better! Changing the curry paste can give your ramen a new taste. Green curry paste adds a fresh, herbal flavor. Yellow curry paste brings a milder, sweeter taste. You can even make your own paste for a unique touch. Using different types of broth can also change the vibe. Chicken broth adds depth, while miso broth gives a rich, savory flavor. Each option adds its own charm and keeps things exciting. Coconut curry ramen can blend with other cuisines for fun fusion ideas. Try adding kimchi for a Korean twist or serve it with tacos. The mix of flavors can surprise and delight your taste buds. Pairing this ramen with side dishes from other cultures can enhance your meal. Serve it with spring rolls for a light touch or a simple salad for crunch. Enjoy exploring new flavors with your coconut curry ramen! To keep your coconut curry ramen fresh, store it in the fridge. Use airtight containers to prevent spoilage. You can keep it for up to three days. Divide the ramen into single servings for easy meals later. When reheating ramen, the key is to maintain its texture. I suggest using the stovetop for the best results. Pour the ramen into a pot and heat over low. Stir until it warms. If you use a microwave, place it in a bowl. Heat in short bursts, stirring in between. This helps avoid soggy noodles. You can freeze your ramen for longer storage. It’s best to freeze the broth and noodles separately. This way, the noodles won’t become mushy. Place the cooled broth in a freezer-safe bag. For the noodles, you can keep them in a container. When you’re ready to eat, thaw both in the fridge overnight. Heat the broth on the stove and cook the noodles fresh to enjoy. To make this dish vegan, swap the broth with vegetable broth. Use coconut milk instead of dairy. For the red curry paste, check the label to ensure it contains no fish sauce. If you use soy sauce, make sure it is vegan. You can replace any animal protein with tofu or chickpeas. This keeps the meal hearty and plant-based. Yes, you can switch up the noodles! Soba or udon noodles work well. Rice noodles are a gluten-free option, too. Cooking times will vary; check the package. Ramen noodles often cook in 3-4 minutes, while soba may take about 5 minutes. Udon noodles usually need around 8-10 minutes. Coconut curry ramen blends two worlds. Ramen hails from Japan, known for its rich broth and noodles. Curry has deep roots in many Asian cultures. This dish shows how flavors can mix. The use of coconut adds a tropical twist, making it unique. Both ramen and curry share stories of comfort and joy, making this dish special. For a complete meal, consider light side dishes. A simple cucumber salad pairs well. Spring rolls offer a nice crunch. For drinks, try iced green tea or a light beer. These choices will complement the curry flavors nicely. Enjoying them together creates a balanced dining experience. This blog post took you through the basics of making coconut curry ramen. We covered the main ingredients, including vegetable broth, coconut milk, and fresh veggies. You learned key steps for preparing your broth and noodles, as well as tips for enhancing flavor and presentation. Remember, you can customize your ramen with different proteins and vegetables. Don’t forget about storage tips for leftovers! Enjoy your cooking adventure and impress yourself with this delicious dish.

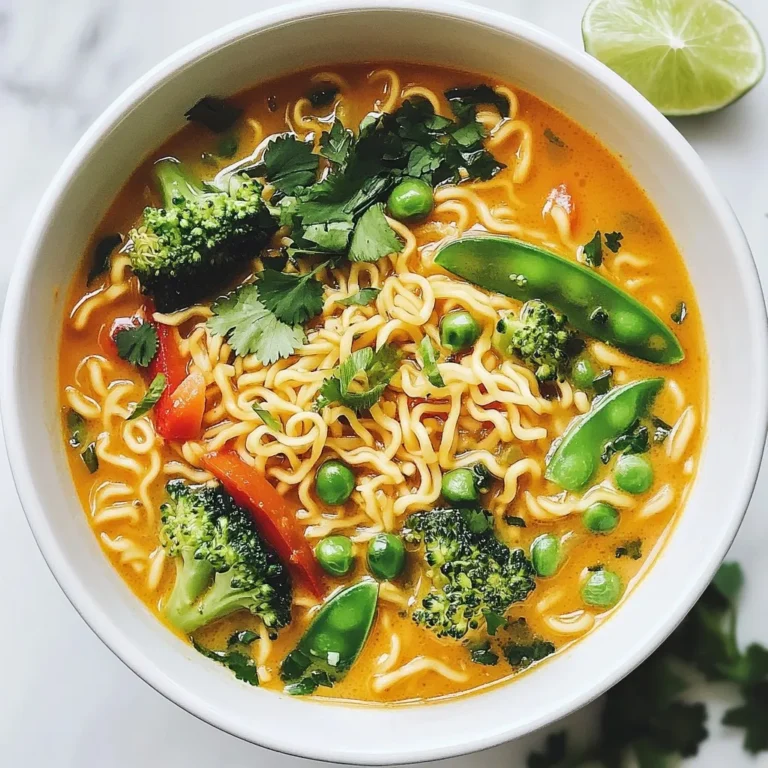
Coconut Curry Ramen Comforting and Flavorful Meal

- 1 cup unsalted butter - 1 ½ cups granulated sugar - 1 cup brown sugar, packed - 4 large eggs - 1 teaspoon vanilla extract - 1 cup all-purpose flour - 1 cup unsweetened cocoa powder - 1 teaspoon baking powder - ½ teaspoon salt - 2 tablespoons finely ground espresso beans - 1 cup semi-sweet chocolate chips - ½ cup chopped walnuts (optional) - 9x13 inch baking pan - Medium-sized saucepan - Spatula - Mixing bowls - Whisk - Sifter Use high-quality semi-sweet chocolate chips for a rich flavor. Choose finely ground espresso beans for a smooth blend. {{ingredient_image_2}} 1. Preheat your oven to 350°F (175°C). 2. Prepare a 9x13 inch baking pan. You can grease it or line it with parchment paper. This helps in removing the brownies later. 3. In a medium saucepan, melt 1 cup of unsalted butter over low heat. Stir occasionally until it melts fully. 4. Once melted, remove it from heat. Mix in 1 ½ cups of granulated sugar and 1 cup of packed brown sugar. Stir until smooth. 5. Let the butter-sugar mix cool slightly. When it’s warm but not hot, add 4 large eggs one at a time. Whisk thoroughly after each egg. 6. Stir in 1 teaspoon of vanilla extract. Make sure it is mixed in well. 1. In another bowl, sift together 1 cup of all-purpose flour and 1 cup of unsweetened cocoa powder. 2. Add in 1 teaspoon of baking powder, ½ teaspoon of salt, and 2 tablespoons of finely ground espresso beans. Mix well to avoid lumps. 1. Gradually fold the dry mixture into the wet mixture using a spatula. 2. Mix gently until just combined. Avoid over-mixing to keep the brownies tender. 3. Fold in 1 cup of semi-sweet chocolate chips and ½ cup of chopped walnuts if you like. This adds a nice crunch. 1. Transfer the brownie batter to the prepared baking pan. Spread it evenly using your spatula. 2. Bake the brownies in the preheated oven for 25-30 minutes. 3. To check if they are done, insert a toothpick into the center. It should come out with a few moist crumbs, but not wet batter. 4. Once baked, remove the brownies and let them cool in the pan for about 15 minutes. 5. Carefully transfer them to a wire rack to cool completely. When cool, cut them into squares and enjoy! To get your brownies just right, focus on mixing. Over-mixing can lead to tough brownies. When you combine the dry and wet ingredients, mix gently. Stop as soon as you see no flour. This keeps your brownies soft and fudgy. Cooling is also key. After baking, let your brownies cool in the pan for 15 minutes. Then, move them to a wire rack. This helps them set and improves their texture. If you skip this step, they might crumble when cut. For a beautiful finish, dust your brownies with powdered sugar. Use a fine sieve for an even look. This simple touch makes them look fancy. To make your brownies even more special, serve them warm with a scoop of vanilla ice cream. The warm brownie pairs perfectly with the cold ice cream. You can also drizzle melted chocolate on top for an extra treat. This adds a rich, sweet layer that everyone will love. Pro Tips Butter Temperature: Ensure the butter is melted but not too hot when mixing with sugar; this helps achieve a smooth batter without cooking the eggs. Egg Incorporation: Adding eggs one at a time and whisking thoroughly helps to create a light and airy texture in the brownies. Mixing Method: Be gentle when folding in the dry ingredients and chocolate chips to prevent over-mixing, which can lead to tough brownies. Cooling Time: Allowing the brownies to cool in the pan for a bit before transferring to a wire rack helps them set properly, making them easier to cut. {{image_4}} You can make your Chocolate Espresso Brownies even better! Try adding different nuts or chocolates. For instance, swap walnuts for pecans or almonds. You can also use dark chocolate chips for a richer taste. If you want a twist, add orange zest. It gives a bright flavor that pairs well with chocolate. Mint is another fun option. A few drops of mint extract can make your brownies feel fresh and exciting. If you need gluten-free brownies, use almond flour instead of all-purpose flour. This change keeps the texture nice and moist. You can also try gluten-free baking mixes. For nut-free brownies, simply skip the walnuts. Use sunflower seeds or pumpkin seeds instead. These options add a nice crunch without using nuts. Enjoy exploring these variations to fit your needs! To keep your brownies fresh, store them properly. First, let them cool completely. Place them in an airtight container. This will help keep them moist. You can also refrigerate them for extra freshness. Just make sure they are covered well. If you want to freeze them, cut the brownies into squares. Wrap each piece in plastic wrap. Then, place them in a freezer bag. They can stay frozen for up to three months. At room temperature, brownies last about four to five days. Keep them in a cool, dry place. If they start to feel hard or dry, they may be spoiled. Look for signs like an off smell or mold. If you see any changes, it's best to toss them. Always trust your senses when it comes to food safety. Can I use dark chocolate instead of semi-sweet? Yes, you can use dark chocolate. Dark chocolate adds a rich flavor. Keep in mind, dark chocolate is less sweet. You may want to adjust the sugar in the recipe. How can I make brownies fudgier? To make brownies fudgier, use less flour. You can also add an extra egg. Another tip is to bake for a shorter time. Check for moist crumbs on the toothpick, not clean. Can I use espresso powder instead of ground beans? Yes, espresso powder works well. It blends easily into the batter. Use about half the amount of espresso powder as ground beans for a strong flavor. What’s the best type of espresso for baking? Use a finely ground espresso. A dark roast will give a bold flavor. Look for high-quality beans for the best results. Freshly ground beans enhance the taste. What to do if brownies are too dry? If your brownies are dry, try adding a bit of milk. You can also add melted butter to the batter. Make sure not to over-bake them next time. How to fix brownies that didn’t rise? If brownies don’t rise, check your baking powder. Make sure it's fresh. Also, don’t forget to mix the batter well. This helps incorporate air for better rising. In this blog post, we explored the key ingredients and detailed steps for baking the perfect brownies. I shared tips on mixing and baking, plus ideas for storage and variations. Remember, the key to great brownies lies in not over-mixing and experimenting with flavors. Don't forget to enjoy them warm with ice cream or dusted with sugar. With these insights, you can bake brownies that impress everyone. Happy baking!

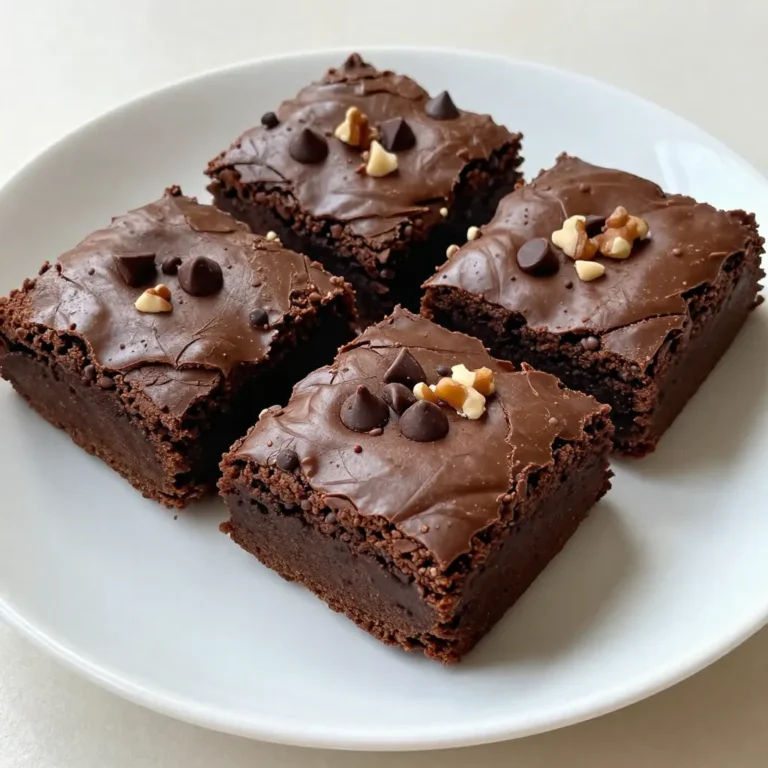
Chocolate Espresso Brownies Rich and Luscious Recipe

To make this creamy broccoli cheddar soup, you need the following: - 4 cups fresh broccoli florets - 1 medium onion, finely diced - 2 medium carrots, diced - 3 cloves garlic, minced - 4 cups vegetable broth - 1 cup heavy cream - 2 cups shredded sharp cheddar cheese - 1 teaspoon dried thyme - 1 teaspoon salt (adjust to taste) - ½ teaspoon black pepper (adjust to taste) - 1 tablespoon olive oil - Optional: croutons and fresh parsley for garnish If you don’t have something on hand, you can swap ingredients easily: - Broccoli: You can use frozen broccoli instead of fresh. - Onion: Leeks or shallots work well as a substitute. - Carrots: Sweet potatoes or parsnips add a nice twist. - Vegetable broth: Chicken broth can be used if you prefer. - Heavy cream: Coconut milk gives a dairy-free option. - Cheddar cheese: Gruyère or Monterey Jack can replace cheddar. Garnishes can elevate your soup. Here are a few fun ideas: - Croutons add crunch and texture. - Fresh parsley brightens the look and flavor. - A drizzle of olive oil gives richness. - A sprinkle of chili flakes adds a bit of heat. These ingredients not only create flavor but also make your soup visually appealing. Enjoy crafting your creamy broccoli cheddar soup! First, gather your ingredients. You need fresh broccoli, onion, carrots, garlic, and broth. Start by adding the diced onion, carrots, and minced garlic into your slow cooker. Drizzle with olive oil, then stir gently. This helps coat the veggies nicely. Next, place the broccoli florets on top of the onion and carrot mix. It’s important to layer the broccoli like this, so it cooks evenly. Now, pour in the vegetable broth. Add in dried thyme, salt, and black pepper. Stir gently to mix everything together. You want all the flavors to blend well before cooking. Cover the slow cooker with its lid. Set it to cook on low for 6-7 hours or high for 3-4 hours. During this time, the broccoli and other veggies will become tender. This slow cooking allows all the flavors to shine through. You can check on it halfway through. Just give it a little stir to keep things moving. Once your cooking time is up, it’s time to blend the soup. Use a hand immersion blender for a quick mix right in the pot. If you don’t have one, carefully transfer the soup to a countertop blender. Remember to let steam escape to avoid splashes. After blending, return the creamy soup to the slow cooker if needed. Now, stir in the heavy cream and shredded cheddar cheese. Let this cook on low for another 30 minutes. This step melts the cheese and warms the soup. Before serving, taste the soup. Adjust salt and pepper if needed. Then, ladle the soup into bowls. Top with croutons and fresh parsley for a nice touch. Enjoy your creamy broccoli cheddar soup! To make your soup extra creamy, use heavy cream. This cream adds a rich texture. When blending, make sure to blend well. A smooth blend makes a big difference. If you want a thicker soup, blend a bit more. You can also add more cheese for creaminess. To boost flavor, add more herbs. Fresh thyme or parsley can brighten the soup. You might try a pinch of nutmeg for warmth. For a kick, a dash of hot sauce can work wonders. Always taste as you go. Adjust salt and pepper to suit your taste. Don’t skip the blending step. Leaving chunks can change the soup's texture. Be careful with the cheese. Add it slowly to avoid clumping. If your soup is too thick, add more broth or cream. Lastly, don't rush the cooking time. Slow cooking brings out the best flavors. {{image_4}} You can enjoy this soup without dairy. Use coconut milk or almond milk instead of cream. For cheese, try nutritional yeast. It adds a cheesy taste without dairy. You can also use cashew cream for a rich texture. Blend soaked cashews with water until smooth. This keeps the soup creamy while being plant-based. Want to boost the protein? Add shredded chicken or white beans. You can add cooked chicken during the last cooking hour. For beans, canned ones work well. Rinse and drain them before adding. They not only add protein but also make the soup heartier. Feel free to switch up the veggies! Cauliflower, spinach, or peas are great choices. They bring new flavors and colors. For seasonings, try adding a touch of paprika or a pinch of cayenne. This will give your soup a nice kick. Experiment with fresh herbs, like basil or dill, for a unique twist. You can store your creamy broccoli cheddar soup in the fridge. First, let it cool down. Then, pour it into an airtight container. This soup stays fresh for about 3 to 4 days. Before serving, check for any off smells or signs of spoilage. If you want to save some for later, freezing works well. Use a freezer-safe container or bags. Make sure to leave some space for expansion. This soup can last for up to 3 months in the freezer. When you're ready to eat, thaw it in the fridge overnight. To reheat your soup, you can use the stove or microwave. If using the stove, heat over low to medium heat, stirring often. If using the microwave, heat in short bursts, stirring in between. Always check the temperature so it warms evenly. Add a splash of cream if it seems too thick after reheating. Yes, you can use frozen broccoli. Thaw and drain it first. Frozen broccoli cooks faster than fresh. So, add it during the last hour of cooking. This keeps the broccoli tender and bright. To thicken the soup, you have a few options. You can blend more of the soup. This adds creaminess without extra ingredients. Another option is to add a cornstarch slurry. Mix 1 tablespoon of cornstarch with 2 tablespoons of water. Stir this into the soup and let it cook for 10 more minutes. This soup pairs well with crusty bread or a fresh salad. Grilled cheese sandwiches are also a favorite. For a lighter option, try a simple green salad. These sides add balance and flavor to your meal. You now have all the steps to make a great broccoli cheddar soup. We covered key ingredients, cooking tips, and how to add your own twist. Remember to focus on the creaminess and avoid common mistakes for the best results. You can try different veggies or proteins to keep it fun. Store leftovers properly, and don't hesitate to experiment. Enjoy your cooking journey and savor that warm, cheesy goodness. Your soup will surely impress!

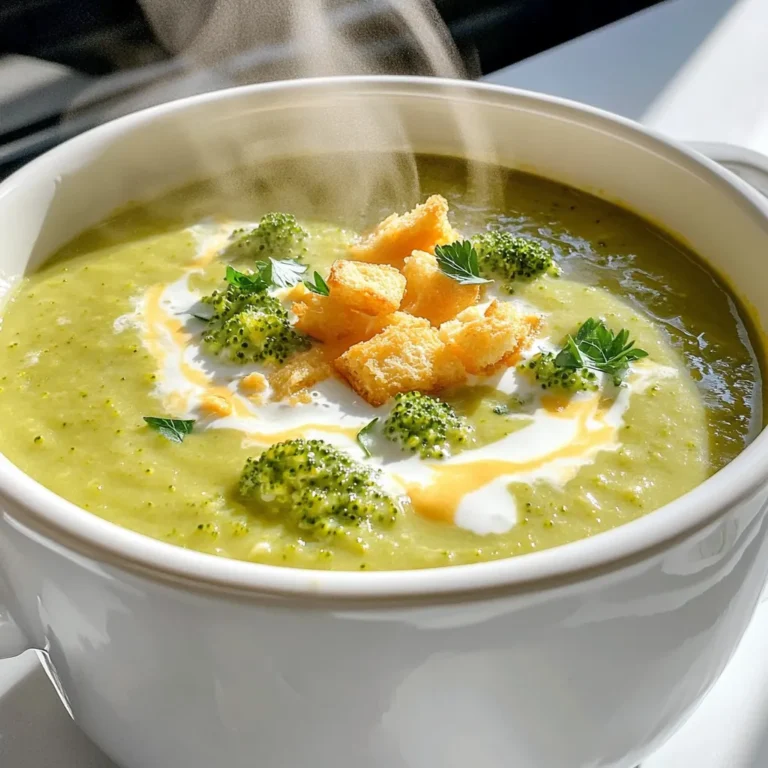
Creamy Broccoli Cheddar Soup Slow Cooker Delight

To make the best brown butter pumpkin spice blondies, you need these key ingredients: - 1 cup unsalted butter - 1 cup packed brown sugar - 1/2 cup granulated sugar - 2 large eggs - 1 teaspoon pure vanilla extract - 2 cups all-purpose flour - 1 teaspoon baking powder - 1 teaspoon baking soda - 1 teaspoon pumpkin spice blend - 1/2 teaspoon fine sea salt - 1 cup creamy white chocolate chips - 1/2 cup chopped pecans (optional) The chopped pecans add a nice crunch and depth to the flavor. If you have allergies or preferences, here are some substitutes: - Butter: Use coconut oil or vegan butter for a dairy-free option. - Sugars: You can try coconut sugar instead of brown sugar. - Eggs: Use flaxseed meal mixed with water for a vegan version. - Flour: For gluten-free blondies, almond flour or a gluten-free blend works well. - Chocolate chips: Dark chocolate or dairy-free chips are great swaps. These substitutions help you enjoy the blondies while keeping them safe for your diet. Measuring accurately is crucial in baking. It ensures the right texture and taste. Use these tools for best results: - Dry measuring cups: Perfect for flour and sugar. - Liquid measuring cups: Great for butter and eggs. - Kitchen scale: For precise measurements, especially if you bake often. Being precise helps you make the best brown butter pumpkin spice blondies every time. 1. Preheat the Oven: First, set your oven to 350°F (175°C). This helps the blondies bake evenly. 2. Prepare the Baking Pan: Grease a 9x13 inch baking pan. Line it with parchment paper. Leave some paper sticking out for easy lifting later. 3. Brown the Butter: To brown the butter, melt 1 cup of unsalted butter in a medium saucepan. Heat it over medium. Stir often to keep it from burning. After about 5-7 minutes, the butter will foam and turn golden brown. It should smell nutty. Once it’s browned, take it off the heat and let it cool a bit. 1. Mix the Sugars: In a large bowl, combine the cooled browned butter with 1 cup of brown sugar and 1/2 cup of granulated sugar. Whisk them together until the mix is smooth and creamy. 2. Add Eggs and Vanilla: Add 2 large eggs one at a time. Mix well after each egg. Then, pour in 1 teaspoon of pure vanilla extract. Stir until it’s all well blended. 3. Prepare the Dry Ingredients: In another bowl, whisk together 2 cups of all-purpose flour, 1 teaspoon of baking powder, 1 teaspoon of baking soda, 1 teaspoon of pumpkin spice blend, and 1/2 teaspoon of fine sea salt. Ensure everything is mixed well. 4. Combine Mixtures: Gradually add the dry mix to the wet mix. Stir gently. You want to combine them without overmixing. It’s fine if a few small flour streaks remain. 5. Fold in the Mix-ins: Carefully fold in 1 cup of creamy white chocolate chips. If you like, add 1/2 cup of chopped pecans. This gives the blondies a nice crunch. 1. Bake the Blondies: Pour the batter into the prepared baking pan. Spread it evenly. Bake in the preheated oven for 25-30 minutes. To check if they are done, insert a toothpick in the center. It should come out clean with a few moist crumbs. 2. Cool and Serve: Once baked, let the blondies cool in the pan for about 10 minutes. Use the parchment paper to lift them out and place them on a wire rack. Let them cool completely. After cooling, cut into squares to serve. Enjoy your delicious blondies! To test for doneness, use a toothpick. Insert it into the center of the blondies. If it comes out clean or with a few moist crumbs, they are ready. Avoid checking too soon to prevent overbaking. For a chewy texture, do not overmix the batter. Mixing just until combined helps keep the blondies soft. Use room temperature eggs to help create a smooth batter. Also, be sure to bake at the right temperature, 350°F (175°C), for perfect results. When serving blondies, cut them into squares for a neat look. You can dust them with powdered sugar for a sweet touch. For a warm treat, serve them with a scoop of vanilla ice cream on top. This adds creaminess and balances the spice. You can also pair blondies with caramel sauce or chocolate sauce for extra flavor. A drizzle of sauce adds a nice visual appeal and makes each bite extra enjoyable. One common issue is overbaking. Keep an eye on the time. If you notice the edges turning dark, check earlier. Signs of overbaking include a dry texture and a hard crust. Another mistake is not cooling them enough. Allow the blondies to cool for at least 10 minutes before cutting. This helps them firm up, making them easier to slice. If you cut them too soon, they may crumble and fall apart. {{image_4}} You can easily change the taste of your blondies with different spices. Try using cinnamon or nutmeg instead of pumpkin spice. You can also add a splash of almond or orange extract for a fresh twist. Want some crunch? Toss in chocolate chips, chopped pecans, or walnuts. Dried fruits like cranberries or raisins add sweetness and texture too. If you need gluten-free blondies, swap the all-purpose flour for a gluten-free blend. For a vegan option, use flax eggs and coconut oil instead of butter. You can lower the sugar by using natural sweeteners like applesauce or maple syrup. Lightening up the butter with a low-fat version also works well. These changes keep your blondies tasty and fit different diets. Make your blondies fit the season! For fall, add caramel bits or apple chunks. In winter, stir in peppermint chips. You can even change the presentation. Cut them into holiday shapes and sprinkle with festive toppings. Serve them warm with cinnamon ice cream for a cozy treat during chilly months. Each season brings new flavors to explore! To keep your brown butter pumpkin spice blondies fresh, wrap them well. Use plastic wrap or place them in an airtight container. This helps prevent them from drying out. Store them at room temperature for up to three days. If you want them to last longer, freezing works great! To freeze blondies, cut them into squares first. Wrap each square in plastic wrap. Then, place the wrapped squares in a freezer-safe bag or container. This way, you can enjoy a tasty blondie anytime. When it's time to enjoy your blondies again, reheating is key. Preheat your oven to 350°F (175°C). Place the blondies on a baking sheet and cover them with foil. Heat them for about 10 minutes. This keeps them soft and delicious. You can also use the microwave. Heat each blondie for about 10-15 seconds. This method is quick but may make them a bit softer. Got leftover blondies? Try crumbling them over ice cream or mixing them into yogurt. You can also make a blondie trifle with layers of whipped cream and fruit. Brown butter pumpkin spice blondies last about three days at room temperature. They can last up to a week in the fridge. Store them in an airtight container to keep them fresh. Check your blondies for signs of spoilage. If they have a strange smell or mold, it’s time to toss them. Softness is normal, but they shouldn’t feel overly dry or hard. Keep an eye on them so you can enjoy every bite! Blondies are sweet bars made with brown sugar, butter, and eggs. They look and taste like brownies but do not have cocoa. The key difference is the flavor. Blondies have a rich, buttery taste, while brownies are chocolatey. You can add mix-ins like nuts or chips to enhance the flavor. Yes, you can make these blondies in advance. Bake them a day or two before your event. Store them in an airtight container to keep them fresh. You can also freeze them. To freeze, cool completely, then wrap tightly in plastic wrap. Place them in a freezer bag. When you are ready to serve, thaw them at room temperature. To check if your blondies are done, look for a light golden color. Insert a toothpick into the center. If it comes out clean or with a few moist crumbs, they are ready. The edges should be set, while the center remains soft. Don't overbake, as this can make them dry. In this post, we explored every detail for making brown butter and pumpkin spice blondies. From the complete ingredient list to helpful tips and tricks, each step matters. Accurate measurements, mixing techniques, and baking times lead to perfect blondies. Remember, you can make this recipe your own with substitutions and variations. Keep your blondies fresh with proper storage and reheating tips. Enjoy your baking journey, and may your blondies bring joy to all who taste them!

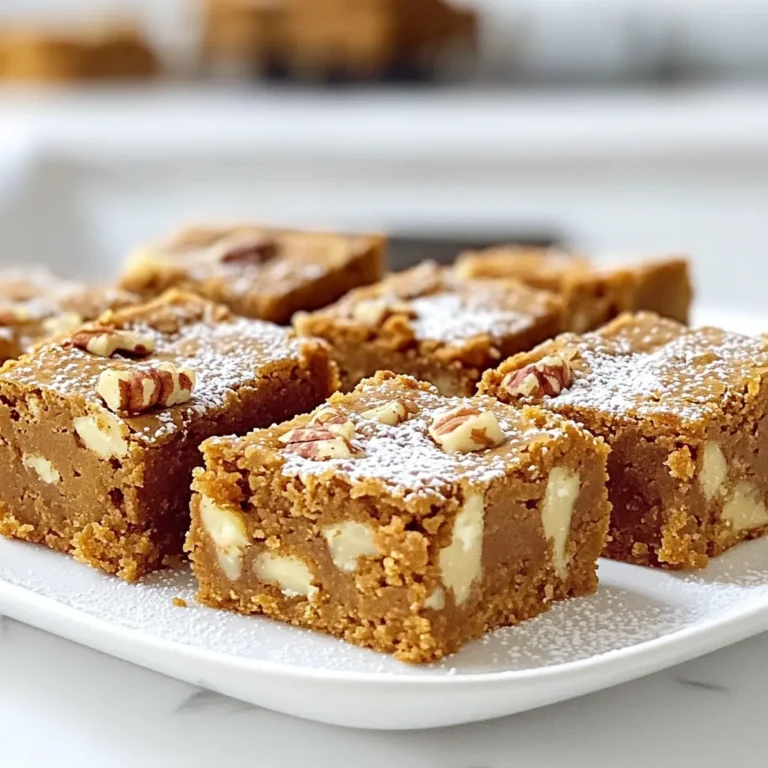
Brown Butter Pumpkin Spice Blondies Delightful Treat

PREV 1 … 6 7 8 … 49 NEXT
mini chef kitchen

explore

DessertsDinnerAppetizersDrinks

Our Policies

  • Cookie Policy
  • Copyright Policy
  • Disclaimer
  • GDPR Policy
  • Terms Of Use
Back to Top
  • About
  • Contact Us
  • Privacy Policy
© 2026 mini chef kitchen