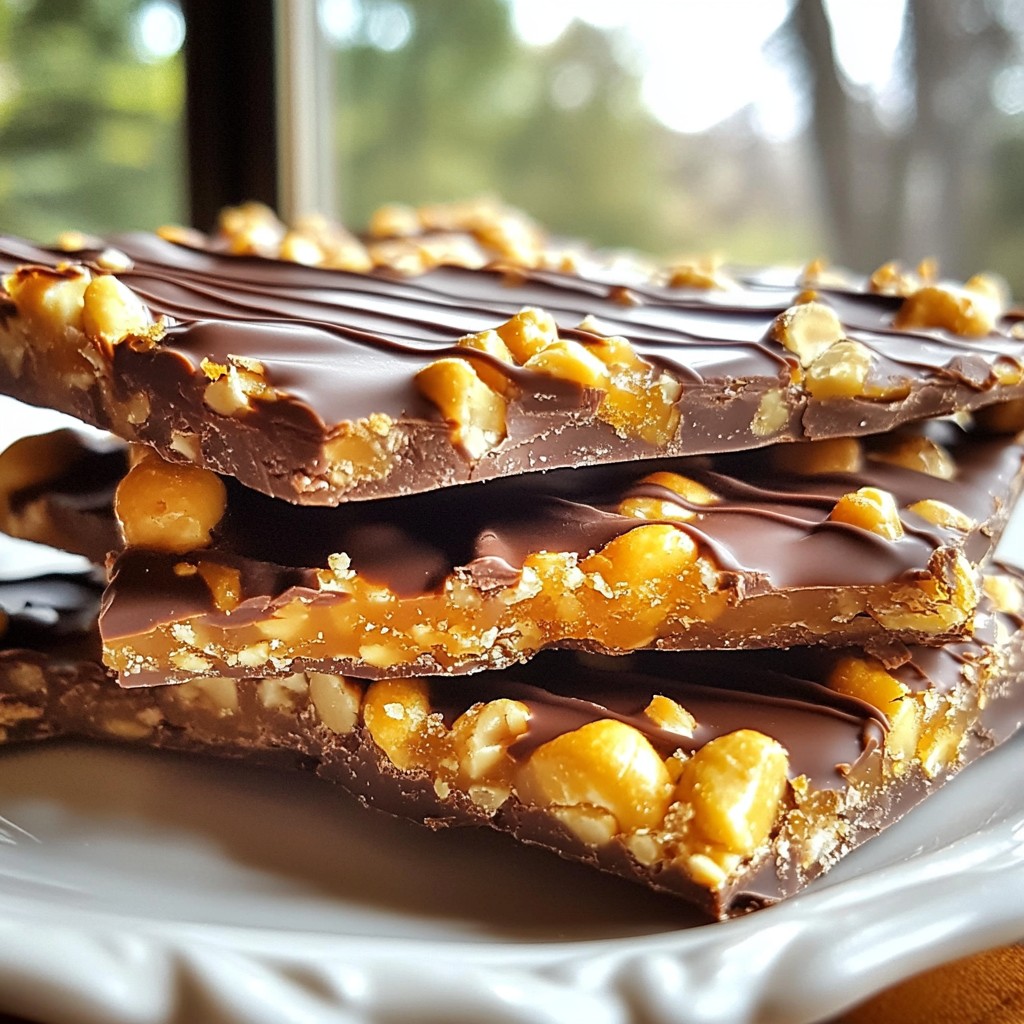
If you love sweet, salty snacks, then you need to try my Chocolate Drizzled Peanut Brittle. This treat combines crunchy peanuts with rich chocolate for a flavor explosion. Perfect for sharing or enjoying yourself, this easy recipe will impress everyone. Follow my step-by-step guide to create this irresistible treat, packed with tips to make it just right. Ready to make some magic in the kitchen? Let’s dive in!
Why I Love This Recipe
- Irresistible Sweet and Salty Combo: The combination of crunchy peanuts and sweet, caramel-like candy creates a flavor explosion that is simply addictive.
- Simple and Quick: This recipe comes together in under 90 minutes, making it perfect for a last-minute treat or gift.
- Customizable Delight: Add your favorite nuts or even a sprinkle of sea salt to tailor the brittle to your taste.
- Perfect for Gifting: Wrapped beautifully, this peanut brittle makes an excellent homemade gift that everyone will appreciate.
Ingredients
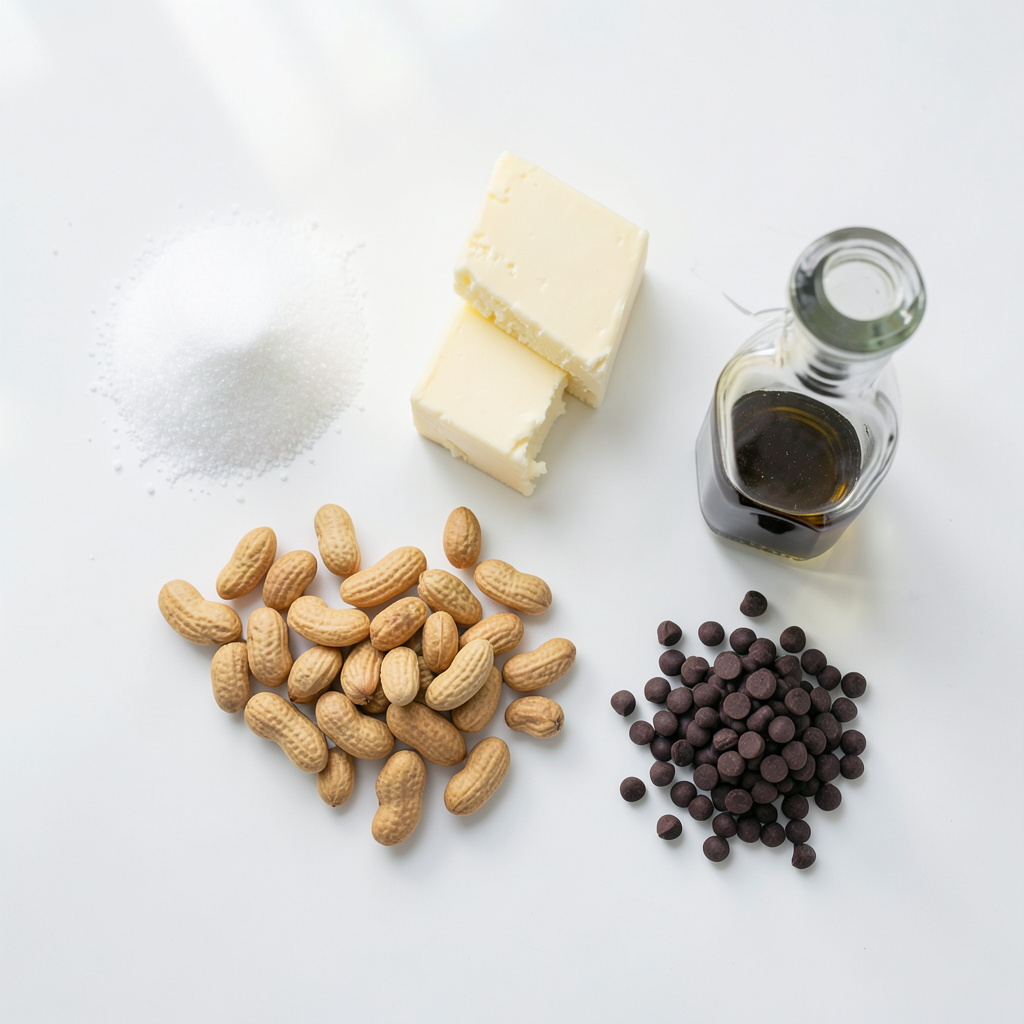
Main Ingredients List
- 1 cup granulated sugar
- 1/2 cup light corn syrup
- 1/4 cup unsalted butter
- 2 cups unsalted roasted peanuts
- 1 teaspoon vanilla extract
- 1/2 teaspoon baking soda
- 1/2 cup dark chocolate chips
Optional Add-ins
- Sea salt
- Other nuts (e.g., almonds, cashews)
- Flavorings (e.g., cinnamon, espresso powder)
When making chocolate drizzled peanut brittle, choosing quality ingredients is key. The sugar gives it sweetness, while corn syrup adds a smooth texture. Unsalted butter brings richness. Roasted peanuts offer a great crunch. Vanilla extract imparts warm flavors, and baking soda helps with texture.
For extra flavor, you can add a sprinkle of sea salt. It enhances the sweetness and makes each bite pop. If you love nuts, feel free to mix in almonds or cashews. You can also experiment with spices like cinnamon or espresso powder for a unique twist.
Using dark chocolate chips for the drizzle creates a rich contrast. If you prefer milk chocolate or white chocolate, those work too! Just remember, each choice affects the taste. So, have fun exploring different combinations!
Step-by-Step Instructions
Preparing Your Workspace
- Line the baking sheet: Use parchment paper to make it easy to remove the brittle later.
- Gather necessary equipment: You need a medium saucepan, a spatula, and a candy thermometer.
Cooking the Peanut Brittle
- Combine sugar, corn syrup, and butter: In your saucepan, mix one cup of sugar, half a cup of corn syrup, and a quarter cup of butter.
- Boil and monitor temperature: Heat the mixture on medium. Stir until it boils, then add two cups of peanuts. Cook without stirring for about four to five minutes. The candy should reach 300°F, the hard crack stage.
Finishing Touches
- Incorporate vanilla and baking soda: Remove the pan from heat. Add one teaspoon of vanilla and half a teaspoon of baking soda. The mixture will bubble up, so stir gently until mixed.
- Drizzle melted chocolate and let set: Once the brittle cools, melt half a cup of dark chocolate chips in the microwave. Drizzle the chocolate over the brittle using a fork. Let it sit until the chocolate hardens, about 30 minutes.
Tips & Tricks
Perfecting the Candy Texture
To make great peanut brittle, you need to know about the hard crack stage. This is when your candy reaches about 300°F (149°C). At this point, it sets up hard and crunchy. Using a candy thermometer helps you track the heat and get it just right. You can find these thermometers at kitchen stores or online.
Preventing Sticking
Parchment paper is your best friend here. It keeps the peanut brittle from sticking to the pan. Always line your baking sheet with it. To avoid clumping, make sure the peanuts are well mixed in the candy. Stir gently when adding them, but stop stirring once it starts boiling. This tip helps keep your brittle nice and smooth.
Making Cleanup Easy
Choose kitchen tools that are easy to clean. Silicone spatulas and non-stick pans work best. They help prevent any sticky mess. If you want faster setting for your peanut brittle, put the baking sheet in the fridge. This speeds up the cooling process and makes it ready to eat sooner.
Pro Tips
- Use a Candy Thermometer: To ensure your peanut brittle reaches the perfect hard crack stage, a candy thermometer is essential. This will help you achieve that perfect texture without guesswork.
- Be Cautious with Hot Mixtures: When adding baking soda and vanilla extract to the hot sugar mixture, be very careful as it can bubble up aggressively. Always stand back and stir gently.
- Cool Completely: Allow the peanut brittle to cool completely before breaking it into pieces. This ensures it will have a nice, crisp texture and won't be too sticky.
- Experiment with Toppings: Feel free to get creative with your chocolate drizzle! You can add toppings like crushed pretzels, sea salt, or even a sprinkle of crushed nuts for added flavor and texture.
Variations
Chocolate Alternatives
You have options when it comes to chocolate. Milk chocolate is sweet and creamy. It adds a nice contrast to the salty peanuts. Dark chocolate is richer and deeper. It gives a more intense flavor. You can use either based on your taste.
White chocolate is another fun choice. It adds a nice sweetness and a creamy texture. Drizzling white chocolate on your brittle can create a beautiful look. It can also make the treat more festive for holidays.
Flavor Variations
Want to spice things up? You can add a pinch of cayenne or chili powder. This gives your brittle a nice kick that surprises the taste buds. You can also think about adding cinnamon. It adds warmth and pairs well with peanuts.
Another tasty option is to mix in dried fruits. Dried cranberries or cherries add a fruity burst. They also provide a chewy texture that contrasts with the crisp brittle.
Different Nut Combinations
Using mixed nuts can enhance your brittle. Almonds, cashews, or pecans can add different flavors and textures. They bring new tastes and crunch to the mix. You can also try using nut butters. Swirling in peanut butter or almond butter can make the brittle richer.
Experiment with these variations to make the recipe your own. Each twist adds a unique touch that you can enjoy.
Storage Info
Best Storage Practices
To keep your chocolate drizzled peanut brittle fresh, store it in an airtight container. Glass jars or plastic containers work well. Avoid containers that let in air. You want to keep the brittle crunchy, not chewy. Place a piece of parchment paper between layers if stacking. This step helps prevent sticking.
Shelf Life
When stored properly, your peanut brittle can last about two weeks. Check for signs of spoilage, like a changed color or a strange smell. If it feels sticky, it’s best to toss it. Fresh is always better!
Freezing Options
Yes, you can freeze peanut brittle! Wrap it tightly in plastic wrap, then place it in a freezer bag. This method helps keep it fresh for up to three months. When you’re ready to eat, thaw it in the fridge overnight. This way, it retains its crispness.
FAQs
Can I make this peanut brittle in advance?
Yes, you can make this peanut brittle ahead of time. I recommend making it up to a week in advance. To store your pre-made brittle, place it in an airtight container. This will keep it fresh and crunchy. You can also layer it with parchment paper to prevent sticking.
What can I use instead of corn syrup?
If you need a substitute for corn syrup, use honey or maple syrup. Both will add a unique flavor. However, the taste and texture will differ slightly. Honey may make the brittle a bit chewier, while maple syrup can give a nice hint of warmth.
How to prevent my peanut brittle from being too hard?
To avoid hard peanut brittle, watch your cooking time closely. If it cooks too long, it gets too hard. Aim for the hard crack stage, but don’t overdo it. Use a candy thermometer to check the temperature. Another tip is to stir in the baking soda gently, which helps keep it light and crisp.
You learned how to make a tasty peanut brittle with simple steps and ingredients. You can customize it with add-ins and variations for your taste. Remember to use parchment paper for easy cleanup and proper storage to keep it fresh. With these tips, you'll impress friends and family with your candy-making skills. Enjoy your delicious creations and feel free to experiment with flavors. Happy cooking!