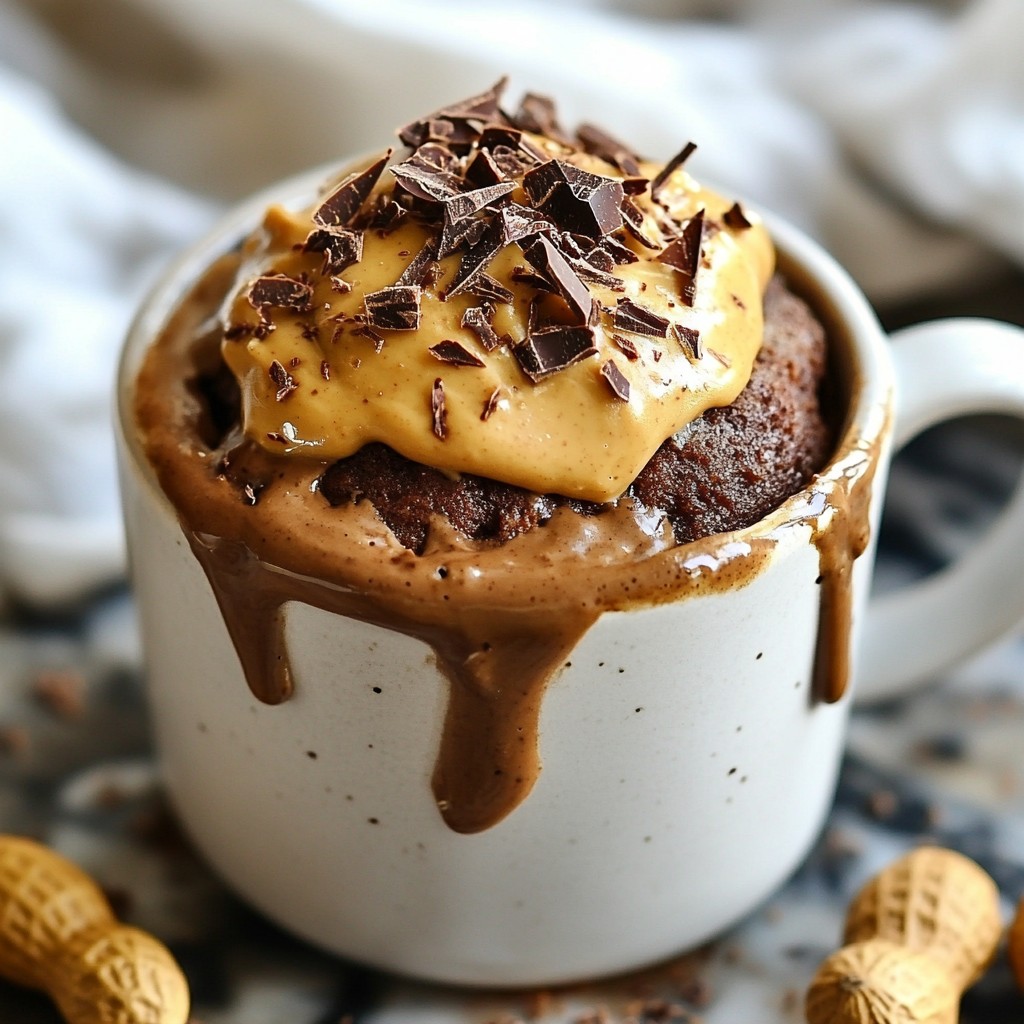
Craving something sweet but short on time? This Chocolate Peanut Butter Mug Cake is your answer! In just a few minutes, you’ll whip up a rich, gooey treat that satisfies your chocolate cravings. Perfect for a quick dessert or a late-night snack, this recipe is simple and customizable. Follow me as I guide you through each step to create your new favorite treat right in your microwave! Let’s dive in.
Why I Love This Recipe
- Quick and Easy: This mug cake is ready in just a few minutes, making it the perfect sweet treat when you need instant gratification.
- Perfect Portion: It’s a single serving dessert, so you can indulge without the temptation of leftovers hanging around.
- Customizable: You can easily modify the recipe by adding your favorite mix-ins like nuts or different types of chocolate.
- Decadent Flavor: The combination of chocolate and peanut butter creates a rich and satisfying flavor that satisfies any sweet tooth.
Ingredients
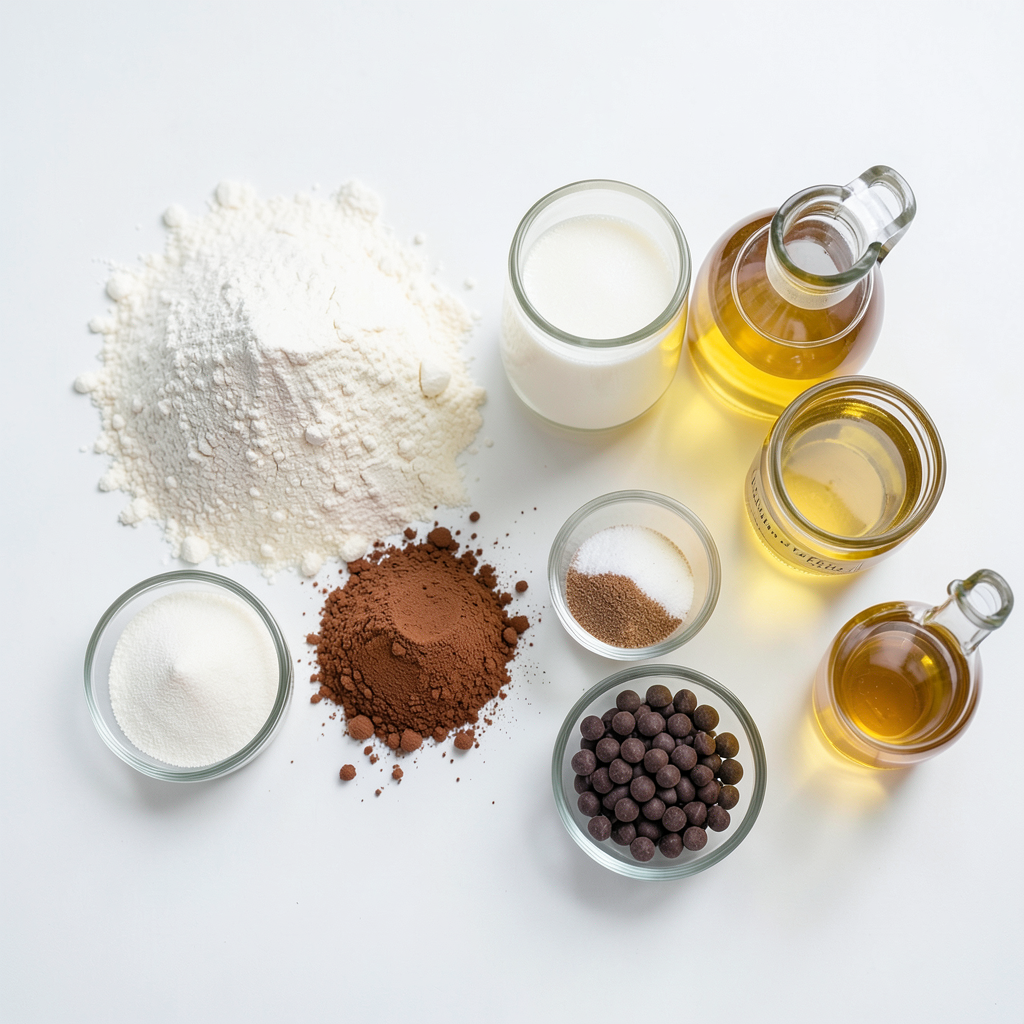
Full list of ingredients
To make a tasty Chocolate Peanut Butter Mug Cake, gather these ingredients:
- 4 tablespoons all-purpose flour
- 4 tablespoons granulated sugar
- 2 tablespoons unsweetened cocoa powder
- 1/8 teaspoon baking powder
- 1/8 teaspoon fine sea salt
- 3 tablespoons milk (your choice of dairy or non-dairy)
- 2 tablespoons creamy or crunchy peanut butter
- 2 tablespoons vegetable oil or melted coconut oil
- 1/4 teaspoon pure vanilla extract
- 2 tablespoons chocolate chips (optional, for added indulgence)
These ingredients come together to create a rich and satisfying treat.
Substitute options for key ingredients
If you need substitutes, here are some options:
- Flour: Use almond flour or oat flour for a gluten-free option.
- Sugar: Swap granulated sugar with coconut sugar or honey.
- Cocoa powder: Use carob powder for a caffeine-free choice.
- Milk: Almond milk, oat milk, or soy milk work well.
- Peanut butter: Try almond butter or sun butter for a nut-free option.
- Oil: Use olive oil or melted butter if preferred.
These swaps can cater to different diets while keeping the cake delicious.
Recommended brands for better results
For the best flavor and texture, I recommend using:
- Flour: King Arthur Flour for consistency.
- Sugar: Domino granulated sugar for sweetness.
- Cocoa powder: Ghirardelli unsweetened cocoa powder for deep flavor.
- Peanut butter: Jif or Skippy for creamy texture.
- Milk: Silk almond milk for creaminess.
- Chocolate chips: Enjoy Life for dairy-free options.
Using these brands can enhance your mug cake experience!
Step-by-Step Instructions
Preparation of dry ingredients
Start by picking a large microwave-safe mug. It should hold at least 12 oz. Next, add these dry ingredients:
- 4 tablespoons all-purpose flour
- 4 tablespoons granulated sugar
- 2 tablespoons unsweetened cocoa powder
- 1/8 teaspoon baking powder
- 1/8 teaspoon fine sea salt
Use a fork or small whisk to mix them well. Make sure to break up any clumps. This step helps the cake rise nicely.
Mixing wet ingredients into the batter
Now, create a well in the center of your dry mix. Pour in:
- 3 tablespoons milk (your choice of dairy or non-dairy)
- 2 tablespoons creamy or crunchy peanut butter
- 2 tablespoons vegetable oil or melted coconut oil
- 1/4 teaspoon pure vanilla extract
Stir with a spoon until the batter is smooth. Scrape the sides and bottom of the mug. This ensures all ingredients blend well. If you love chocolate, fold in 2 tablespoons of chocolate chips for extra flavor.
Cooking time and tips for microwave settings
Place your filled mug in the microwave. Heat it on high for about 1 minute and 30 seconds. Keep watch, as cooking times may change. Check at the 1-minute mark. The cake is done when it sets around the edges but stays slightly moist in the center.
After cooking, carefully remove the mug from the microwave; it will be hot! Let it cool for about a minute before diving in. Enjoy your warm, gooey treat!
Tips & Tricks
Troubleshooting common issues
If your mug cake is too dry, it might be overcooked. Each microwave varies, so check it often. If it’s too wet, try cooking it a little longer. Remember, the cake should be set around the edges but soft in the middle. If it’s too dense, ensure you mixed the batter well to aerate it.
How to achieve the perfect mug cake texture
To get a fluffy mug cake, avoid overmixing the batter. Mix just until combined. Use a large mug to allow room for rising. The baking powder helps it rise, so don’t skip it. Adding a bit more milk can also create a softer texture.
Serving suggestions and ideal pairings
Serve your mug cake warm for the best taste. Top it with a scoop of vanilla ice cream or a dollop of whipped cream. Drizzle some chocolate syrup or extra peanut butter for added flavor. Crushed peanuts or chocolate shavings can add a nice crunch and a touch of elegance. Enjoy it with a glass of cold milk for a classic combo!
Pro Tips
- Use Room Temperature Ingredients: Ensure your peanut butter and milk are at room temperature for a smoother batter that blends more easily.
- Monitor Microwave Time: Microwave wattages vary greatly; check your mug cake at 1 minute to prevent overcooking.
- Add a Pinch of Cinnamon: For extra warmth and flavor, sprinkle a pinch of cinnamon into the dry ingredients before mixing.
- Experiment with Toppings: Try adding sliced bananas, whipped cream, or a drizzle of chocolate sauce on top for a fun twist!
Variations
Gluten-free option
To make this mug cake gluten-free, swap the all-purpose flour. Use a gluten-free flour blend instead. Many blends work well, like almond flour or coconut flour. Just keep in mind that these flours can change the cake’s texture. Start with the same amount of the gluten-free blend. You may need to adjust the liquid if it feels too dry.
Vegan modifications
Want a vegan version? It’s easy! Use plant-based milk, like almond or oat milk, instead of dairy milk. For the peanut butter, choose a vegan brand or make your own. Replace vegetable oil with coconut oil. You can also use flaxseed to replace the egg. Mix 1 tablespoon of ground flaxseed with 2.5 tablespoons of water. Let it sit for five minutes to thicken up.
Flavor add-ins
Feel free to get creative with flavors! Swap peanut butter for almond or cashew butter for a new twist. You can also add spices like cinnamon or nutmeg for warmth. If you like a little crunch, toss in chopped nuts or seeds. For more sweetness, you can add a splash of maple syrup or honey. Even a dash of espresso can enhance the chocolate flavor!
Storage Info
Best practices for storing leftovers
If you have any mug cake left, store it in an airtight container. You can use a small bowl with a lid or wrap the mug with plastic wrap. This keeps it fresh and moist. Place it in the fridge if you want it to last longer.
Reheating instructions
To reheat your mug cake, use the microwave. Place it in for about 15 to 20 seconds. Check if it’s warm enough. If not, heat it in small bursts. This keeps the cake soft and tasty.
Shelf life of the mug cake
The mug cake stays fresh in the fridge for about 2 to 3 days. After that, it may lose its texture and flavor. For the best taste, enjoy it within the first couple of days.
FAQs
Can I make this recipe without a microwave?
Yes, you can. Use a conventional oven instead. Preheat your oven to 350°F (175°C). Pour your mixed batter into an oven-safe dish. Bake for about 15 to 20 minutes. Check for doneness by inserting a toothpick in the center. It should come out clean.
How do I know when the mug cake is done?
The mug cake is done when the edges are set. It should look firm but a little moist in the center. Start checking at 1 minute. If it's still wet, microwave in 10-second bursts until done. Remember, every microwave is different.
What are some topping ideas for my mug cake?
Toppings can make your mug cake even better. Here are some ideas:
- A dollop of creamy peanut butter
- A scoop of vanilla ice cream
- Whipped cream for a fluffy touch
- Chocolate shavings for extra chocolate flavor
- Crushed peanuts for some crunch
- Fresh berries for a fruity twist
Experiment with these to find your favorite!
This blog post covered how to make a great mug cake. We discussed the right ingredients, substitutions, and the best brands for success. I walked you through each step, from prep to cooking tips. We shared tricks to fix issues and achieve the best texture. You learned about gluten-free and vegan options, plus how to store and reheat your mug cake. Remember, a fun mug cake can be made quickly and enjoyed any time! Use this guide to impress your friends or treat yourself. Happy baking!