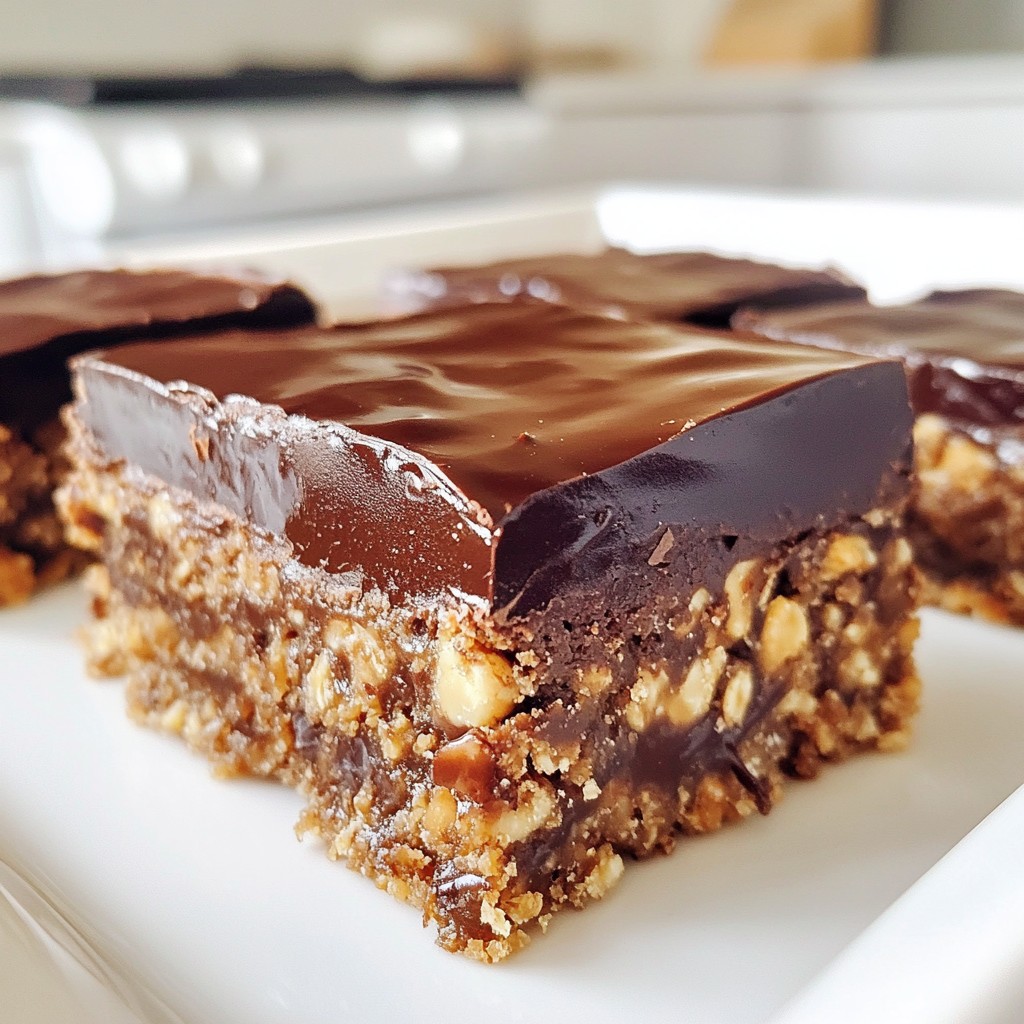
Looking for a simple and tasty treat? These Chocolate Peanut Butter Oatmeal Bars are your answer! Packed with wholesome ingredients, they're easy to whip up and perfect for any occasion. Whether you want a quick snack or a sweet addition to your dessert table, these bars fit the bill. Let’s dive into how to create this delicious recipe that you and your family will love!
Why I Love This Recipe
- Healthy Ingredients: These bars are made with wholesome ingredients like oats and natural peanut butter, making them a nutritious snack option.
- Quick and Easy: With minimal prep time and simple steps, you can whip up a batch in no time!
- Customizable: You can easily modify the recipe by adding your favorite nuts or seeds, or substituting with different sweeteners.
- Deliciously Satisfying: The combination of chocolate and peanut butter is a classic that never fails to please your taste buds.
Ingredients
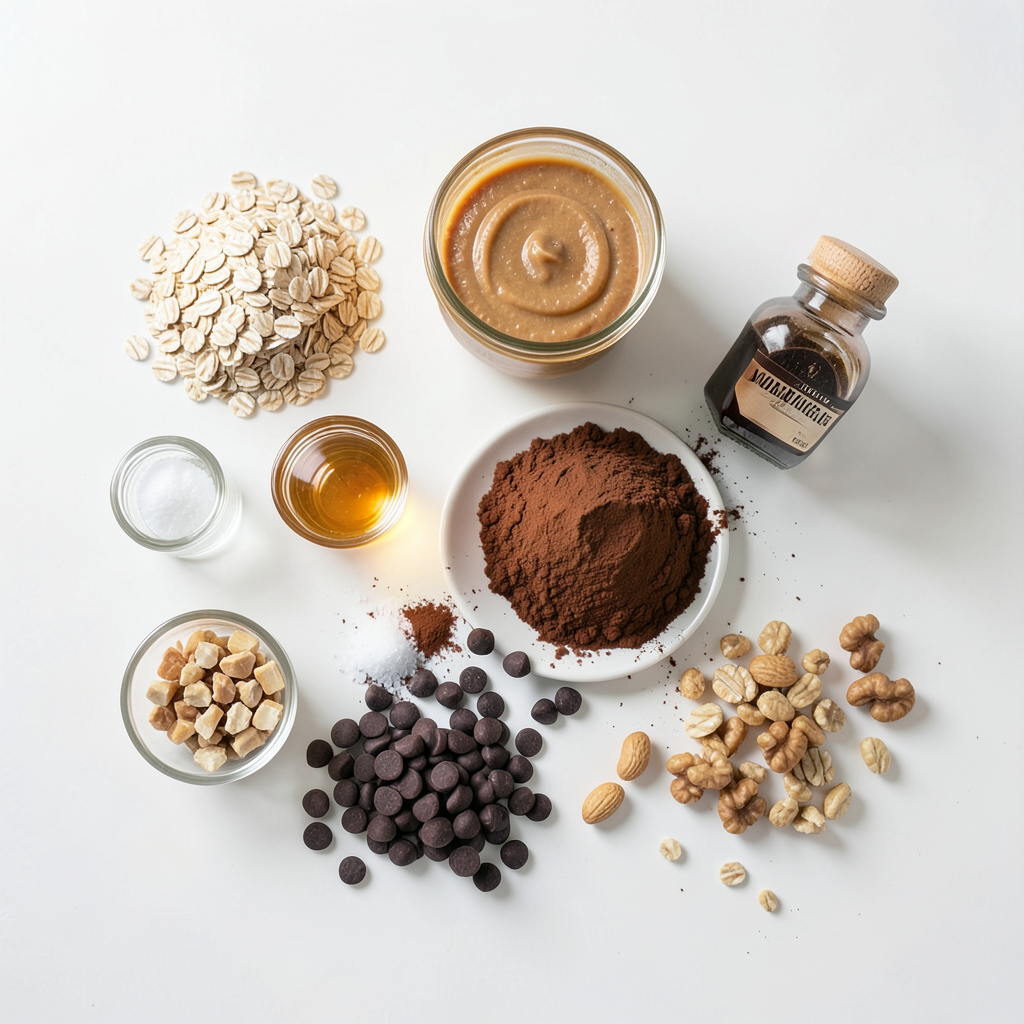
List of Required Ingredients
- 2 cups rolled oats
- 1 cup natural peanut butter
- 1/2 cup honey (or maple syrup for vegan option)
- 1/2 cup dark chocolate chips
- 1/4 cup unsweetened cocoa powder
- 1 teaspoon vanilla extract
- 1/2 teaspoon sea salt
- 1/4 cup chopped nuts (optional: almonds or walnuts)
To make these bars, gather all your ingredients first. Rolled oats provide the base. Natural peanut butter gives a rich taste. Honey adds sweetness, while dark chocolate chips bring a delightful touch. Cocoa powder gives a deep chocolatey flavor. Vanilla extract boosts the overall taste, and sea salt balances the sweetness. If you like, toss in some chopped nuts for extra crunch.
Optional Ingredient Substitutions
You can swap honey with maple syrup for a vegan treat. If you want, try different nut butters like almond or cashew. For sweeteners, you can use agave or brown rice syrup too.
Nutritional Information
These bars are a great snack choice. Each serving has around 150 calories. They offer a good mix of carbs, protein, and fats. If you're gluten-free, ensure you use certified gluten-free oats. These bars are also vegan if you use maple syrup.
Step-by-Step Instructions
Prepping the Baking Dish
- Preheat your oven to 350°F (175°C).
- Line an 8-inch square baking dish with parchment paper. Leave some paper over the edges. This helps lift the bars out after baking.
Mixing the Dry Ingredients
- In a large bowl, combine 2 cups of rolled oats, 1/4 cup of cocoa powder, and 1/2 teaspoon of sea salt.
- Use a whisk or spoon to mix them well. This ensures an even flavor in your bars.
Whisking the Wet Ingredients
- In another bowl, add 1 cup of natural peanut butter, 1/2 cup of honey (or maple syrup), and 1 teaspoon of vanilla extract.
- Whisk these together until smooth and creamy. This gives your bars a rich taste.
Combining Wet and Dry Mixtures
- Gently pour the wet mixture into the bowl of dry ingredients.
- Stir until everything blends. Carefully fold in 1/2 cup of dark chocolate chips and 1/4 cup of chopped nuts (if using). Make sure they spread out well.
Baking the Oatmeal Bars
- Spoon the mixture into your lined baking dish. Use a spatula to press it down firmly. This helps form a solid base.
- Bake for 20 to 25 minutes. Look for a light golden brown color on the edges. The center should feel set.
Cooling and Cutting the Bars
- After baking, let the dish cool for at least 15 minutes. This helps them firm up.
- Use the overhanging parchment to lift the bars out. Place them on a wire rack for complete cooling.
- Once cool, cut them into squares or bars. Enjoy your treat! Store leftovers in an airtight container for up to a week.
Tips & Tricks
Baking Tips for Perfect Bars
To bake your bars just right, pay close attention to time. Avoid overbaking; it can make them dry. Aim for a light golden brown color on the edges. Check the center for a set look. If it jiggles too much, give it a bit more time. For the best texture, let them cool fully. Cooling helps them firm up for easier cutting.
Serving Suggestions
Plating your bars can make them shine. Consider drizzling melted chocolate on top. A sprinkle of sea salt adds a nice touch too. Serve them on a colorful platter for extra appeal. Pair these bars with milk, coffee, or a smoothie. The flavors blend well, creating a delightful snack moment.
Storage Tips
To keep your bars fresh, store them in an airtight container. They can stay at room temperature for up to a week. For longer storage, freeze them. Wrap each bar in plastic wrap before placing them in a freezer bag. This way, you can enjoy them later without losing flavor or texture.
Pro Tips
- Use Creamy Peanut Butter: For a smoother texture, opt for creamy natural peanut butter over chunky. This will help the bars hold together better.
- Store Properly: To maintain freshness, store your oatmeal bars in an airtight container. You can also refrigerate them for an extended shelf life.
- Experiment with Mix-Ins: Don't hesitate to customize your bars! Try adding dried fruits, seeds, or different nuts to enhance flavor and texture.
- Check for Doneness: Keep an eye on the bars while baking; they should be lightly golden on the edges and firm in the center. Overbaking can lead to a dry texture.
Variations
Flavor Variations
You can add a twist to your bars. Try adding spices like cinnamon or nutmeg. A teaspoon of cinnamon gives warmth and depth. Nutmeg adds a hint of earthiness. Both spices work well with chocolate and peanut butter. You can also use different types of chocolate. Swap dark chocolate chips for milk or white chocolate. This simple change can make a big taste difference.
Health-Conscious Adjustments
Want to lower the sugar? Use less honey or maple syrup. You can also try a sugar substitute like stevia. This keeps the flavor while cutting calories. For those who need gluten-free options, use certified gluten-free oats. They will give the same great texture without gluten.
Incorporating Fruits or Extras
You can make these bars even better by adding fruits or extras. Dried fruits like cranberries or raisins add sweetness and chewiness. Seeds like chia or flaxseed can boost nutrition too. Mixing in protein powder is another great idea. It adds healthy protein and keeps you full longer. Adjust the recipe to fit your taste and health goals.
Serving Information
Portion Sizes
The recommended serving size for these bars is one square or bar. You can cut them into 16 equal pieces. For kids, cut smaller squares, about 1 inch each. For adults, you can keep the full size or make larger pieces.
Creative Serving Ideas
These bars are great for parties! Serve them on a nice platter. You can drizzle extra chocolate on top for a fun touch. They also make great goodie bags. Cut the bars and wrap them in nice paper for gifts.
Pairing with Other Foods
For drinks, serve these bars with milk or a nut milk. Coffee also pairs well. If you want dessert, try some ice cream or yogurt on the side. These pair nicely with fresh fruit too, like berries or bananas.
FAQs
Can I make these bars gluten-free?
Yes, you can make these bars gluten-free! Look for oats labeled as gluten-free. Regular oats may be processed with gluten products. Ensure your oats are certified gluten-free to avoid any cross-contamination. This simple swap keeps your bars tasty and safe for gluten-free diets.
How can I customize the sweetness level?
You can adjust the sweetness by changing the amount of honey or maple syrup. Start with the recipe's half cup, then taste. If you want it sweeter, add more. Swap honey for agave syrup or coconut nectar for different flavors. Always mix well after adding sweeteners.
Can I use a different type of nut butter?
Absolutely! You can use almond butter, cashew butter, or sunflower seed butter. Each nut butter offers a unique taste. Just make sure it is smooth and natural. This keeps the bars creamy and delicious. Experiment with your favorites to find the best fit.
How long do the bars last?
These bars last up to one week at room temperature. Store them in an airtight container to keep them fresh. For longer storage, you can freeze them for up to three months. Just wrap them well in plastic wrap or foil first. Thaw at room temperature before enjoying.
Can I add protein powder to the mix?
Yes, you can add protein powder to boost nutrition. Use one to two scoops, depending on your taste. Mix it in with the dry ingredients to ensure even distribution. This makes your bars a great snack for after workouts or busy days.
This blog post provided a clear guide on making delicious oatmeal bars. We covered ingredients, step-by-step instructions, and helpful tips for baking. You learned about optional substitutions and variations to suit your taste and dietary needs. Feel free to get creative while making these bars! Try different flavors or add-ins for a personal touch. Enjoy sharing these tasty treats at your next gathering or snack session. Remember, with a few simple steps, you can impress everyone with your homemade oatmeal bars!