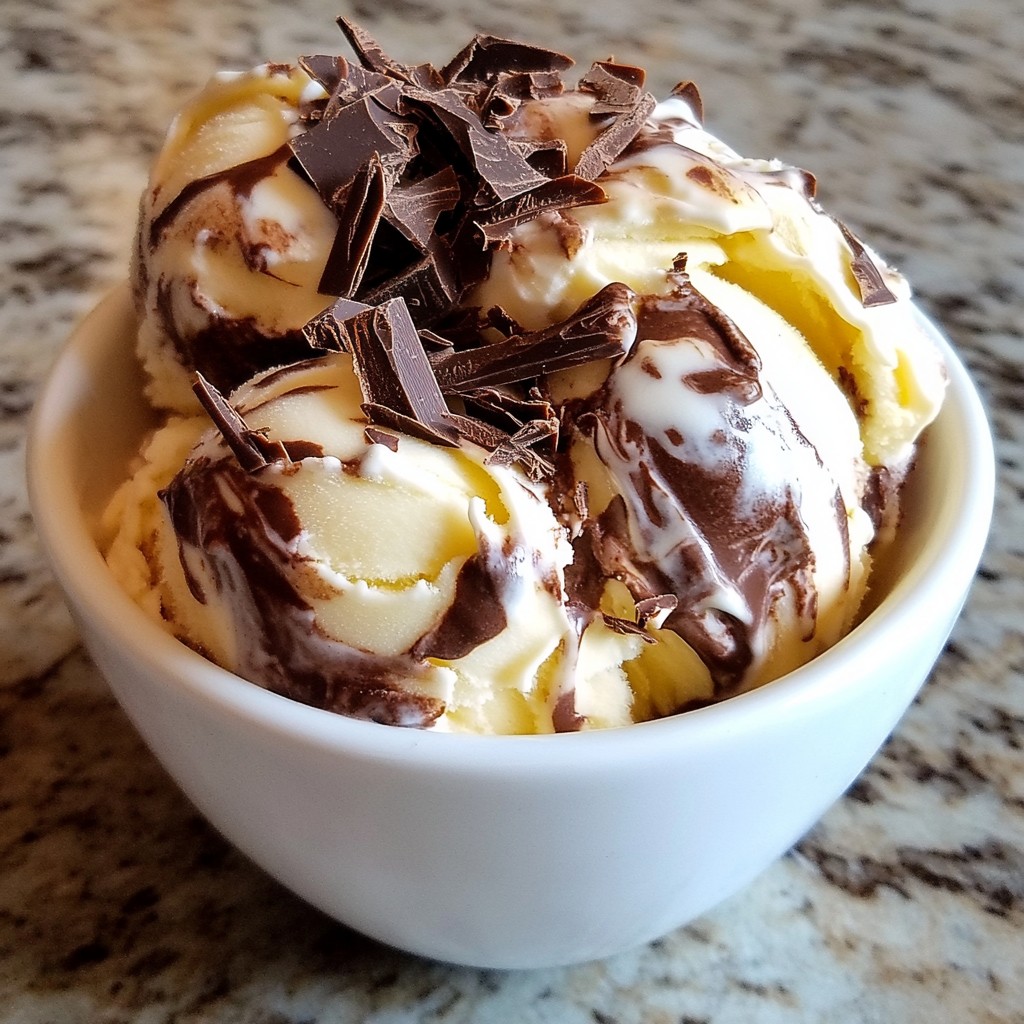
Are you craving a sweet treat that's both easy and delicious? Let me introduce you to Chocolate Swirl Banana Ice Cream! This simple recipe combines creamy banana goodness with rich chocolate swirls. It's perfect for hot days or any time you want a guilt-free dessert. Follow along as I share the ingredients, step-by-step instructions, and tips to make your ice cream just right. Get ready to enjoy a delightful twist on a classic favorite!
Why I Love This Recipe
- Deliciously Creamy: This ice cream has a rich and creamy texture that melts in your mouth, making it a perfect treat for any occasion.
- Healthy Indulgence: Made primarily from bananas and coconut milk, this recipe is a guilt-free dessert option packed with nutrients.
- Easy to Make: With just a few simple ingredients and minimal prep time, you can whip up this delightful dessert in no time.
- Customizable: Feel free to adjust the sweetness or add your favorite toppings, like nuts or other fruits, to make it your own!
Ingredients
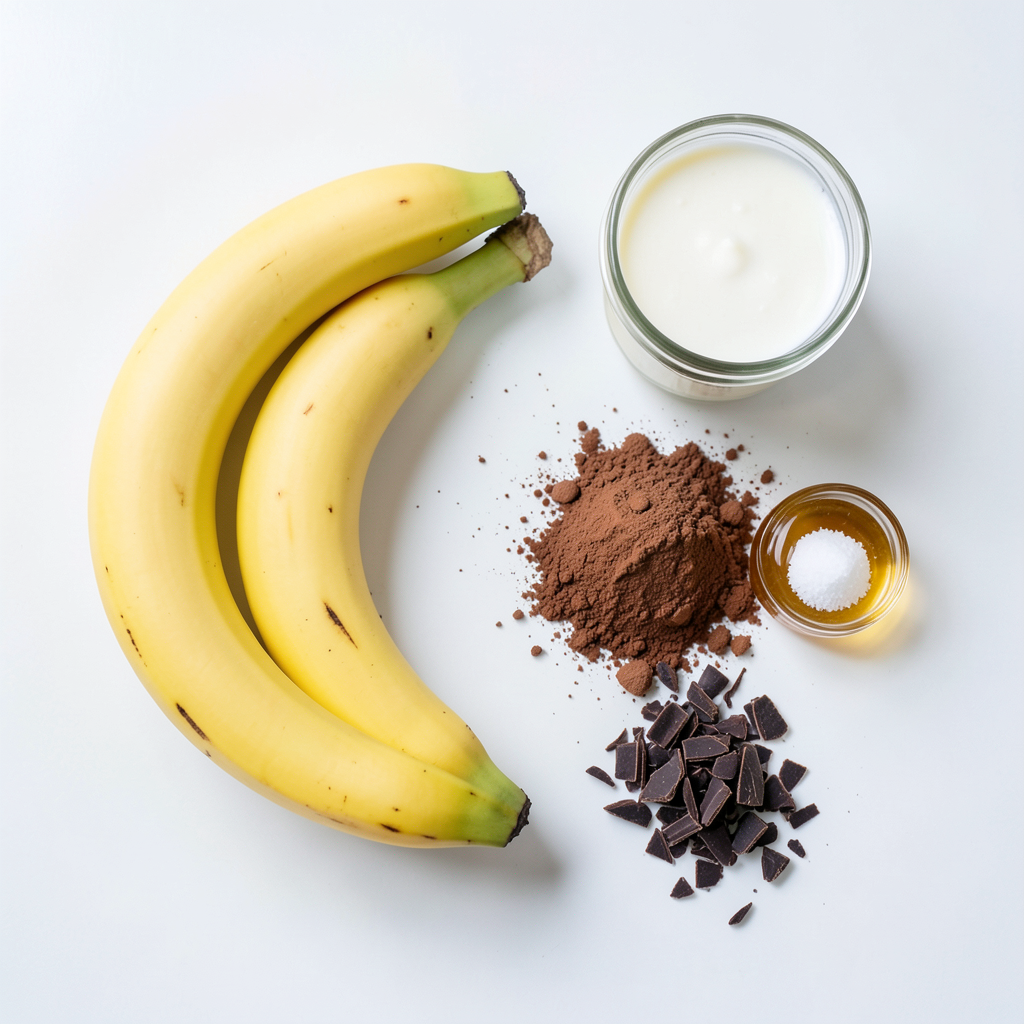
List of Ingredients
- 4 ripe bananas
- 1 cup coconut milk (or your preferred milk)
- 1/4 cup cocoa powder
- 1/4 cup honey or maple syrup
- 1 teaspoon vanilla extract
- A pinch of sea salt
- Dark chocolate shavings or chips (optional for topping)
Measurement Details
When using bananas, choose ones that are very ripe. They should have brown spots. This adds sweetness and flavor. For milk, coconut milk works well, but any milk is fine. Honey or maple syrup sweetens the ice cream. Use cocoa powder for a rich chocolate taste. Measure carefully for the best results.
Substitutions and Alternatives
If you want a nut-free option, use oat milk instead of coconut milk. You can swap honey for agave syrup to keep it vegan. If you dislike cocoa powder, try carob powder for a different flavor. You can also skip the dark chocolate topping if you prefer a lighter treat.
Step-by-Step Instructions
Preparing the Bananas
Start with ripe bananas. They should be yellow with some brown spots. Peel them and slice them into round pieces. This helps them freeze faster. Place the slices in a freezer-safe container. Freeze them for at least 2 hours. The bananas need to be solid before blending.
Blending the Ice Cream Mixture
Once the bananas are frozen, take them out. Put them in a high-speed blender. Add 1 cup of coconut milk. Then, add 1/4 cup of cocoa powder. Next, pour in 1/4 cup of honey or maple syrup. Add 1 teaspoon of vanilla extract. Finally, sprinkle in a pinch of sea salt. Blend on high speed until smooth. Stop to scrape down the sides if needed.
Layering and Swirling
After blending, divide the mixture in half. Transfer half to another bowl. Add about 1 tablespoon of cocoa powder to the blender. Blend again to mix the extra cocoa in. Now, take a large container for freezing. Layer the plain banana mixture at the bottom. Spoon the chocolate mixture on top. Use a spatula to gently swirl the two together. This creates a nice marbled look. If you want, sprinkle dark chocolate shavings on top for extra flair. Cover the container and freeze for 2 to 3 hours. Now, you’re ready to enjoy your tasty creation!
Tips & Tricks
Tips for Achieving Creamy Texture
To get a creamy texture, use ripe bananas. They have more natural sweetness and mash better. Freeze the banana slices for at least two hours. This helps make the ice cream smooth. When blending, pause to scrape down the sides. This ensures all ingredients mix well. If the mixture is too thick, add a splash of coconut milk to help.
Best Practices for Freezing
After mixing, layer the ice cream in a container. This helps maintain the swirl pattern. Cover it tightly with a lid or plastic wrap. This prevents ice crystals from forming. Let it freeze for 2-3 hours. This time helps the ice cream get firm enough to scoop easily.
Flavor Enhancement Suggestions
For a richer taste, add more cocoa powder. Just one tablespoon can boost the chocolate flavor. You can use other add-ins like crushed nuts or berries. These add fun textures and flavors. If you want a unique twist, try a pinch of cinnamon. It pairs well with chocolate and banana!
Pro Tips
- Use Overripe Bananas: The riper the bananas, the sweeter and more flavorful your ice cream will be. Look for bananas with brown spots for the best results.
- Chill Your Ingredients: For an extra creamy texture, chill your coconut milk and other ingredients before blending. This helps achieve a smoother consistency.
- Experiment with Sweeteners: Feel free to adjust the sweetness by using more or less honey or maple syrup, or try adding a touch of agave for a different flavor profile.
- Serving Suggestions: Top your ice cream with fresh fruit, nuts, or a drizzle of chocolate sauce for added flavor and texture, making it even more indulgent!
Variations
Dairy-Free Options
You can easily make this ice cream dairy-free. Just use coconut milk or any plant-based milk. Almond milk, soy milk, or oat milk all work well. Each option brings a unique taste. Coconut milk gives a creamy texture, while almond milk adds a nutty flavor.
Additional Flavor Ideas
You can play with flavors to make this ice cream your own. Try adding peanut butter or almond butter to the mix. This will add a rich and nutty taste. You can also add a splash of espresso for a coffee twist. If you love spice, a pinch of cinnamon can add warmth.
Toppings and Mix-Ins
Toppings can elevate your ice cream. Dark chocolate shavings or chips are a great start. You can also add chopped nuts for crunch. Try crushed cookies for a fun texture. Fresh fruit like berries or sliced strawberries can add a burst of flavor. A drizzle of honey or maple syrup on top is a sweet finish.
Storage Info
How to Store Chocolate Swirl Banana Ice Cream
To store your chocolate swirl banana ice cream, place it in an airtight container. Make sure the lid fits snugly to keep air out. This step helps prevent freezer burn. If you have leftover toppings, store them separately. Toppings like dark chocolate shavings can lose their crunch if mixed in.
Shelf Life and Freezing Tips
Your ice cream can last in the freezer for about 2 weeks. After that, the texture may change. To keep it fresh, store it at a consistent temperature. Avoid opening the freezer too often. Each time you open it, warm air enters, which can affect the ice cream.
Reheating Instructions
If your ice cream is too hard to scoop, let it sit at room temperature for about 5 minutes. This will soften it just enough for easy scooping. Do not microwave the ice cream. Microwaving can change its texture and make it mushy. Enjoy your treat once it is at the right softness!
FAQs
Can I use frozen bananas?
Yes, you can use frozen bananas! I often do this for convenience. Just make sure they are ripe before freezing. Ripe bananas add natural sweetness and flavor. You can slice them up and freeze them in a container. When you're ready to make the ice cream, they blend perfectly.
How can I make this recipe vegan?
Making this recipe vegan is simple. Use coconut milk as your base. Replace honey with maple syrup. Both options keep the ice cream creamy and sweet. You can also check for dairy-free chocolate chips if you choose to add chocolate toppings.
What to do if the ice cream is too hard?
If your ice cream is too hard, let it sit out for a few minutes. This softens it and makes scooping easier. You can also try blending it again for a smoother texture. If it’s still hard, you may need to adjust the freezing time next time.
This blog post covered how to make Chocolate Swirl Banana Ice Cream. We looked at the ingredients, measurements, and possible swaps. I shared clear steps to prepare, blend, and layer. Tips helped you create a creamy texture and enhance flavor. We also explored dairy-free options and fun toppings. Finally, I provided storage tips to keep your ice cream fresh.
Now, with these steps in mind, you can enjoy this tasty treat whenever you want. Happy making!