If you're looking for a quick and tasty dinner, you’ve just found it! My Crispy Parmesan Crusted Tilapia offers a satisfying crunch with every bite. This dish is easy to make and filled with flavor, perfect for busy nights or special occasions. In this post, I’ll guide you through the ingredients, steps, and tips for making this delightful fish dish. Let’s dive in and impress your taste buds!
Why I Love This Recipe
- Quick and Easy: This recipe comes together in just 30 minutes, making it perfect for busy weeknights when you crave something delicious without spending hours in the kitchen.
- Crispy Texture: The combination of Parmesan cheese and panko breadcrumbs creates an irresistible crunch that enhances the tender tilapia fillets.
- Flavor Packed: With garlic powder, smoky paprika, and dried parsley, each bite is bursting with flavor, making it a hit with both kids and adults.
- Versatile Pairing: This crispy tilapia can be served with a variety of sides, from salads to roasted vegetables, allowing you to customize your meal to your liking.
Ingredients
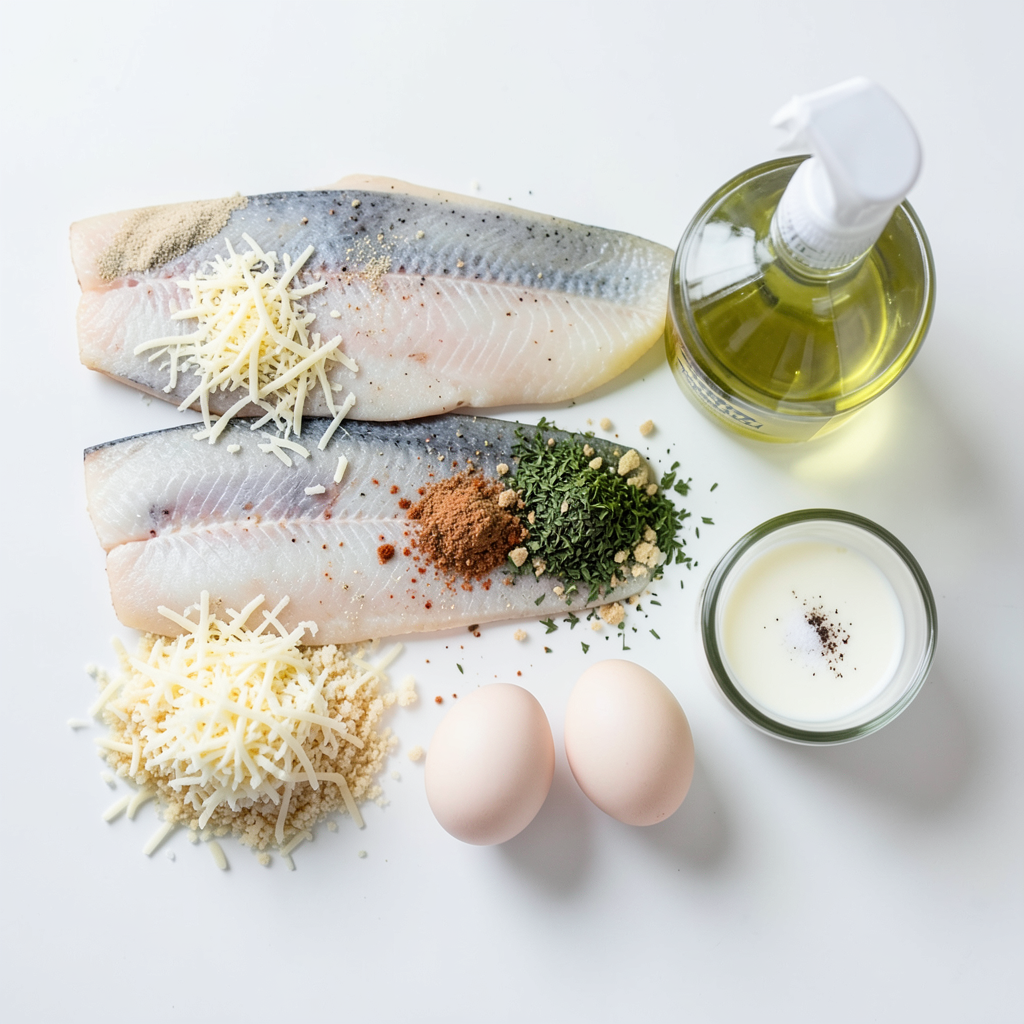
- 4 tilapia fillets
- 1 cup freshly grated Parmesan cheese
- 1 cup panko breadcrumbs
- 2 teaspoons garlic powder
- 1 teaspoon smoky paprika
- 1 teaspoon dried parsley
- 2 large eggs
- 2 tablespoons milk
- Salt and black pepper, to taste
- Olive oil spray
For this dish, you want fresh tilapia. It has a mild taste that works well with the crust. Parmesan cheese adds a rich flavor, while panko breadcrumbs give a nice crunch. Garlic powder and smoky paprika add depth and warmth. Dried parsley brightens the dish with color and a hint of freshness.
Eggs and milk bind the coating to the fish, ensuring a great crunch. Season your fillets with salt and black pepper to enhance the flavor. Finally, olive oil spray helps achieve that perfect golden brown crust. Each ingredient plays a role in making this dish delicious and satisfying.
Step-by-Step Instructions
Preheat and Prepare the Baking Sheet
First, preheat your oven to 425°F (220°C). This high heat gives the fish a nice, crispy finish. Line a baking sheet with parchment paper. This step helps the fish not stick and makes cleanup easy.
Mix the Dry Ingredients
In a shallow bowl, combine the following:
- 1 cup freshly grated Parmesan cheese
- 1 cup panko breadcrumbs
- 2 teaspoons garlic powder
- 1 teaspoon smoky paprika
- 1 teaspoon dried parsley
- Salt and black pepper to taste
Mix these ingredients well. You want every bite to be packed with flavor.
Whisk the Eggs and Milk
In a separate bowl, crack open 2 large eggs. Add 2 tablespoons of milk to the eggs. Whisk until the mixture is combined and a bit frothy. This will help the coating stick well to the fish.
Coat the Tilapia Fillets
Take each tilapia fillet and dip it into the egg mixture. Let any excess drip off. Then coat it in the Parmesan-breadcrumb mix. Press down gently to ensure the coating sticks well. This makes a crunchy crust as it bakes.
Baking the Tilapia
Arrange the coated fillets on the baking sheet. Make sure to leave space between each piece. Lightly mist the tops with olive oil spray. This helps achieve a golden brown color. Bake in the preheated oven for 12-15 minutes. The tilapia is done when it flakes easily with a fork.
Resting the Fish
After baking, remove the sheet from the oven. Let the crispy tilapia rest for a couple of minutes. This helps the coating set for that perfect crunch. Enjoy your flavorful dinner dish!
Tips & Tricks
Achieving the Perfect Crunch
To get that perfect crunch on your tilapia, use panko breadcrumbs. Panko gives more texture than regular breadcrumbs. Mixing in freshly grated Parmesan cheese helps create a tasty crust. Make sure to press the mixture firmly onto the fish. This helps the coating stick better. A light spray of olive oil before baking also adds to the crunchiness.
Seasoning Suggestions
Seasoning is key to flavor. Garlic powder adds depth to the dish. Smoky paprika gives it a nice kick. Dried parsley brightens up the taste and looks great, too. Feel free to add other spices you like. A bit of cayenne pepper can add heat, or lemon zest can brighten things up. Don't be shy about tasting your mixture before coating the fish. Adjust as needed!
How to Know When it's Done
You’ll know your tilapia is done when it flakes easily with a fork. This usually takes 12 to 15 minutes in the oven. The coating should be a beautiful golden brown. For best results, let the fish rest for a couple of minutes after baking. This will help the crust set and give you that perfect crunch. Always trust your senses and check the fish before serving!
Pro Tips
- Fresh Ingredients: Use fresh Parmesan cheese for the best flavor and texture. Pre-grated cheese can contain anti-caking agents that affect melting and browning.
- Panko Magic: Panko breadcrumbs are key for an extra crispy texture. If you can't find panko, you can make your own by processing regular bread into coarse crumbs.
- Resting Time: Allow the crispy tilapia to rest for a few minutes after baking. This helps the coating to set and maintain its crunchiness when served.
- Spice it Up: Feel free to experiment with different spices in the breadcrumb mixture. Adding a pinch of cayenne pepper or Italian herbs can enhance the flavor profile significantly.
Variations
Using Different Fish
You can swap out tilapia for other fish. Cod, haddock, or even salmon work well. Each fish has its own taste and texture. Cod offers a mild flavor, while salmon adds richness. Adjust cooking time based on thickness. Thicker fillets need a few extra minutes.
Gluten-Free Alternatives
For a gluten-free version, use gluten-free breadcrumbs. Almond flour or crushed cornflakes are great options. Both give a nice crunch and flavor. Always check for gluten-free labels on other ingredients, like spices or sauces. This way, everyone can enjoy the dish.
Flavor Additions and Substitutions
Feel free to mix in your favorite herbs and spices. Adding lemon zest brightens the flavor. You can also try cayenne pepper for a spicy kick. For a different cheese, use Asiago or Pecorino Romano. These choices can change the taste and make it unique. Experiment and find what you love!
Storage Info
How to Store Leftovers
To store your crispy Parmesan crusted tilapia, let it cool first. Place the leftover fillets in an airtight container. You can keep them in the fridge for up to three days. This will help keep the fish fresh and tasty.
Reheating Tips
When you're ready to eat the leftovers, preheat your oven to 350°F (175°C). Place the fillets on a baking sheet. Bake for about 10 minutes or until they are warm. This helps maintain the crispy texture. You can also use an air fryer for a quick reheat.
Freezing Instructions
If you want to freeze the tilapia, wrap each fillet tightly in plastic wrap. Then, place them in a freezer bag. Label the bag with the date. You can freeze them for up to three months. When ready to eat, thaw in the fridge overnight before reheating.
FAQs
Can I use frozen tilapia fillets?
Yes, you can use frozen tilapia fillets. Just remember to thaw them first. Place them in the fridge overnight or run them under cold water. Make sure they dry well before coating. This helps the crust stick better.
Is it necessary to use panko breadcrumbs?
Panko breadcrumbs give a great crunch. They are lighter and crispier than regular breadcrumbs. If you don’t have panko, you can use regular ones. However, the texture will not be as crispy.
How can I make this dish ahead of time?
You can prepare the tilapia fillets and coat them ahead of time. After coating, place them on a baking sheet, cover with plastic wrap, and store in the fridge. Bake them just before serving for the best results.
What should I serve with crispy Parmesan crusted tilapia?
You can serve this dish with a fresh side salad or roasted vegetables. A wedge of lemon adds brightness and flavor. Rice or quinoa can also pair nicely for a complete meal.
Can I bake instead of spray olive oil?
Yes, you can bake without spray oil. Just brush the tops with olive oil instead. This helps achieve that lovely golden color and keeps the fish moist during baking.
This blog post explained how to make crispy Parmesan crusted tilapia. You learned about the ingredients, step-by-step instructions, and tips to improve the dish. I shared variations for using different fish and gluten-free options. Storing leftovers and reheating instructions help you enjoy this meal later.
Now you can create a tasty dish that impresses everyone. Enjoy your cooking journey!