No Bake Pumpkin Chocolate Oat Bars Easy Recipe

WANT TO SAVE THIS RECIPE?

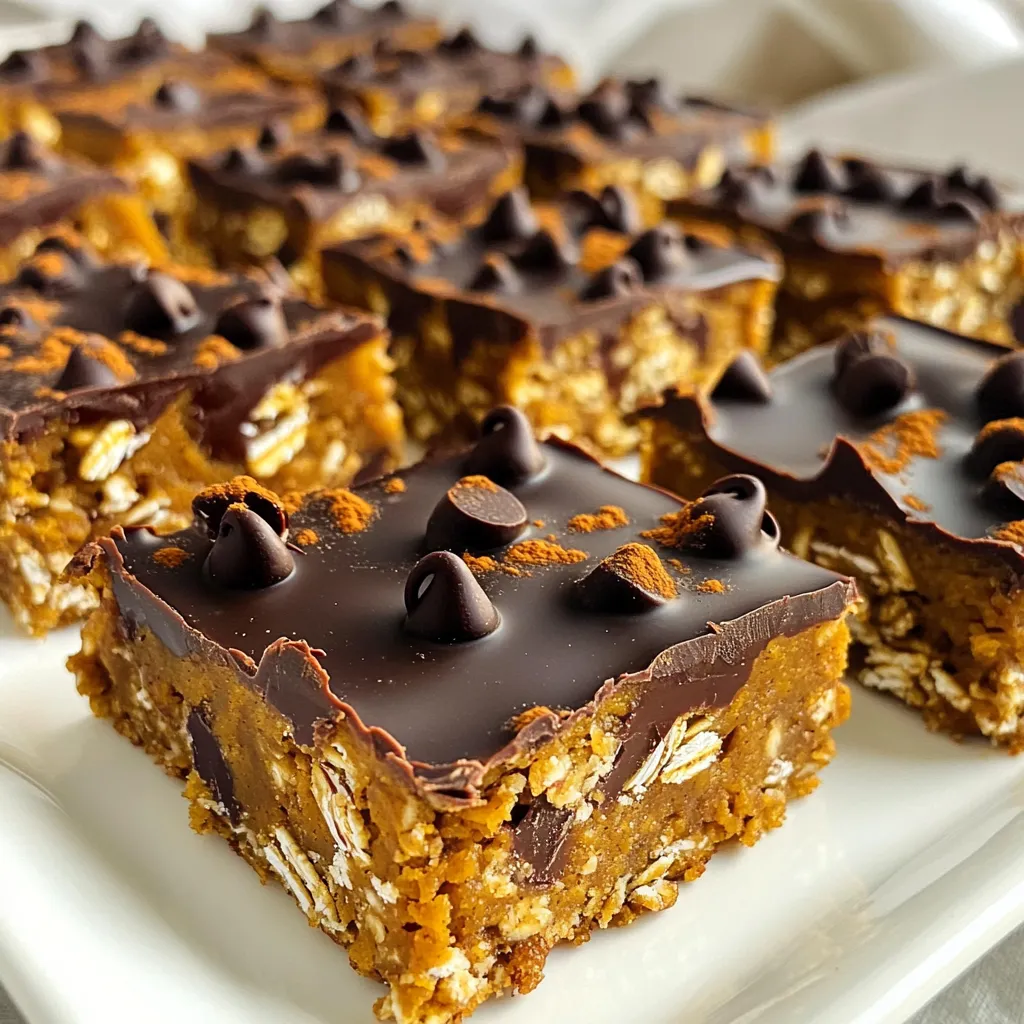
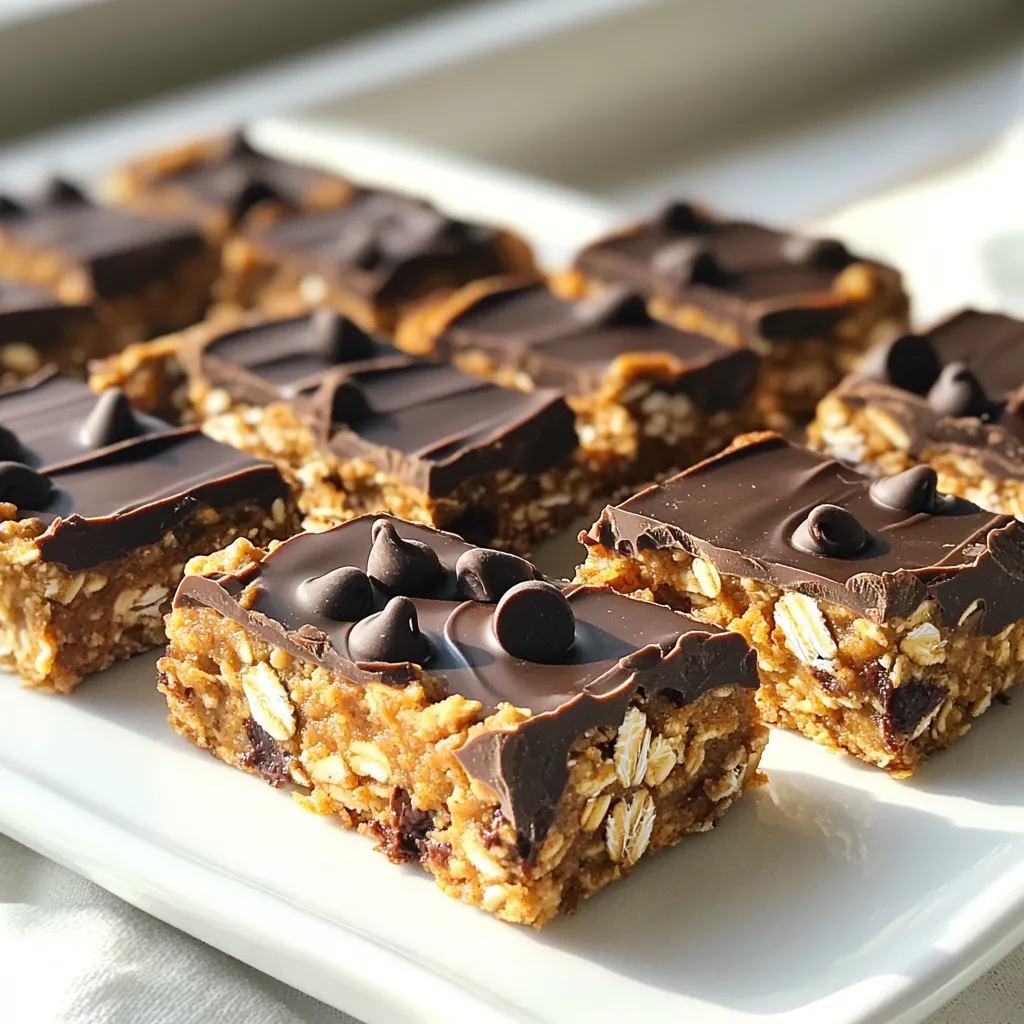
Get ready to satisfy your sweet tooth with these No Bake Pumpkin Chocolate Oat Bars! This easy recipe combines creamy pumpkin, rich chocolate, and wholesome oats for a delicious treat. No oven needed! Whether you need a quick snack or a fun dessert, these bars are simple to make and full of flavor. Let’s dive into the ingredients and discover how to whip up this tasty delight!

When making No Bake Pumpkin Chocolate Oat Bars, you need a few key ingredients. They work together to create a tasty treat that’s easy to prepare. Here's what you will need: - 1 cup rolled oats - 1/2 cup pumpkin puree - 1/4 cup almond butter (or your favorite nut butter) - 1/4 cup honey or maple syrup - 1/3 cup dark chocolate chips - 1 teaspoon vanilla extract - 1 teaspoon pumpkin spice - 1/4 teaspoon salt - 1/4 cup chopped nuts (walnuts or pecans) – optional Each ingredient plays a role. The rolled oats give the bars a chewy texture. Pumpkin puree adds moisture and flavor. Almond butter keeps everything together while adding healthy fats. Honey or maple syrup sweetens the mix without overpowering the pumpkin. Dark chocolate chips provide a rich, chocolatey contrast. Vanilla extract and pumpkin spice round out the flavor, making these bars cozy and comforting. You can also add chopped nuts for crunch. They add a nice texture and nutty flavor. Feel free to swap in your favorite nut butter or sweetener. This recipe is flexible and fun to customize! Start by taking a big bowl. Add the rolled oats, pumpkin puree, almond butter, and honey or maple syrup. Mix these ingredients well with a spatula. Make sure there are no dry spots or lumps. A good blend is key for taste. Next, pour in the vanilla extract, pumpkin spice, and salt. Stir the mixture quickly until everything is mixed. This step helps to create a smooth and even mixture. A uniform consistency is important for the best flavor. Now, grab an 8x8 inch baking dish. Line it with parchment paper. Leave some paper hanging over the sides. This makes it easy to lift out the bars later. It’s a simple trick that saves time. Transfer the mixture into the lined baking dish. Use a spatula or your hands to press it down evenly. Make sure to pack it in tight. This helps the bars keep their shape when you cut them later. Put the baking dish in the fridge for at least 2 hours. This chilling time is important. It helps the bars become firm and hold together well. You want the right texture for the best bite. Once the bars are firm, lift them out using the parchment paper. Place them on a cutting board. Use a sharp knife to cut them into squares or rectangles. For a nice touch, arrange the bars on a platter. Drizzle some melted chocolate on top for extra flair. Sprinkle a bit of pumpkin spice for a charming finish. - Store your bars in an airtight container to keep them fresh. - Place parchment paper between layers to avoid sticking. - In the fridge, they last about a week. - Freeze them for up to three months for longer storage. - For best taste, eat them fresh but enjoy them longer if needed. - To reduce sweetness, use less honey or maple syrup. - Try using a sugar substitute like stevia or monk fruit. - Start with half the amount, then taste and adjust. - Remember, natural sweeteners can change the flavor a bit. - Consider adding spices like cinnamon or nutmeg for warmth. - Try mixing in dried fruits like cranberries or raisins for added texture. - You can also use seeds like chia or flax for extra crunch. - Experiment with different nut butters for unique flavors. {{image_4}} You can switch the almond butter for many types. Peanut butter gives a strong taste. Sunflower butter is great for nut-free diets. Cashew butter adds creaminess. Each nut butter changes the flavor and texture. Experiment with what you like. Make sure all your ingredients are gluten-free. Regular oats may have gluten. Look for certified gluten-free oats instead. You can also use ground flaxseed as a base. This keeps the bars tasty and safe for everyone. If you want a vegan treat, swap honey for maple syrup. This keeps it plant-based and sweet. You can add chia seeds for extra nutrition. Dried fruit or coconut can also boost flavor. These options make the bars fun and healthy! Store your No Bake Pumpkin Chocolate Oat Bars in airtight containers. This helps keep them fresh. If you have no airtight container, use parchment wraps. Wrap each bar tightly to prevent them from drying out. The best temperature for storing these bars is in the fridge. They stay firm and tasty when kept cool. You can also leave them at room temperature for a short time, but they last longer in the fridge. To freeze your bars, cut them into squares first. Place the cut bars in a single layer on a baking sheet. Freeze them for about one hour. After they are firm, transfer them to a freezer-safe bag. Remove as much air as possible to avoid freezer burn. When you want to eat them, take them out of the freezer. Let them thaw in the fridge for a few hours. If you need them fast, you can thaw them at room temperature. Enjoy them as is or with a warm drink. Check your bars for signs of spoilage. If they smell off or have a strange color, don't eat them. You should also look for mold or an unusual texture. You can keep these bars in the fridge for about a week. If frozen, they can last for up to three months. Always label your containers with the date to track freshness. Yes, you can use quick oats. The texture will change a bit. Quick oats are finer than rolled oats. They absorb liquid faster and may make the bars softer. If you prefer a chewier texture, stick with rolled oats. You can make these bars even healthier with a few swaps. Use almond butter or peanut butter for healthy fats. Replace honey with mashed banana or applesauce for less sugar. Add seeds like chia or flax for more fiber. Consider using dark chocolate that is at least 70% cocoa for added health benefits. If you don't have pumpkin puree, sweet potato works well. Cooked sweet potato gives a similar taste and texture. Butternut squash is another great option. Just make sure to puree it until smooth. Yes, these bars are perfect for kids! They have wholesome ingredients and offer good nutrition. With oats, pumpkin, and nut butter, they are filling and tasty. Just check for nut allergies before serving. These bars will last about one week in the fridge. Store them in an airtight container to keep them fresh. If you want them to last longer, freeze them. They can stay good for up to three months if frozen. These no-bake pumpkin bars are simple and fun to make. We covered key ingredients, like oats and pumpkin puree, and went through each step from mixing to chilling. You can customize flavors and decide on sweetness levels. Don’t forget the tips on storage and freezing to keep them fresh. With these easy steps and variations, you can enjoy delicious treats year-round. Now, it’s time for you to whip up your own batch and share them with friends and family!

Ingredients

When making No Bake Pumpkin Chocolate Oat Bars, you need a few key ingredients. They work together to create a tasty treat that’s easy to prepare. Here’s what you will need:

– 1 cup rolled oats

– 1/2 cup pumpkin puree

– 1/4 cup almond butter (or your favorite nut butter)

– 1/4 cup honey or maple syrup

– 1/3 cup dark chocolate chips

– 1 teaspoon vanilla extract

– 1 teaspoon pumpkin spice

– 1/4 teaspoon salt

– 1/4 cup chopped nuts (walnuts or pecans) – optional

Each ingredient plays a role. The rolled oats give the bars a chewy texture. Pumpkin puree adds moisture and flavor. Almond butter keeps everything together while adding healthy fats. Honey or maple syrup sweetens the mix without overpowering the pumpkin. Dark chocolate chips provide a rich, chocolatey contrast. Vanilla extract and pumpkin spice round out the flavor, making these bars cozy and comforting.

You can also add chopped nuts for crunch. They add a nice texture and nutty flavor. Feel free to swap in your favorite nut butter or sweetener. This recipe is flexible and fun to customize!

Step-by-Step Instructions

Mixing the Base

Start by taking a big bowl. Add the rolled oats, pumpkin puree, almond butter, and honey or maple syrup. Mix these ingredients well with a spatula. Make sure there are no dry spots or lumps. A good blend is key for taste.

Adding Flavor

Next, pour in the vanilla extract, pumpkin spice, and salt. Stir the mixture quickly until everything is mixed. This step helps to create a smooth and even mixture. A uniform consistency is important for the best flavor.

Preparing the Baking Dish

Now, grab an 8×8 inch baking dish. Line it with parchment paper. Leave some paper hanging over the sides. This makes it easy to lift out the bars later. It’s a simple trick that saves time.

Pressing the Mixture

Transfer the mixture into the lined baking dish. Use a spatula or your hands to press it down evenly. Make sure to pack it in tight. This helps the bars keep their shape when you cut them later.

Chilling the Bars

Put the baking dish in the fridge for at least 2 hours. This chilling time is important. It helps the bars become firm and hold together well. You want the right texture for the best bite.

Cutting and Serving

Once the bars are firm, lift them out using the parchment paper. Place them on a cutting board. Use a sharp knife to cut them into squares or rectangles. For a nice touch, arrange the bars on a platter. Drizzle some melted chocolate on top for extra flair. Sprinkle a bit of pumpkin spice for a charming finish.

Tips & Tricks

Storage Recommendations

– Store your bars in an airtight container to keep them fresh.

– Place parchment paper between layers to avoid sticking.

– In the fridge, they last about a week.

– Freeze them for up to three months for longer storage.

– For best taste, eat them fresh but enjoy them longer if needed.

Adjusting Sweetness Level

– To reduce sweetness, use less honey or maple syrup.

– Try using a sugar substitute like stevia or monk fruit.

– Start with half the amount, then taste and adjust.

– Remember, natural sweeteners can change the flavor a bit.

Enhancing Flavor Profiles

– Consider adding spices like cinnamon or nutmeg for warmth.

– Try mixing in dried fruits like cranberries or raisins for added texture.

– You can also use seeds like chia or flax for extra crunch.

– Experiment with different nut butters for unique flavors.

Variations

Different Nut Butters

You can switch the almond butter for many types. Peanut butter gives a strong taste. Sunflower butter is great for nut-free diets. Cashew butter adds creaminess. Each nut butter changes the flavor and texture. Experiment with what you like.

Gluten-Free Adaptations

Make sure all your ingredients are gluten-free. Regular oats may have gluten. Look for certified gluten-free oats instead. You can also use ground flaxseed as a base. This keeps the bars tasty and safe for everyone.

Vegan Options

If you want a vegan treat, swap honey for maple syrup. This keeps it plant-based and sweet. You can add chia seeds for extra nutrition. Dried fruit or coconut can also boost flavor. These options make the bars fun and healthy!

Storage Info

Best Storage Practices

Store your No Bake Pumpkin Chocolate Oat Bars in airtight containers. This helps keep them fresh. If you have no airtight container, use parchment wraps. Wrap each bar tightly to prevent them from drying out.

The best temperature for storing these bars is in the fridge. They stay firm and tasty when kept cool. You can also leave them at room temperature for a short time, but they last longer in the fridge.

Freezing Instructions

To freeze your bars, cut them into squares first. Place the cut bars in a single layer on a baking sheet. Freeze them for about one hour. After they are firm, transfer them to a freezer-safe bag. Remove as much air as possible to avoid freezer burn.

When you want to eat them, take them out of the freezer. Let them thaw in the fridge for a few hours. If you need them fast, you can thaw them at room temperature. Enjoy them as is or with a warm drink.

Expiration Tips

Check your bars for signs of spoilage. If they smell off or have a strange color, don’t eat them. You should also look for mold or an unusual texture.

You can keep these bars in the fridge for about a week. If frozen, they can last for up to three months. Always label your containers with the date to track freshness.

FAQs

Can I use quick oats instead of rolled oats?

Yes, you can use quick oats. The texture will change a bit. Quick oats are finer than rolled oats. They absorb liquid faster and may make the bars softer. If you prefer a chewier texture, stick with rolled oats.

How can I make these bars healthier?

You can make these bars even healthier with a few swaps. Use almond butter or peanut butter for healthy fats. Replace honey with mashed banana or applesauce for less sugar. Add seeds like chia or flax for more fiber. Consider using dark chocolate that is at least 70% cocoa for added health benefits.

What can I substitute for pumpkin puree?

If you don’t have pumpkin puree, sweet potato works well. Cooked sweet potato gives a similar taste and texture. Butternut squash is another great option. Just make sure to puree it until smooth.

Are these bars suitable for kids?

Yes, these bars are perfect for kids! They have wholesome ingredients and offer good nutrition. With oats, pumpkin, and nut butter, they are filling and tasty. Just check for nut allergies before serving.

How long will the bars last?

These bars will last about one week in the fridge. Store them in an airtight container to keep them fresh. If you want them to last longer, freeze them. They can stay good for up to three months if frozen.

These no-bake pumpkin bars are simple and fun to make. We covered key ingredients, like oats and pumpkin puree, and went through each step from mixing to chilling. You can customize flavors and decide on sweetness levels. Don’t forget the tips on storage and freezing to keep them fresh. With these easy steps and variations, you can enjoy delicious treats year-round. Now, it’s time for you to whip up your own batch and share them with friends and family!

When making No Bake Pumpkin Chocolate Oat Bars, you need a few key ingredients. They work together to create a tasty treat that’s easy to prepare. Here's what you will need: - 1 cup rolled oats - 1/2 cup pumpkin puree - 1/4 cup almond butter (or your favorite nut butter) - 1/4 cup honey or maple syrup - 1/3 cup dark chocolate chips - 1 teaspoon vanilla extract - 1 teaspoon pumpkin spice - 1/4 teaspoon salt - 1/4 cup chopped nuts (walnuts or pecans) – optional Each ingredient plays a role. The rolled oats give the bars a chewy texture. Pumpkin puree adds moisture and flavor. Almond butter keeps everything together while adding healthy fats. Honey or maple syrup sweetens the mix without overpowering the pumpkin. Dark chocolate chips provide a rich, chocolatey contrast. Vanilla extract and pumpkin spice round out the flavor, making these bars cozy and comforting. You can also add chopped nuts for crunch. They add a nice texture and nutty flavor. Feel free to swap in your favorite nut butter or sweetener. This recipe is flexible and fun to customize! Start by taking a big bowl. Add the rolled oats, pumpkin puree, almond butter, and honey or maple syrup. Mix these ingredients well with a spatula. Make sure there are no dry spots or lumps. A good blend is key for taste. Next, pour in the vanilla extract, pumpkin spice, and salt. Stir the mixture quickly until everything is mixed. This step helps to create a smooth and even mixture. A uniform consistency is important for the best flavor. Now, grab an 8x8 inch baking dish. Line it with parchment paper. Leave some paper hanging over the sides. This makes it easy to lift out the bars later. It’s a simple trick that saves time. Transfer the mixture into the lined baking dish. Use a spatula or your hands to press it down evenly. Make sure to pack it in tight. This helps the bars keep their shape when you cut them later. Put the baking dish in the fridge for at least 2 hours. This chilling time is important. It helps the bars become firm and hold together well. You want the right texture for the best bite. Once the bars are firm, lift them out using the parchment paper. Place them on a cutting board. Use a sharp knife to cut them into squares or rectangles. For a nice touch, arrange the bars on a platter. Drizzle some melted chocolate on top for extra flair. Sprinkle a bit of pumpkin spice for a charming finish. - Store your bars in an airtight container to keep them fresh. - Place parchment paper between layers to avoid sticking. - In the fridge, they last about a week. - Freeze them for up to three months for longer storage. - For best taste, eat them fresh but enjoy them longer if needed. - To reduce sweetness, use less honey or maple syrup. - Try using a sugar substitute like stevia or monk fruit. - Start with half the amount, then taste and adjust. - Remember, natural sweeteners can change the flavor a bit. - Consider adding spices like cinnamon or nutmeg for warmth. - Try mixing in dried fruits like cranberries or raisins for added texture. - You can also use seeds like chia or flax for extra crunch. - Experiment with different nut butters for unique flavors. {{image_4}} You can switch the almond butter for many types. Peanut butter gives a strong taste. Sunflower butter is great for nut-free diets. Cashew butter adds creaminess. Each nut butter changes the flavor and texture. Experiment with what you like. Make sure all your ingredients are gluten-free. Regular oats may have gluten. Look for certified gluten-free oats instead. You can also use ground flaxseed as a base. This keeps the bars tasty and safe for everyone. If you want a vegan treat, swap honey for maple syrup. This keeps it plant-based and sweet. You can add chia seeds for extra nutrition. Dried fruit or coconut can also boost flavor. These options make the bars fun and healthy! Store your No Bake Pumpkin Chocolate Oat Bars in airtight containers. This helps keep them fresh. If you have no airtight container, use parchment wraps. Wrap each bar tightly to prevent them from drying out. The best temperature for storing these bars is in the fridge. They stay firm and tasty when kept cool. You can also leave them at room temperature for a short time, but they last longer in the fridge. To freeze your bars, cut them into squares first. Place the cut bars in a single layer on a baking sheet. Freeze them for about one hour. After they are firm, transfer them to a freezer-safe bag. Remove as much air as possible to avoid freezer burn. When you want to eat them, take them out of the freezer. Let them thaw in the fridge for a few hours. If you need them fast, you can thaw them at room temperature. Enjoy them as is or with a warm drink. Check your bars for signs of spoilage. If they smell off or have a strange color, don't eat them. You should also look for mold or an unusual texture. You can keep these bars in the fridge for about a week. If frozen, they can last for up to three months. Always label your containers with the date to track freshness. Yes, you can use quick oats. The texture will change a bit. Quick oats are finer than rolled oats. They absorb liquid faster and may make the bars softer. If you prefer a chewier texture, stick with rolled oats. You can make these bars even healthier with a few swaps. Use almond butter or peanut butter for healthy fats. Replace honey with mashed banana or applesauce for less sugar. Add seeds like chia or flax for more fiber. Consider using dark chocolate that is at least 70% cocoa for added health benefits. If you don't have pumpkin puree, sweet potato works well. Cooked sweet potato gives a similar taste and texture. Butternut squash is another great option. Just make sure to puree it until smooth. Yes, these bars are perfect for kids! They have wholesome ingredients and offer good nutrition. With oats, pumpkin, and nut butter, they are filling and tasty. Just check for nut allergies before serving. These bars will last about one week in the fridge. Store them in an airtight container to keep them fresh. If you want them to last longer, freeze them. They can stay good for up to three months if frozen. These no-bake pumpkin bars are simple and fun to make. We covered key ingredients, like oats and pumpkin puree, and went through each step from mixing to chilling. You can customize flavors and decide on sweetness levels. Don’t forget the tips on storage and freezing to keep them fresh. With these easy steps and variations, you can enjoy delicious treats year-round. Now, it’s time for you to whip up your own batch and share them with friends and family!

No Bake Pumpkin Chocolate Oat Bars

Indulge in these delicious No Bake Pumpkin Chocolate Oat Bars, perfect for a healthy treat! Made with rolled oats, pumpkin puree, and dark chocolate chips, these bars are simple to prepare and require no baking. Just mix, chill, and enjoy the tasty combination of flavors! Click through for the full recipe and step-by-step instructions to create this delightful snack. #PumpkinRecipes #NoBakeTreats #HealthySnacks #ChocolateLovers

Ingredients
  

1 cup rolled oats

1/2 cup pumpkin puree

1/4 cup almond butter (or your favorite nut butter)

1/4 cup honey or maple syrup

1/3 cup dark chocolate chips

1 teaspoon vanilla extract

1 teaspoon pumpkin spice

1/4 teaspoon salt

1/4 cup chopped nuts (walnuts or pecans) – optional

Instructions
 

In a large mixing bowl, combine the rolled oats, pumpkin puree, almond butter, and honey or maple syrup. Using a spatula, mix until all the ingredients are thoroughly blended, ensuring there are no dry spots or lumps.

    Add the vanilla extract, pumpkin spice, and salt to the mixture. Stir vigorously until everything is fully integrated, creating a uniform consistency.

      Gently fold in the dark chocolate chips and chopped nuts (if you choose to add them), ensuring even distribution without breaking the chocolate chips.

        Prepare an 8x8 inch (20x20 cm) baking dish by lining it with parchment paper, leaving some overhang for easy removal. This step will make it easy to lift out the bars after they have set.

          Transfer the mixture into the lined baking dish, then use the back of a spatula or your hands (damped slightly to prevent sticking) to press the mixture evenly into the dish. Make sure to pack it down firmly, as this will help the bars hold their shape when cut.

            Place the baking dish in the refrigerator for at least 2 hours, or until the bars are firm to the touch. This chilling process is crucial for achieving the right texture.

              Once the bars are set, carefully lift them out of the baking dish using the parchment paper. Place them on a cutting board and cut them into squares or rectangles, depending on your preference.

                Prep Time: 10 min | Total Time: 2 hrs 10 min | Servings: 12 bars

                  - Presentation Tips: Arrange the bars on a decorative platter and enhance their appearance by drizzling with melted chocolate. For an extra touch of flavor and charm, sprinkle some additional pumpkin spice atop the bars before serving.

                    WANT TO SAVE THIS RECIPE?