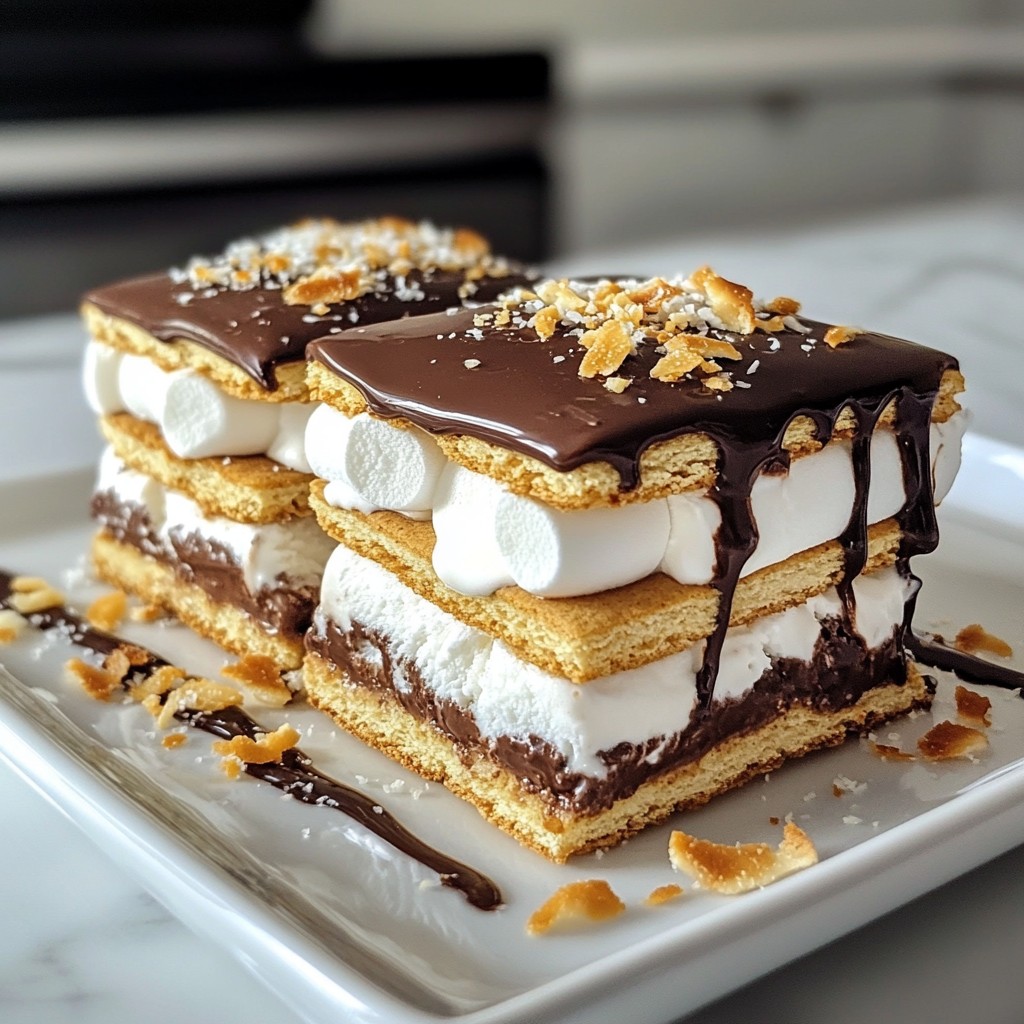
Get ready to indulge in a treat that combines classic campfire magic with a chilly twist! S’mores Ice Cream Sandwiches are a fun and easy way to enjoy this beloved dessert all year round. With a crunchy graham cracker crust, rich chocolate ice cream, and gooey marshmallows, each bite is a delicious delight. Let’s dive into how you can make these sweet and simple sandwiches at home!
Why I Love This Recipe
- Decadent Flavor Combination: The rich chocolate ice cream, paired with the sweetness of marshmallows and the crunch of graham crackers, creates a delightful explosion of flavors.
- Easy to Make: With simple ingredients and straightforward steps, this recipe is perfect for both novice and experienced bakers.
- Perfect for Any Occasion: Whether it's a summer BBQ or a cozy night in, these ice cream sandwiches are a hit with everyone.
- Customizable: You can easily swap out the chocolate ice cream for your favorite flavor or add different toppings to suit your taste.
Ingredients
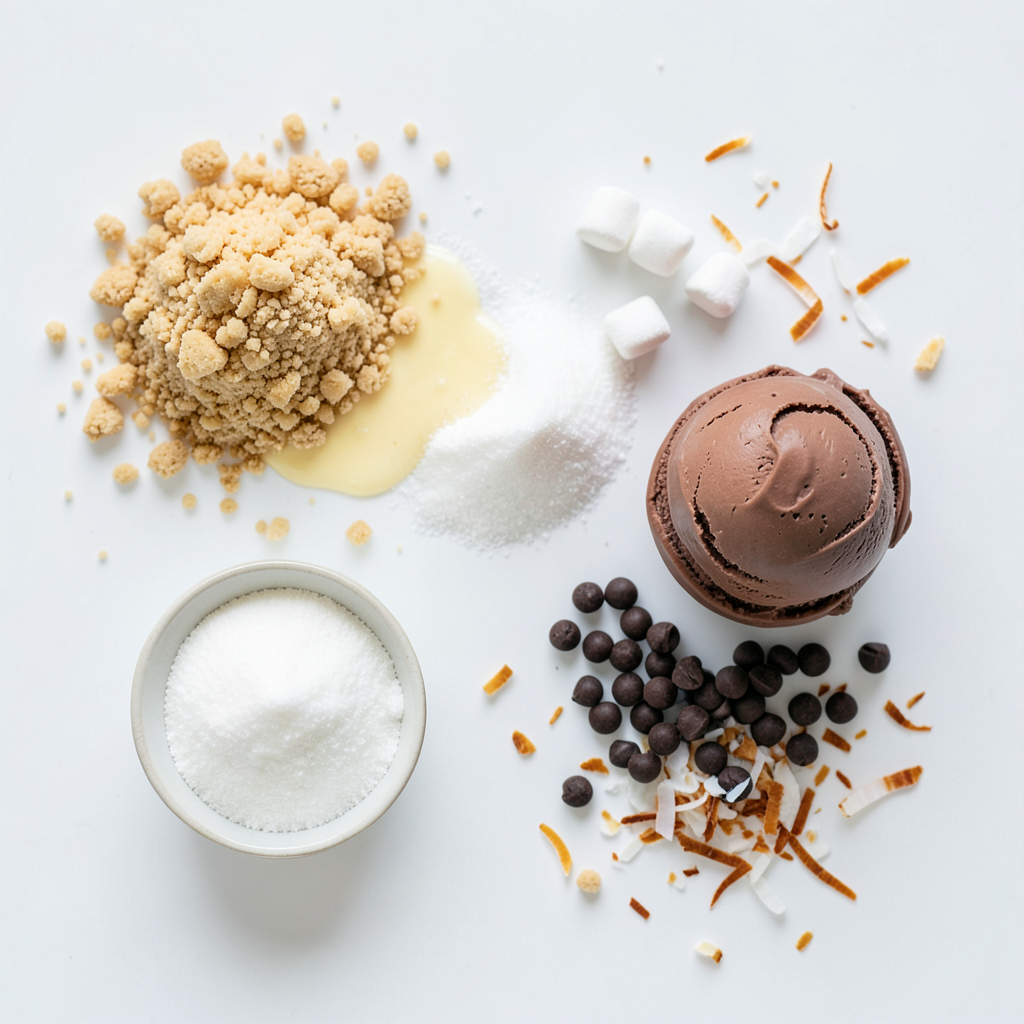
Essential Ingredients for S'mores Ice Cream Sandwiches
- 1 cup graham cracker crumbs
- 1/4 cup granulated sugar
- 1/2 cup unsalted butter, melted
- 1 cup mini marshmallows
- 2 cups chocolate ice cream
To make the best S'mores Ice Cream Sandwiches, you need a few key ingredients. First, graham cracker crumbs give that classic S'mores taste. The sweet granulated sugar adds a nice touch to the crust. Unsalted butter helps bind the crumbs and keeps everything moist. Mini marshmallows bring the gooey texture we all love. Finally, chocolate ice cream is the star of the show, adding rich flavor.
Optional Garnishes
- 1/2 cup chocolate chips
- 1/4 cup toasted coconut flakes
You can make your treats even better with optional garnishes. Drizzling melted chocolate chips over the marshmallows adds extra sweetness and flavor. Toasted coconut flakes give a nice crunch and a hint of tropical taste. These additions make your S'mores Ice Cream Sandwiches look and taste amazing!
Step-by-Step Instructions
Preparing the Graham Cracker Crust
- In a mixing bowl, combine 1 cup of graham cracker crumbs and 1/4 cup of granulated sugar.
- Pour in 1/2 cup of melted butter. Mix until the crumbs look like damp sand.
Layering the Ingredients
- Spread 2 cups of chocolate ice cream over the graham cracker base.
- Use a spatula to make it even.
- Sprinkle 1 cup of mini marshmallows on top of the ice cream.
Melting and Drizzling Chocolate
- In a microwave-safe bowl, add 1/2 cup of chocolate chips.
- Heat in the microwave for 30 seconds. Stir until smooth.
- Drizzle the melted chocolate over the mini marshmallows.
Completing the Sandwiches
- Sprinkle the remaining graham cracker mixture over the melted chocolate.
- Press down gently to help it stick.
- Freeze for 2-3 hours until firm.
- Cut into squares or rectangles for easy serving.
Tips & Tricks
Perfecting the Graham Cracker Base
To make a great base, use about 1 cup of graham cracker crumbs. Mix them with 1/4 cup of granulated sugar. Then, pour in 1/2 cup of melted unsalted butter. Stir until it looks like damp sand. This mixture forms a strong base for your ice cream. Press half into a greased dish. Make sure it’s tightly packed. This helps keep the ice cream from leaking out. For a crunchier texture, add more crumbs. For a softer base, reduce the crumbs slightly.
Freezing Time Optimization
When freezing, aim for even layers. After adding ice cream, freeze it for about 1 hour. This helps it set well. For faster freezing, spread the ice cream in a thin layer. Use a shallow dish if you can. This way, it freezes faster without losing taste. Avoid opening the freezer too often. Each time you do, it lets warm air in. Wait until the ice cream is firm before adding marshmallows.
Serving Suggestions
To serve, cut the sandwiches into squares or rectangles. Use a sharp knife for clean edges. For parties, stack them on a nice plate. This makes them look fun and inviting. You can add toasted coconut flakes on top for a crunchy twist. Other great toppings include chocolate syrup or sprinkles. Feel free to get creative! Offer a variety of toppings so everyone can customize their treat.
Pro Tips
- Chill Your Tools: Before spreading the ice cream, chill your spatula in the freezer for a few minutes. This will help create a smoother and more even layer.
- Graham Cracker Consistency: For the best crust, ensure your graham cracker crumbs are finely crushed. This will help the crust hold together better when pressed into the pan.
- Layering Flavors: Feel free to get creative! Add layers of peanut butter or caramel sauce between the ice cream and marshmallows for an extra flavor boost.
- Storage Tips: Wrap individual sandwiches in parchment paper before placing them in an airtight container to keep them fresh and prevent sticking.
Variations
Flavor Variations
You can switch up the ice cream flavor to fit your taste. Try vanilla, strawberry, or mint chocolate chip. Each flavor gives a new twist to your S'mores Ice Cream Sandwiches. You can also add fruit toppings like sliced strawberries or bananas. Nuts, like chopped pecans or walnuts, add a nice crunch.
Dietary Adjustments
If you need gluten-free options, use almond flour or gluten-free graham crackers for the crust. This way, everyone can enjoy the treat. For those who want dairy-free, many brands sell coconut or almond milk ice cream. These alternatives still taste great and keep the dessert fun.
Creative Twists
You can make S'mores Ice Cream Sandwiches with brownies instead of the graham crust. Brownies add a rich flavor and chewy texture. You can also layer in different candies, such as Reese’s cups or crushed Oreos, for a unique taste. Don’t be afraid to mix and match!
Storage Info
Best Methods for Storing S'mores Ice Cream Sandwiches
To keep your s'mores ice cream sandwiches fresh, you have two choices: refrigerate or freeze.
- Refrigerating: If you plan to eat them in a day or two, the fridge works well. Just place them in an airtight container.
- Freezing: For longer storage, freeze them. Wrap each sandwich in plastic wrap or foil. This helps avoid freezer burn and keeps them tasty.
Shelf Life
S'mores ice cream sandwiches can last in the freezer for up to three months. After that, they might lose flavor and texture.
- Signs of spoilage: Look for ice crystals on the surface or a change in color. If they smell off or taste bland, it’s best to toss them.
Storing your treats properly ensures they stay delicious for as long as possible!
FAQs
How do I make S'mores Ice Cream Sandwiches without a baking dish?
You can use a few simple methods. First, try using a large sheet pan lined with parchment paper. This lets you spread the graham cracker mix evenly. You can also use muffin tins for individual servings. Just press the mix into the bottom of each cup. This way, you get fun-sized treats. Cutting them into squares or circles works well too.
Can I use store-bought graham cracker crust?
Yes, you can use a store-bought graham cracker crust. It saves time and effort. However, it may not taste as fresh as homemade. Store-bought crusts can also be thinner, making them less sturdy. If you want a thicker base, consider making your own. That way, you control the texture and flavor.
What are the best toppings for S'mores Ice Cream Sandwiches?
You can get creative with toppings! Here are some great ideas:
- Crushed nuts for crunch
- Extra mini marshmallows
- Drizzled caramel or chocolate sauce
- Sprinkles for fun colors
- Fresh fruit like strawberries or bananas
These toppings add flavor and make your sandwiches look stunning.
How long does it take for S'mores Ice Cream Sandwiches to freeze?
After you prepare the sandwiches, freeze them for at least 2 to 3 hours. This time allows the layers to set and become firm. For best results, leave them overnight. This way, they achieve the perfect texture. If you cut into them too early, they might be too soft.
You learned how to make delicious S'mores Ice Cream Sandwiches, starting with simple ingredients like graham cracker crumbs, sugar, and chocolate ice cream. We covered how to prepare a solid crust, layer the fillings, and freeze them just right. Remember the tips for serving and storing to keep them fresh. Feel free to explore flavor variations to make them your own. Enjoying this treat encourages creativity and delicious fun! Make it your next sweet project.