Looking for an easy, budget-friendly meal? This Affordable Meal Prep White Bean Chili Recipe Boost has you covered! Packed with flavor and nutrients, this chili is simple to make and great for any weeknight dinner. I'll walk you through all the ingredients you need, easy steps, and tips for perfecting your dish. Plus, I’ll share easy ways to customize it. Let’s dive into the delicious details!
Why I Love This Recipe
- Easy to Prepare: This chili comes together quickly with minimal prep time, making it perfect for busy weeknights.
- Nutritious Ingredients: Packed with vegetables and protein from white beans, this meal is both healthy and satisfying.
- Budget-Friendly: Utilizing canned beans and seasonal vegetables makes this recipe affordable for everyone.
- Versatile and Customizable: You can easily adjust the spices and toppings to suit your taste preferences.
Ingredients
List of Main Ingredients
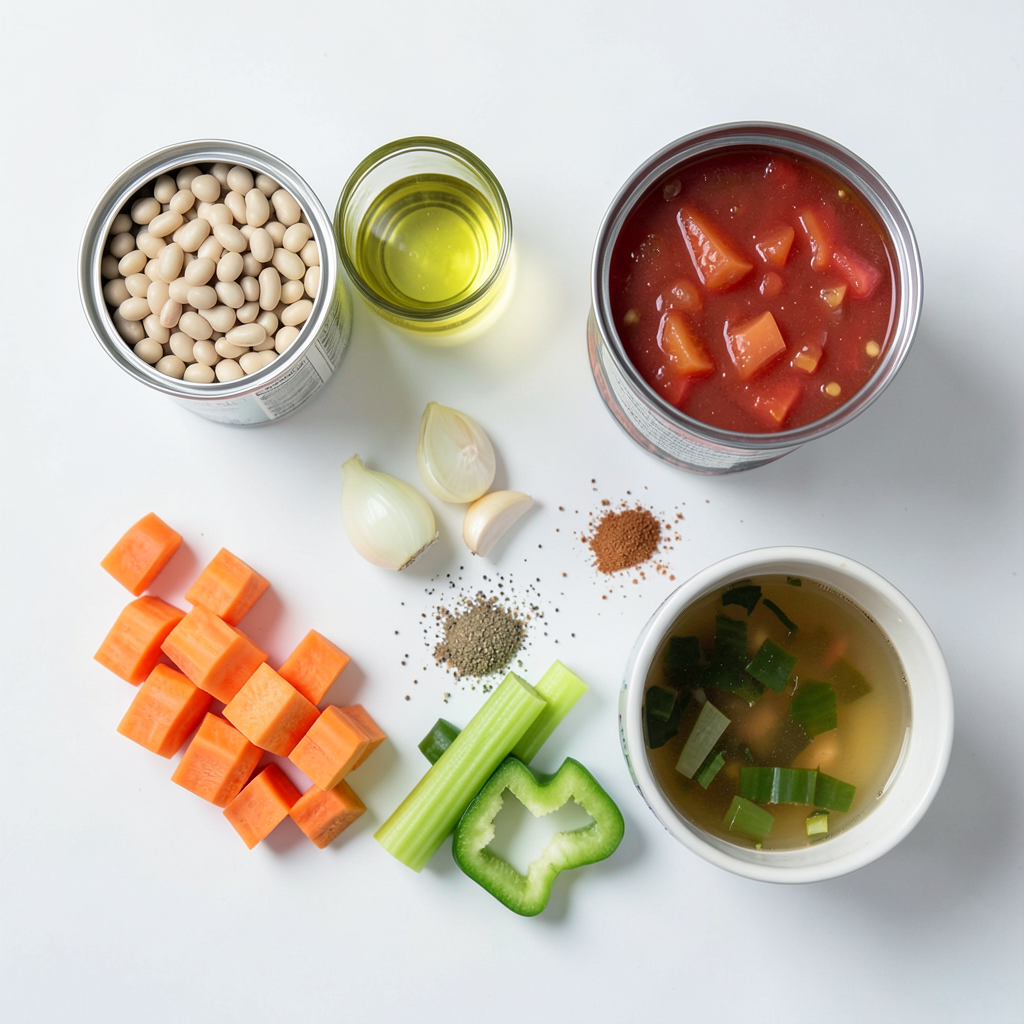
- 2 cans (15 oz each) white beans (cannellini or great northern), rinsed and drained
- 1 tablespoon olive oil
- 1 large onion, diced
- 3 cloves garlic, minced
- 2 medium carrots, diced
- 2 celery stalks, diced
- 1 green bell pepper, diced
- 1 can (14.5 oz) diced tomatoes with their juices
- 2 cups vegetable broth
- 2 teaspoons ground cumin
- 1 teaspoon chili powder
- 1 teaspoon smoked paprika
- Salt and pepper to taste
Optional Garnishes
- Fresh cilantro or parsley
- Slices of avocado
- A dollop of sour cream
Notes on Ingredient Substitutions
You can swap white beans for other beans like kidney or pinto. If you lack fresh veggies, use frozen ones. For a meatier flavor, try adding cooked chicken or turkey. You can also replace vegetable broth with chicken broth. If you need a gluten-free option, check the labels on your broth and spices. This chili is adaptable, so feel free to get creative!
Step-by-Step Instructions
Preparing the Base
First, heat 1 tablespoon of olive oil in a large pot over medium heat. Add one large, diced onion. Sauté it for about 5 minutes until it turns soft and clear. Stir it now and then to cook evenly. This forms a strong base for your chili.
Cooking the Vegetables
Next, mix in 3 minced garlic cloves, 2 diced medium carrots, 2 diced celery stalks, and 1 diced green bell pepper. Cook these for another 5 minutes. Stir often. You want the veggies to soften but not lose their crunch. This step adds layers of flavor to your dish.
Combining Ingredients and Simmering
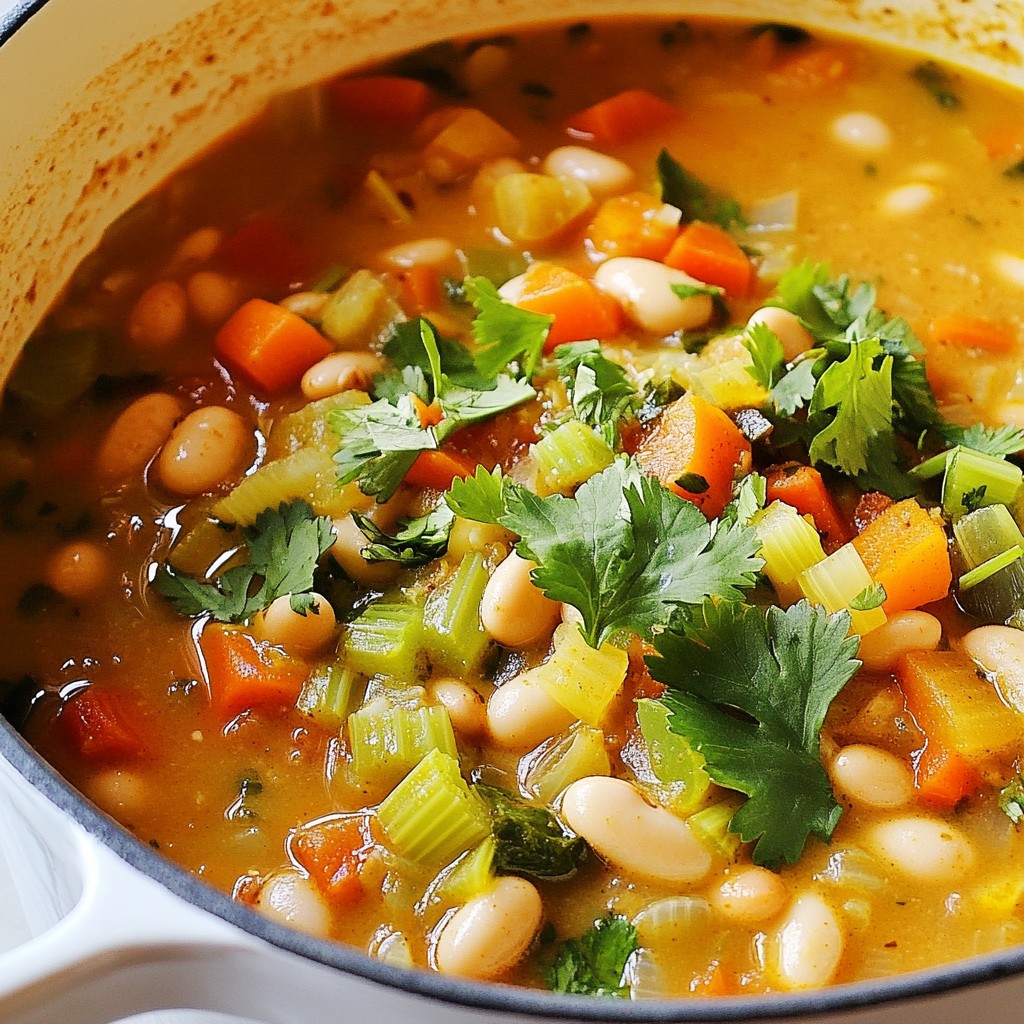
Now it’s time to add the spices. Sprinkle in 2 teaspoons of ground cumin, 1 teaspoon of chili powder, and 1 teaspoon of smoked paprika. Stir for about 1 minute to toast the spices. Then, add 2 cans of rinsed white beans, 1 can of diced tomatoes (with juices), and 2 cups of vegetable broth. Stir everything well. Bring the mix to a boil. Once boiling, lower the heat and let it simmer uncovered for 20-25 minutes. This lets the flavors blend together.
Adjusting Seasoning and Texture
After simmering, taste your chili. Adjust the flavor with salt and pepper as needed. If you like a creamier chili, use an immersion blender to blend part of it. For a chunkier texture, leave it as is. Finally, let the chili cool for a few minutes. Portion it into meal prep containers. This makes it easy to enjoy throughout the week.
Tips & Tricks
Meal Prep Tips for Easy Storage
To store your chili, let it cool first. Use meal prep containers for easy access. Divide the chili into portions. This helps with freezing and reheating. Label your containers with dates. You will know when to use them. Store in the fridge for up to five days. For longer storage, freeze it for up to three months. Chili reheats well in the microwave or on the stove.
Best Practices for Flavor Enhancement
To boost flavor, use fresh herbs like cilantro or parsley. These add a bright touch when serving. You can also add lime juice for zing. For deeper flavor, consider using smoked salt. A splash of hot sauce can kick it up a notch. If you like it spicy, add more chili powder or diced jalapeños. Toasted spices can add warmth, so don't skip that step while cooking.
Serving Suggestions for Variety
Serving your chili can be fun! Try garnishing with avocado or sour cream for creaminess. Cornbread or tortilla chips make great sides. You can also serve it over rice or quinoa for a hearty meal. If you want a twist, try it in a taco or burrito. Mixing in some cheese can add rich flavors. Enjoy your meal in different ways throughout the week!
Pro Tips
- Use Fresh Herbs: Adding fresh cilantro or parsley right before serving brightens the flavors and adds a fresh touch to your chili.
- Adjust the Spice Level: If you prefer a spicier chili, consider adding diced jalapeños or a dash of cayenne pepper along with the spices.
- Make Ahead for Better Flavor: This chili tastes even better the next day! Prepare it in advance for meal prep to allow the flavors to develop.
- Freeze for Later: This chili freezes well. Portion it into airtight containers and freeze for up to 3 months for a quick meal option.
Variations
Protein Additions (e.g., chicken or turkey)
You can add protein to your white bean chili for more flavor and nutrition. Chicken or turkey work well. Simply cook diced chicken or turkey in the pot before adding the onion. This method infuses the dish with rich flavor. Use about 1 pound of diced meat for a hearty meal. Cook it until it is no longer pink before adding the onions and other vegetables.
Vegetarian/Vegan Modifications
To make this dish vegetarian or vegan, simply use vegetable broth. The rest of the recipe is already plant-based. You can also add more veggies like zucchini or corn. This makes the dish colorful and packed with nutrients. If you want extra protein, consider adding quinoa or lentils. These ingredients can help you feel full longer and add great texture.
Spice Level Adjustments
If you like heat, add more spices. To boost the spice level, try adding diced jalapeños or a pinch of cayenne pepper. Start with a small amount and taste as you go. This chili can also handle spices like crushed red pepper flakes. Just remember, you can always add more, but you can't take it out! Enjoy adjusting the heat to match your taste.
Storage Info
How to Store Leftover Chili
After cooking, let your chili cool down. Once cool, transfer it to airtight containers. This keeps the chili fresh and tasty. Store the containers in the fridge. Your chili will stay good for about 4 to 5 days. If you plan to eat it later, consider freezing it.
Freezing Instructions for Long-Term Use
To freeze your chili, use freezer-safe containers or bags. Make sure to leave some space at the top. Chili expands when it freezes, so this will help avoid spills. Label each container with the date. Frozen chili keeps well for up to 3 months. When you’re ready to eat, just take it out and thaw it in the fridge overnight.
Reheating Tips for Best Texture
When reheating, use a pot on the stove over low heat. Stir often to keep it from sticking. If it seems thick, add a splash of vegetable broth or water. You can also microwave it. Use a microwave-safe bowl and cover it loosely. Heat in short bursts, stirring in between. This helps maintain the chili's creamy texture. Enjoy your meal!
FAQs
Can I use dried beans instead of canned?
Yes, you can use dried beans. However, you must soak them first. Soak the beans overnight. After soaking, cook them until tender. This may take 1 to 2 hours. Then, use them in the chili as you would the canned ones. Dried beans add great flavor and texture.
How long does the chili last in the fridge?
The chili lasts about 5 days in the fridge. Store it in an airtight container to keep it fresh. Make sure it cools down before sealing. This helps keep the flavors nice and strong. You can enjoy it as a quick meal or snack.
What can I serve with white bean chili?
You can serve white bean chili with many tasty sides. Here are some great options:
- Warm cornbread
- Tortilla chips
- Fresh avocado slices
- Sour cream or Greek yogurt
- A simple green salad
- Rice for extra filling
These sides will enhance your meal and add variety to your plate. Enjoy mixing and matching!
This blog post covered the key ingredients for a delicious white bean chili, including main items and optional garnishes. We discussed step-by-step cooking instructions and shared helpful tips for meal prep and flavor enhancement. You also learned about variations, like adding protein or adjusting spice levels. Lastly, we provided storage and reheating advice.
Now you’re ready to make your own unique chili. Enjoy the process and experiment with flavors!