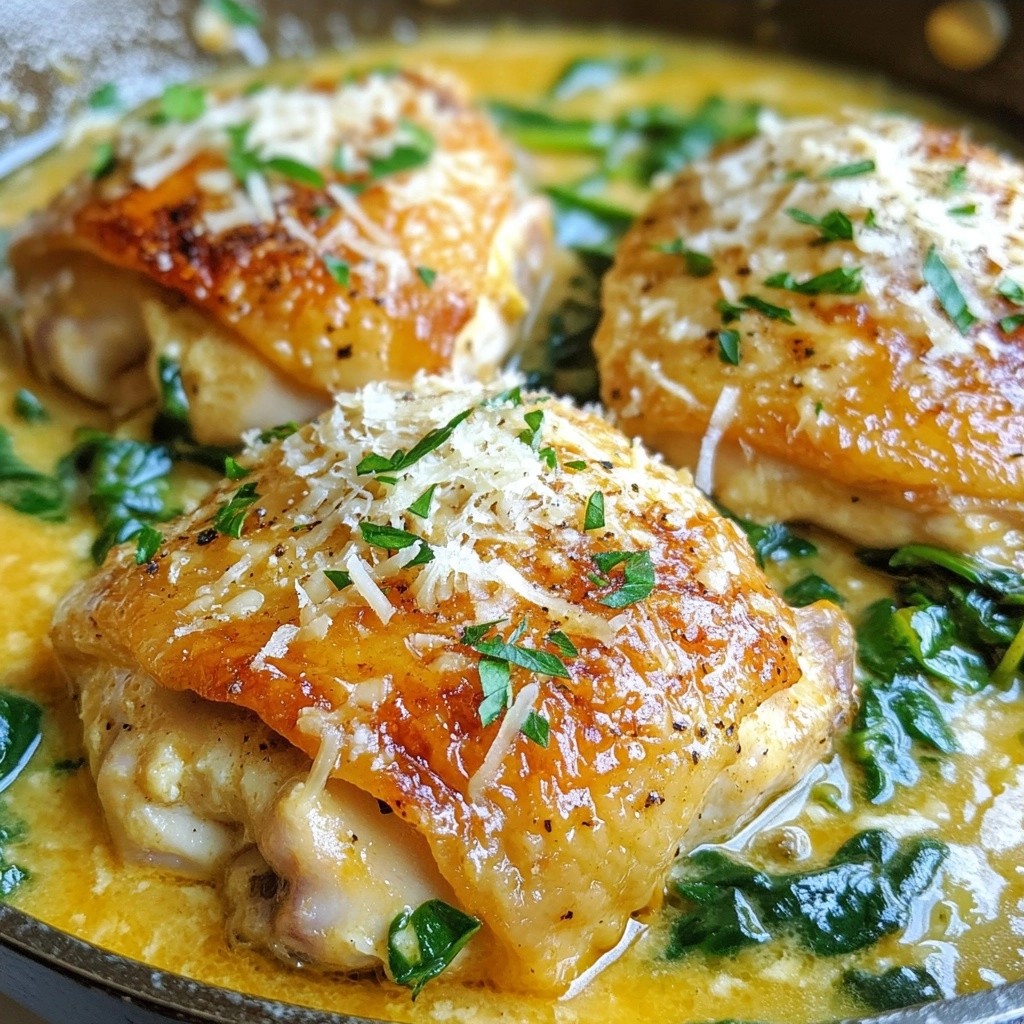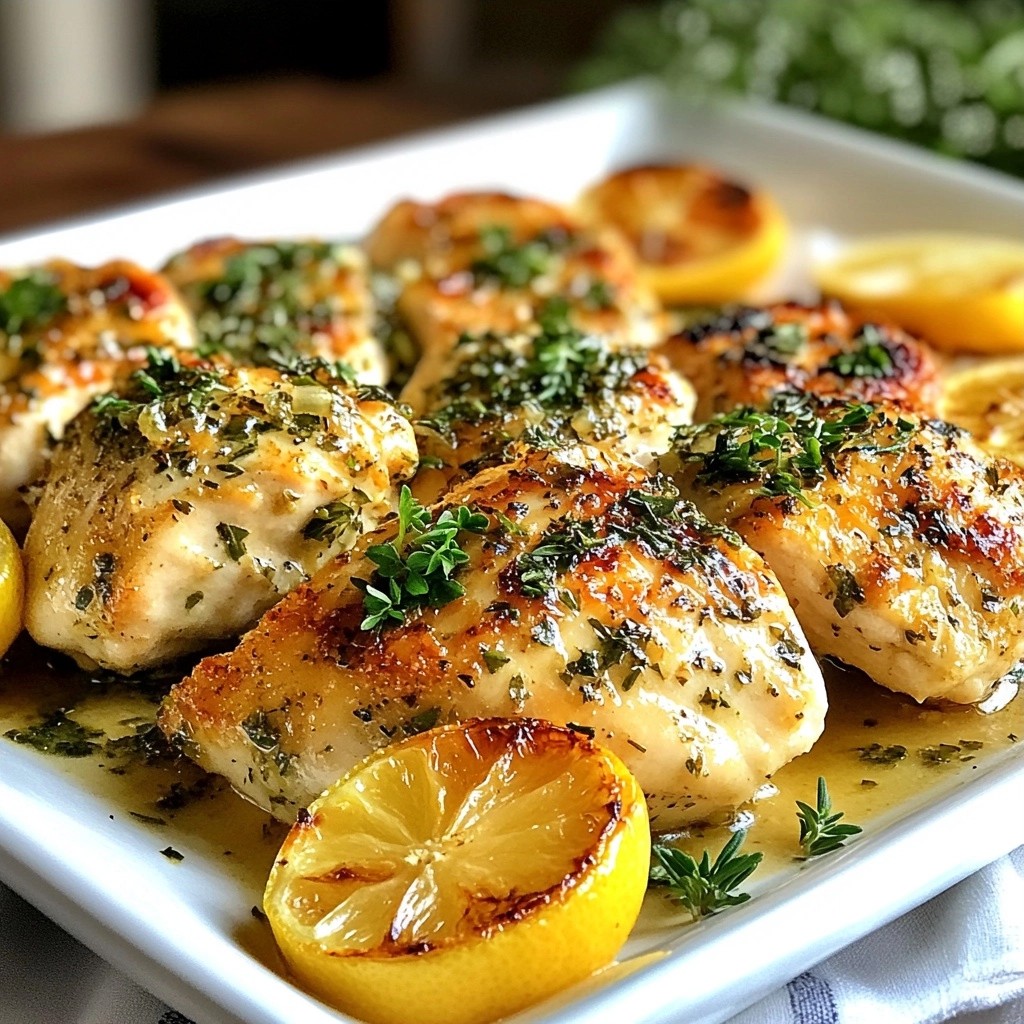
Looking for a delicious meal that won’t break the bank? You’ve come to the right place! This Cheap Garlic and Herb Buttered Chicken is simple, tasty, and full of flavor. With just a few affordable ingredients, you can create a dish that's perfect for any occasion. Follow along as I guide you through easy steps to make this delightful meal, ensuring it turns out perfectly every time. Let’s get cooking!
Why I Love This Recipe
- Flavorful Combination: The blend of garlic and fresh herbs creates a mouthwatering flavor profile that elevates simple chicken breasts to a gourmet dish.
- Easy Preparation: With minimal ingredients and straightforward steps, this recipe is perfect for busy weeknights or when entertaining guests.
- Juicy and Tender: The garlic herb butter ensures that the chicken remains moist and tender, making every bite a delightful experience.
- Versatile Dish: This chicken pairs beautifully with a variety of sides, from roasted vegetables to fluffy rice, making it a versatile choice for any meal.
Ingredients
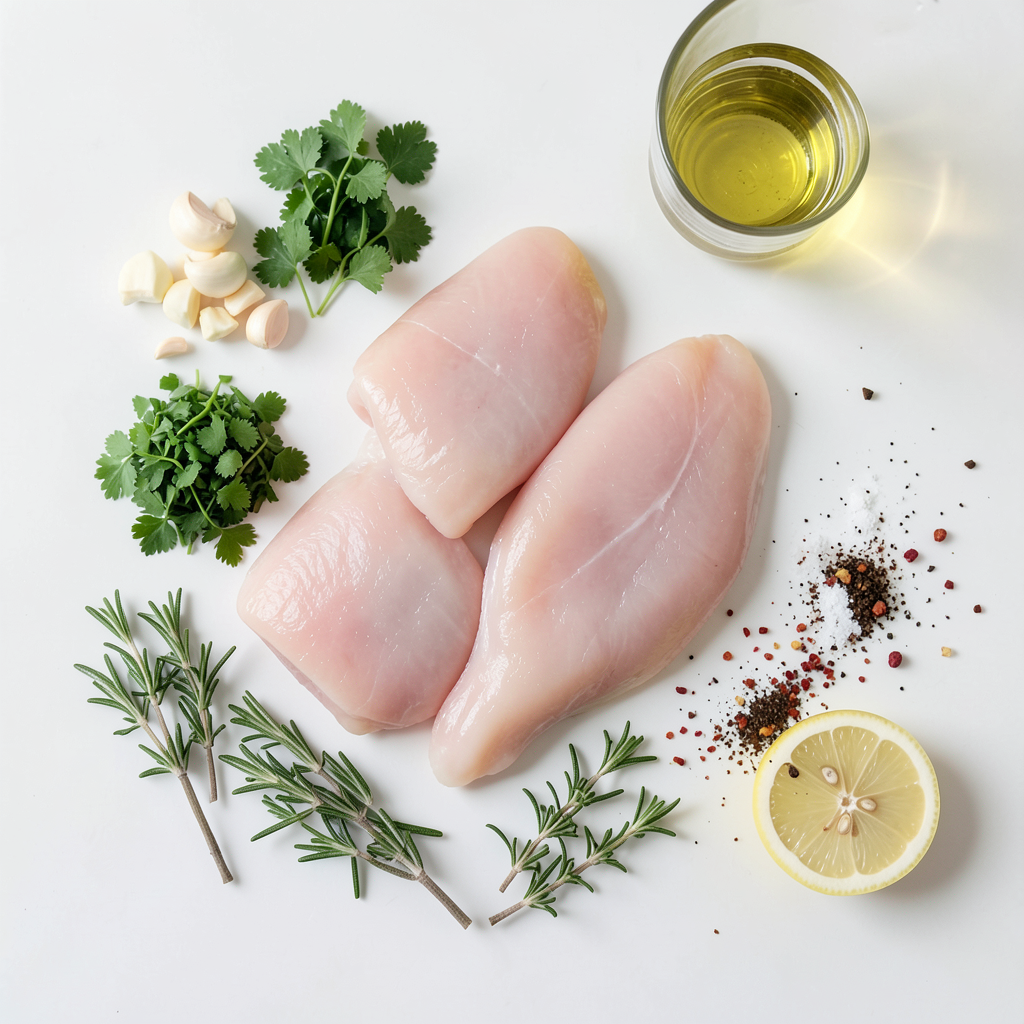
Main Ingredients for Garlic and Herb Buttered Chicken
- 4 boneless, skinless chicken breasts
- 4 tablespoons unsalted butter, softened
- 6 cloves garlic, finely minced
- 2 tablespoons fresh parsley, finely chopped
- 2 tablespoons fresh thyme, finely chopped
- 1 tablespoon fresh rosemary, finely chopped
- 1 teaspoon sea salt
- 1/2 teaspoon freshly ground black pepper
- 1/2 teaspoon red pepper flakes (optional)
- 1 lemon, sliced into rounds
- 1 tablespoon extra virgin olive oil
This dish shines with fresh herbs and garlic. The chicken is juicy and full of flavor. Each ingredient plays a role in making this meal delightful.
Cost-Effective Substitute Options
You can swap out some ingredients for budget-friendly options. Use frozen chicken breasts instead of fresh ones. They are often cheaper and just as tasty. You can also use dried herbs like thyme and parsley if fresh ones are too pricey. Just use less than you would of fresh herbs since dried herbs are stronger. For butter, a margarine spread can work if you want to save a bit.
High-Quality Ingredients to Enhance Flavor
Using fresh herbs makes a big difference in taste. They bring brightness and depth to the dish. For garlic, fresh cloves always beat out pre-minced options. If you can, opt for high-quality olive oil. It adds rich flavor and helps keep the chicken moist. Finally, consider using sea salt instead of table salt for a better taste. These small changes can elevate your dish from good to great!
Step-by-Step Instructions
Prepping the Oven and Chicken
Start by preheating your oven to 400°F (200°C). This heat is just right for cooking the chicken. While the oven warms up, take your four chicken breasts. Use paper towels to pat them dry. This step is key for a crispy finish. Place the chicken breasts in a baking dish, making sure they have space between them.
Making the Garlic and Herb Butter
In a medium bowl, mix four tablespoons of softened butter with six minced garlic cloves. Add two tablespoons each of fresh parsley, thyme, and rosemary. Sprinkle in a teaspoon of sea salt, half a teaspoon of black pepper, and red pepper flakes if you want a little spice. Blend everything well until it forms a smooth mix. This butter will add great flavor to your chicken.
Coating the Chicken and Arranging for Baking
Take the garlic and herb butter and smear it generously over each chicken breast. Make sure every piece is fully coated. This ensures the chicken stays moist and tasty. Next, drizzle one tablespoon of extra virgin olive oil over the chicken. This helps keep the meat juicy while it cooks. Finally, lay lemon slices on top of the chicken. These will add a fresh, zesty flavor as it bakes.
Baking to Perfection and Resting
Now, it’s time to bake! Place the baking dish in the preheated oven. Bake for 25-30 minutes. Keep an eye on the chicken until it reaches an internal temperature of 165°F (75°C). Once it's done, take the dish out and let the chicken rest for five minutes. This step is important as it locks in all the juices. After resting, your Garlic and Herb Buttered Chicken is ready to serve!
Tips & Tricks
How to Achieve a Crispy Exterior
To get a crispy outside, pat the chicken dry first. Moisture makes it hard to crisp up. Use paper towels to soak up any water. Also, make sure your oven is hot enough. Preheat it to 400°F (200°C) before baking. This heat helps the chicken sear nicely. Lastly, don’t skip the olive oil; it adds a nice crunch.
Flavor Enhancements and Add-Ins
You can boost the flavor in many ways. Try adding more herbs like oregano or basil. A touch of smoked paprika can give a nice depth. For a spicy kick, use more red pepper flakes. You can also add a splash of white wine to your butter mix. This adds a rich flavor that blends well with chicken. Don’t forget to toss in some veggies like bell peppers or zucchini. They roast beautifully alongside the chicken.
Common Mistakes to Avoid
One mistake is overcooking the chicken. Use a meat thermometer to check for 165°F (75°C). If you leave it too long, it can dry out. Another mistake is not letting the chicken rest. Let it sit for 5 minutes after baking. This helps the juices stay inside. Also, avoid crowding the chicken in the baking dish; it needs space to cook evenly. If the pieces touch, they will steam instead of roast.
Pro Tips
- Butter Temperature: Ensure the butter is at room temperature for easy mixing, which helps in creating a smooth and flavorful herb blend.
- Resting the Chicken: Letting the chicken rest after baking allows the juices to redistribute, resulting in a more moist and flavorful dish.
- Herb Freshness: Use fresh herbs whenever possible, as they add a bright and vibrant flavor compared to dried ones.
- Perfect Lemon Infusion: Slicing the lemons thinly allows more juice to be released, enhancing the chicken with a zesty flavor as it bakes.
Variations
Oven-Baked vs. Skillet-Cooked Methods
You can cook the garlic and herb butter chicken in two main ways: baking or skillet cooking. Baking is great for a hands-off approach. Just set the oven and let the chicken cook. This method allows the chicken to soak up all the flavors from the butter and herbs. It also helps keep the chicken juicy.
For a quicker option, you can use a skillet. Heat some oil in the pan, then add the chicken. Cook it for about 6-7 minutes on each side. This method gives the chicken a nice brown crust. If you love that crispy texture, go with the skillet! Both methods yield delicious results.
Herb Alternatives and Combinations
If you want to change up the flavors, feel free to swap out the herbs. Basil or oregano works well in place of thyme. You could also try tarragon for a unique taste. Mix and match herbs based on what you have at home. Using dried herbs is fine too; just remember that dried herbs are stronger. Use about one-third of the amount of fresh herbs.
Adding Vegetables for a Complete Meal
Adding vegetables is a great way to make this dish even better. You can place sliced zucchinis, bell peppers, or carrots around the chicken in the baking dish. They will roast and soak up the delicious garlic and herb flavors. This makes dinner easy and colorful. You can serve the chicken and veggies together, making it a complete meal.
Storage Info
Best Practices for Storing Leftovers
To keep your Garlic and Herb Buttered Chicken fresh, store leftovers properly. Place the chicken in an airtight container. This keeps moisture in and prevents drying. Make sure to cool the chicken to room temperature before sealing. Leftovers can last up to three days in the fridge. If you want to enjoy them later, consider freezing them.
Reheating Tips to Maintain Flavor
When you reheat the chicken, keep flavor in mind. Use the oven for the best results. Preheat it to 350°F (175°C). Place the chicken on a baking tray and cover it with foil. This helps retain moisture. Heat for about 15 minutes or until warmed through. You can use a microwave too. Just cover the chicken and use short bursts of heat. This way, you avoid overcooking.
Freezing Instructions and Tips
If you want to freeze your Garlic and Herb Buttered Chicken, do it right. Wrap each piece in plastic wrap, then place them in a freezer bag. This prevents freezer burn and keeps the taste. Label the bag with the date. The chicken can stay in the freezer for up to three months. When ready to eat, thaw it in the fridge overnight before reheating. Enjoy your delicious chicken again!
FAQs
How to Know When Chicken is Fully Cooked?
You can tell chicken is fully cooked by checking its internal temperature. Use a meat thermometer and look for 165°F (75°C) inside the thickest part. The juices should run clear, not pink. Cut into the chicken to check if it is white throughout. This ensures it is safe to eat.
Can I use frozen chicken breasts?
Yes, you can use frozen chicken breasts! Just remember to thaw them first. The best way is to put them in the fridge overnight. If you're short on time, you can use the microwave to defrost. Cook them right after thawing for best results.
What sides pair well with Garlic and Herb Buttered Chicken?
This chicken goes well with many sides. Here are some tasty options:
- Steamed broccoli
- Mashed potatoes
- Rice pilaf
- Roasted vegetables
- Salad with vinaigrette
These sides add color and flavor to your meal.
Is this recipe suitable for meal prep?
Absolutely! Garlic and Herb Buttered Chicken is great for meal prep. You can cook it ahead and store it in the fridge for up to four days. Just reheat it in the oven or microwave when you're ready to eat. This makes for quick and easy meals during the week.
Can I replace butter with a dairy-free alternative?
Yes, you can replace butter with a dairy-free option. Use olive oil, coconut oil, or a dairy-free butter substitute. They will still keep the chicken moist and tasty. Just make sure the alternative you choose melts well for the best flavor.
This blog post covered how to make Garlic and Herb Buttered Chicken. We talked about the key ingredients and their substitutes. I shared step-by-step instructions and important tips for perfecting your dish. You now know about variations, storage methods, and common questions.
In the end, cooking shouldn't be hard. Enjoy experimenting, and make this dish your own. You’ll impress everyone around you with your tasty creation. Happy cooking!